MFT meets City Nights – Tutorial

dsc03836.jpg

When I seen this stamp set Going Places from My Favorite Things I just had to have it for no other reason than I had to have the buildings stamp.  My mind just started working the minute I ordered it.  Well it came in the mail last night and here is my first piece with it.

My stuff usually looks quite country, but today we are going to the City. 

 Supplies:

Stamps: My Favorite Things Going Places, Rubber Stampede Mirror Image Stamp
Paper: Stampin’ Up Whisper White & Not Quite Navy, Basic Grey DP Archaic & Cupcake
Ink: Stampin’ Up Black, Night of Navy, Not Quite Navy, Soft Sky & Palette Noir Black
Accessories: Versamark marker, Stampin’ Up Markers Apricot Appeal, Pumpkin Pie, Gable Green, Green Galore, Lovely Lilac & Almost Amethyst, Clear Embossing Powder & Heat Gun, Screw Brads from Gina K. Designs, Sponges, Black Marker

 dsc03840.JPG

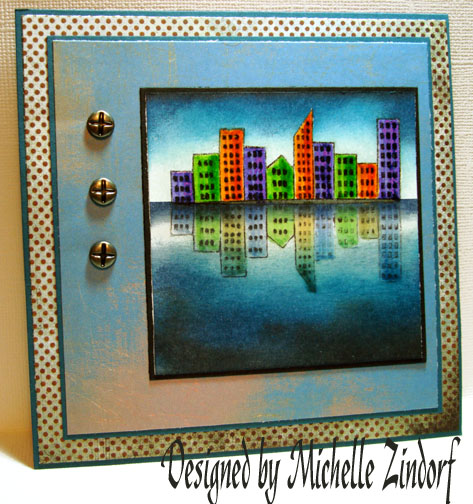
Used my Mirror Image Stamp by Rubber Stampede to stamp a reverse image of the buildings on Whisper White card stock using black ink.

Note:  to use the mirror image stamp, stamp your image on to the mirror image stamp and then stamp your mirror image stamp on the card stock.

dsc03817.JPG

Stamped the building stamp with Black ink being careful to line up the buildings with the mirror image.

dsc03818.JPG

Colored some of the mirror image buildings with an Apricot Appeal marker and the matching building above it with a Pumpkin Pie marker.  I’m using a lighter shade on the mirror images so it is not so strong in appearance.

dsc03819.JPG

dsc03820.JPG

Colored some of the mirror image buildings with an Almost Amethyst marker and the matching buildings above them with a Lovely Lilac marker.

dsc03821.JPG

dsc03822.JPG

Colored the rest of the mirror image buildings with a Gable Green marker and the matching buildings above them with a Green Galore marker.

dsc03823.JPG

I wanted to create a bit of shadow on the right sides of the main building images, so I took the matching marker and colored just the right sides of the buildings with it. 

dsc03824.JPG

Colored in the space between the mirror image and the main image with a gray maker.  I also darkened the windows on the main image buildings with the same marker.

dsc03826.JPG

Colored over the main image buildings only with a Versamark Marker and then heat embossed the buildings with clear embossing powder and a heat gun.

Note:  I did not heat emboss the mirror images.

dsc03827.JPG

dsc03828.JPG

Sponged Soft Sky ink over the entire card stock.  In the water area I used a streaking motion from left to right across the card stock to simulate water.  In the sky area I used a circular motion.

dsc03829.JPG

Sponged Not Quite Navy ink on the sky and water areas using the same motions with the sponge as I did with the Soft Sky ink.  I did not cover the Soft Sky ink completely.

dsc03830.JPG

Sponged Night of Navy ink in the same way as I did the Not Quite Navy ink.  I did not cover the Not Quite Ink completely.

dsc03831.JPG

Used post it notes to mask the sky and main building area.

dsc03832.JPG

Sponged Night of Navy at the post it note edge.

dsc03833.JPG

Added a hint of black sponging at the bottom and top of the card stock.

dsc03834.JPG

Assembled the card and here it is finished.  This card measures 5.25″ x 5.25″ completed.

dsc03836.jpg

Wow, I had a bit of computer issues today uploading this.  Yeah!  I finally got it to upload.

Thanks so much for following along with me to the city.

Until my next post. . . . .

Michelle

36 thoughts on “MFT meets City Nights – Tutorial

  1. Evelynn----Ks.stamper's avatar Evelynn----Ks.stamper

    This is truly a beautiful masterpiece. Michelle, you continue to amaze me with your flair for card making…. I swear you can bring every thing to life. Everything on paper anyhow.ha Really this is so gorgeous.
    Ks.stamper

    Like

  2. Tonniece's avatar Tonniece

    Another beauty. You make every card a masterpiece
    Love that mirror image stamping, I just ordered one and can’t wait to use it.

    Have a great day
    Tonniece

    Like

  3. I loved this building scape stamp also and ordered it for just that reason!!! I’m going to try out this tutorial – I got the mirror image stamp after seeing your prior tutorial using one – so I’m all supplied to do this one!!! just love your work!!

    Like

  4. Debra Hogg's avatar Debra Hogg

    I just love it!! you have amazing talents and I’d go to the city with you anytime. Of course I just love your country scenes as well.

    Like

  5. MSBetsyZ's avatar MSBetsyZ

    Holy cow! Well, I mean, holy sewer rat! LOVE the cityscape, Michelle! Reflections are always fun to do, and I love the attention to coloring yours! I always save rubber scraps from trimming stamps, and every now and then I get a BIG piece that I save for times such as this…

    Like

  6. Gidget-Trish's avatar Gidget-Trish

    Love the cityscape stamp and your mirror image with it….and the way you reflected it in the water. Great card. Thanks again.
    Trish 🙂

    Like

  7. Cindy H.'s avatar Cindy H.

    Wow! This is gorgeous!!! Fabulous coloring. great colors and wonderful DP and mats! I have a mirror imager somewhere, now where is it???? Looking, looking….

    Like

  8. Lisa Foster's avatar Lisa Foster

    Oh Wow, M! Totally cool! Can’t wait to see what your next trip to the city is gonna look like! ( I hope we went shopping while we were there today:) LOL)

    Like

  9. Eileen M's avatar Eileen M

    Awesome! I’d better go pull my mirror stamp out of my “sell these” bag! You are so generous with your talent! Thank you, thank you!

    Like

  10. Glenda J.'s avatar Glenda J.

    Fantastic!! You are so talented and thanks for sharing your techniques with all of us. I have never even seen a mirror image done before so am fascinated with yours. Do you use special sponges? They look blue in your picture. Thanks again for sharing!

    Like

  11. Shelly Schmidt's avatar Shelly Schmidt

    Hahaha what she said- I did just buy a Versamarker…….. I have that same mirror image stamp with the cows on it too! I LOVE, LOVE, LOVE this card- I really enjoy your blog everyday- and I so appreciate the tutorials…..You could write a book!!! Thanks for sharing your talent!

    Like

  12. alex's avatar alex

    Hello:
    You outdid yourself. Well, that is what I say every time I see your tutorial. Every day you out do yourself. Awesome! Thank you so much for sharing your talent with us and teaching us how to do it.
    Alex

    Like

  13. Is there nothing you can’t do??!! I am always so amazed at how you can use so many different styled stamps and make it work with your amazing technique!! Thanks for sharing!!

    Like

  14. Becky's avatar Becky

    This card is awesome, you seem to out do your self with every card. thank you again for taking the time to share with us.
    Becky

    Like

  15. Heather Fullerton's avatar Heather Fullerton

    As usual FANtastic! I have a probably dumb question but what did you stamp the reflection stamp on? It looks like something I need.
    Thanks for sharing your talent.
    Retired Heather

    Like

  16. sandyh50's avatar sandyh50

    Michelle, I am just loving your work! I am so glad I subscribed to your blog. It is so nice to open my email and see another stunning card. Thanks for all your work in sharing each step of the process with us.

    Like

  17. karen m's avatar karen m

    Michelle, Thank you for sharing you work today. I’m always surprise and amazed when I visit your blog. Your cards are so beautiful and inspiring. Stamp on!!!
    Blessings!!!

    Like

Leave a reply to Monica Cancel reply