Rusty Bird Songs – Tutorial

dsc04120.jpg

Well it’s a beautiful sunny day here in Ohio.  The birds are singing and my bird-feeders are extra busy this morning.   The bird songs I’m hearing are what inspired this creation.  🙂

I used the up and coming sketch challenge that will be posted later at  http://www.innovativestampcreations.blogspot.com/  

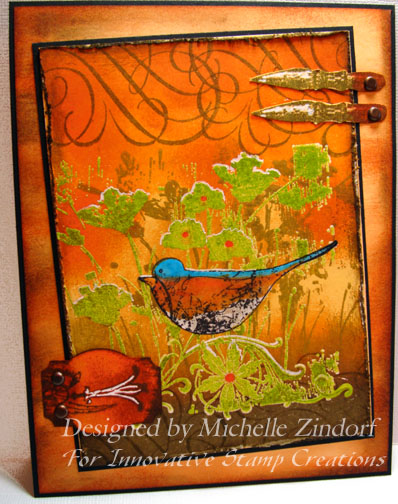
and new stamp images from Innovative Stamp Creations – Nature Silhouettes II & Art 4 Frames II.  Here is a link to their online store:  http://www.innovativestampcreations.com/ischomepage.html

Ready for this Rusty Spring Scene Tutorial?  Alright, then let’s get started 🙂

Supplies:

Stamps: Innovative Stamp Creations – Art 4 Frames II & Nature Silhouesttes II
Paper: Stampin’ Up Whisper White, Basic Black, Apricot Appeal
Ink: Stampin’ Up More Mustard, Pumpkin Pie, Really Rust, Adirondack Lettuce & Oregano, Walnut Distress Ink, Palette Noir Black
Accessories: Versamark, Sponges, Brads, Label Punch, Distressing Tool, Versamark Marker & Pad, White Gel Pen, Clear embossing powder & heat gun, Prismacolor Markers – Burnt Ochre, Terra Cotta, Buff, True Blue

dsc04125.JPG

Stamped Bird with Palette Noir Black ink on Whisper White card stock.

dsc04088.JPG

Colored birds belly with a Prismacolor Buff marker.

dsc04089.JPG

Colored the upper half of bird’s belly with a Prismacolor Burnt Ochre marker.

dsc04090.JPG

Colored the very top of the bird’s belly with a Prismacolor Terra Cotta marker.

dsc04092.JPG

Colored the top of the bird with a Prismacolor True Blue marker.

dsc04093.JPG

Colored the Bird’s beak with a Prismacolor Burnt Ochre marker.

dsc04094.JPG

Colored over the bird image with a Versamark Marker and heat embossed with clear embossing powder and a heat gun.

dsc04095.JPG

Stamp Floral Swirl stamp by first loading with Versamark and then with Lettuce Ink before stamping.

dsc04096.JPG

Heat embossed using Clear embossing powder and a heat gun.

dsc04097.JPG

Colored Center of flower with a Terra Cotta marker and went over it with Versamark and then heat embossed it with clear embossing powder and a heat gun.

dsc04098.JPG

dsc04099.JPG

Stamped Floral Silhouette stamp by first loading stamp with Versamark and then Lettuce Ink before stamping.

dsc04100.JPG

Heat embossed with clear embossing powder and a heat gun.

dsc04101.JPG

Starting at the center of the card stock, sponged on More Mustard ink in a circular motion.

dsc04102.JPG

Working from the outside in, sponged Pumpkin Pie Ink in a circular motion not covering all of the More Mustard.  I left a light area behind the bird.

dsc04103.JPG

Sponged Really Rust ink at the top of the card stock and at the bottom of the flowers.

dsc04104.JPG

Stamped the floral silhouette stamp again only using Oregano ink and moving the stamp about 1/2″ over to the right from where I stamp it before.

dsc04105.JPG

Sponged Walnut Stain using a swiping motion from bottom toward top to create the look of grasses.

dsc04107.JPG

Using a rag wiped ink from embossed images.

dsc04108.JPG

Made highlight with white gel pen on the top of the Flowers in the silhouette.

dsc04109.JPG

Distress edges with The Tim Holtz distressing tool.

dsc04110.JPG

Sponged Walnut Distress ink on the edges.

dsc04111.JPG

Stamped pen nib stamp with Oregano ink on Apricot Appeal card stock.  Cut out images wand swiped on end of the images over a Really Rust ink pad.  Colored the nib end of the images in with a white gel pen.

dsc04113.JPG

Stamped flourish with Oregano Ink at the top of the card stock.

dsc04115.JPG

Punched a label shape out of Apricot Appeal card stock.  Sponged Really Rust ink on it.  Drug the ends of the label over the Walnut Distress Ink pad.  Stamped flower on the label shape using Walnut Stain ink.  Colored Flower bud with a white gel pen.

dsc04116.JPG

Cut a panel of Apricot Appeal card stock and sponged on Really Rust ink and Walnut ink around the edges using a swiping motion.  Sorry, no photo.

Assembled card.  Finished card measures 5″ x 6.5″. 

dsc04120.jpg

Hope you enjoyed this tutorial and your day is one filled with bird songs and sunshine.

Until my next post. . . . . . .

Michelle

24 thoughts on “Rusty Bird Songs – Tutorial

  1. Lisa Foster's avatar Lisa Foster

    Fabulous! I really like these Innovative stamps…they’re so different from all of the usual stuff. (not that I don’t still love all the usual:) You do such a wonderful job with them too! I know they are beside themselves with joy to have you on their team! Have a great Sunday!

    Like

  2. HB's avatar HB

    WOW! (I know, all my comments to you start with WOW!, but that is literally the first thing that comes out of my mouth). This is just over-the-TOP fabulous!

    Like

  3. Brenda's avatar Brenda

    Lovely as always 🙂 Some day Im actually going to try one of your cards… when I get the courage lol. One question.. When you emboss over other embossing, doesnt it melt the EP into the cardstock? How are you able to layer the EP without it melting away? Thanks 🙂

    Like

  4. Brenda asked “When you emboss over other embossing, doesnt it melt the EP into the cardstock? How are you able to layer the EP without it melting away?”

    Brenda it’s like magic, lol. No really, as long as you are just heating it long enough for the embossing powder to melt it does fine. Try it out. You will love the results, I promise!

    Like

  5. Laurie Helgason's avatar Laurie Helgason

    Do you sketch an outline of your card before stamping? I am amazed when you stamp the first image slightly off center of the c.s. and add other images around the focal point.

    I love the card and colors.
    Thank you.

    Like

  6. i just LOVE your tutorials, and i especially love how you start each one with ‘Let’s get started’. It brings a smile to my face every time I read it! I teach stamp classes at a local store here and i’ve started to begin every class with “as Michelle Zindorf would say, let’s get started”. you should feel proud that everyone in the class who is a blog reader knows exactly who I mean when I say that.

    Like

  7. Laurie asked “Do you sketch an outline of your card before stamping? I am amazed when you stamp the first image slightly off center of the c.s. and add other images around the focal point.”

    Laurie, I learned by reading sketch/painting books that you don’t want to put anything directly in the middle of your paper. It’s much more pleasing to the eye to have things off center, including your horizon line.

    I don’t sketch anything thing out, I just start. 🙂 When you see my tutorial, you are seeing me do a card for the very first time. They just evolve.

    Like

  8. Heather Fullerton's avatar Heather Fullerton

    Gorgeous again Michelle. My question today is, when you add versamark and then inkm does it also work with water based ink such as Stampin up or does it have to be an adrondac type ink? I haven`t tried this yet but want to.
    Retired Heather

    Like

  9. Bessey's avatar Bessey

    Love the card! The colors are so vibrant. Thanks again for the tutorials, you make us all want to go and try to re-create your beautiful work. Keep them coming.

    Like

  10. Heather asked “when you add versamark and then inkm does it also work with water based ink such as Stampin up or does it have to be an adrondac type ink?”

    Heather, Yes, Adirondack inks are dye based like Stampin’ Up’s Classic Pads. 🙂

    Like

  11. MSBetsyZ's avatar MSBetsyZ

    Michelle, I’m so totally lovin’ this new look for you, lol! (New for you from what I’ve seen, anyway!). Very cool…I just LOVE “watching” you work…I know it’s adding steps for you to take so many pictures for us, and I’m so thankful you take that time for us!

    Hugs,
    Betsy

    Like

  12. Nicole Steele's avatar Nicole Steele

    Michelle, these colors are gorgeous together! My 7-year-old daughter Emma and I are sitting here, looking in amazement at your card. We just went through the tutorial together because Emma wanted to know how you’d made it. She likes me to show her techniques and to copy my cards. Maybe she’ll attempt yours! Thanks for sharing!

    Like

  13. Pingback: [mlm blog]

Leave a reply to Norie Cancel reply