Daisies & Dragonfly – Tutorial

dsc04193.jpg

Boy, ever have one of those days you just couldn’t make up your mind on what you wanted to create?  Well that is me today for sure, lol.  So I settled on a project with a background that is as random as my thoughts are!

Enough said, you will see what I’m talking about in a moment.

Let’s get started.  🙂

Supplies:

Stamps: Innovative Stamp Creations Art4Frames II, here is the link to their great store  http://www.innovativestampcreations.com/iscrubberstampsheets.html
Paper: Whisper White, Black
Ink:Adirondack Butterscotch, Lettuce, Oregano, Rust, Stampin Up Black, Shabby Shutters Distress ink
Accessories:Markers, Versmark Pad and marker, Sponges, Clear Embossing powder, heat gun, white gel pen

dsc04184.JPG

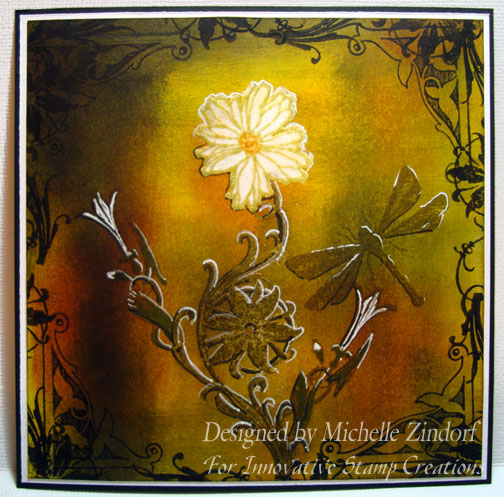
Stamped daisy by first loading stamp with Versamark, then Shabby Shutter ink, and then colored in center of the flower with a More Mustard marker before stamping on Whisper White card stock.  Heat embossed image with clear embossing powder and a heat gun.

 dsc04157.JPG

Colored in flower with a Versamark marker and heat embossed it using clear embossing powder and a heat gun.

dsc04158.JPG

dsc04159.JPG

Stamped stem by first loading stamp with Versamark and then Oregano ink before stamping.  Heat embossed using clear embossing powder and a heat gun.

dsc04160.JPG

dsc04161.JPG

Sponged Butterscotch ink on the card stock using a streaking motion and going different directions.  Note to get a warm glow to your project, start out with an layer of a warmed colored yellow and build color on top of it.

dsc04162.JPG

Sponged on Lettuce ink using the a streaking motion and streaking it in random directions.

dsc04163.JPG

Sponged a few spots of Rust ink on.

dsc04164.JPG

Added some sponged streaks of Oregano ink.

dsc04165.JPG

Going darker yet, sponged on black ink in a streaking motion.  Note:  Be careful not to sponge the black onto you embossed images.  It stains it gray, yuck!

dsc04167.JPG

Added more streaks of Butterscotch ink to bring back some of the warmth.

dsc04168.JPG

More Rust sponging, lol.  There is no right or wrong way to do this.  I just keep piling on the color until I like it.  🙂

dsc04169.JPG

Traced the left side of the stems with a black fine tip marker to create a light and dark side.

dsc04170.JPG

Traced the right side of the stems and top of flower with a White Gel pen.

dsc04171.JPG

Stamped corner stamp with black ink in each corner.

dsc04172.JPG

Stamped dragonfly with Oregano ink.

dsc04173.JPG

Stamped flower bud on left side of stem.  Colored stem with an Old Olive marker, used a black marker and traced the left side of the stem,  traced right side of stem & Dragonfly and colored flower buds with a white gel pen.

dsc04174.JPG

dsc04175.JPG

dsc04176.JPG

Repeated the bud stamp and coloring on the left side of stem.

dsc04177.JPG

Stamped stem stamp around the outside edge of the card stock using black ink.

dsc04178.JPG

Assembled card and here it is finished measuring 5.25″ x 5.25″.

dsc04193.jpg

Hope you enjoyed this embossed sponging project and will give it try.

May your day be filled with sunshine and daisies.  🙂

Until my next post. . . . .

Michelle 

25 thoughts on “Daisies & Dragonfly – Tutorial

  1. Mary L.'s avatar Mary L.

    Beautiful! And this card says a lot about you as an artist…if I were creating this I would have discarded it half way through thinking I had messed it up but you just kept going and adding color and the white pen just adds that finishing touch! Wonderful…and so encouraging!!! Thanks!

    Like

  2. Laurie Helgason's avatar Laurie Helgason

    A friend is coming to my house to stamp. I plan to impress her using your card as inspiration. Then I will show her your blog.

    Like

  3. Evelynn----Ks.stamper's avatar Evelynn----Ks.stamper

    As I said before , another beautiful card. I am always excited to see what you are going to bring us, and I am never dissapointed………….
    Thanks for your time and efforts.
    Evelynn

    Like

  4. Michelle I always “lurk” on your site. Your creations are amazing!! I am in awe when I look at all you’ve done. You are such a talent! I hope to some day be 1/2 as good as you!
    GREAT job.
    Hugs,
    Joani

    Like

  5. Sankari's avatar Sankari

    What an unbelievable card!!! My mouth dropped when I saw your card this morning! It is fantastic! I am so blown away by your creations and also so grateful that you show the steps on how to do it – you are really soooo amazing!

    Like

  6. Kathy's avatar Kathy

    This is soooo beautiful. I really enjoyed watching your step by step of how this one came to life. Thank you for sharing your amazing creative process! I wouldn’t have thought to sponge the black on the background, and it turned out beautifully. You’re so smart and talented 🙂 …in case you didn’t know 🙂

    Like

  7. sandyh50's avatar sandyh50

    Oh, gosh, so gorgeous! I appreciate every photo you take and your step by step instructions. Sometimes I go back and reread each step to make sure I understand. I am new at these techniques. Thank so much for sharing.

    Like

  8. Heather Fullerton's avatar Heather Fullerton

    Again, a Beauty. I love your work but I seem to be unable to do the clear embossing like you do. Could you explain please. When I do it, it is bumpy and alomost always goes outside the image. Got any suggestions?
    Retired Heather

    Like

  9. Mari's avatar Mari

    I absolutely adore how you sponged with streaks! That’s sorta how ALL my sponging looks… now I know what to do with it!
    As always, you are just a fabulous artist. Thank you so much for all your hard work….

    Like

  10. Joan's avatar Joan

    I’m new to your blog and just looked thru it and WOW. I love the things you are doing and the fact you give us a tutorial. I will definitely use some of your techniques.

    Lately I have heard about putting a rubber mat under whatever you are stamping on. So, I know there are other people out there who do it but I don’t know where to buy the mats. I have heard some people use mouse pads. I am going to try it.

    Thanks for a great blog.

    Like

Leave a reply to Glitter Queen Cancel reply