Floral Friendship – Tutorial

dsc04367.jpg

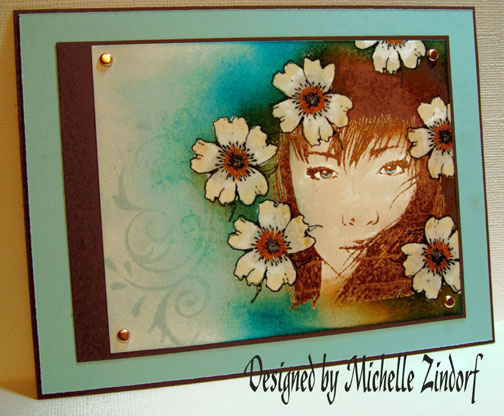
Wanted to work on a piece that was not a landscape this morning.  The images used are by Innovative Stamp Creations.  Here is a link to their online store:  http://www.innovativestampcreations.com/ischomepage.html

Let’s get started on the tutorial.  🙂

Supplies:

Stamps: Innovative Stamp Creations – Friendship & Fancy Designs
Paper: Stampin’ Up Whisper White, Chocolate Chip, Cool Caribbean
Ink: Stampin’ Up Soft Sky & Chocolate Chip, Adirondack Ginger & Stream, Palette Noir Black
Accessories: Versamark Pad & Marker, Fine Detail Clear Embossing Powder, Heat Gun, Prismacolor markers Eggshell, Buff, Light Blue & Terra Cotta, Sponge

dsc04370.JPG

Stamped flowers with Palette Noir Black ink on Whisper White Card stock. 

dsc04351.JPG

Colored the outer part of the flower petals with a Prismacolor Eggshell marker.

dsc04352.JPG

Colore the flower centers with a Prismacolor Terra Cotta marker.

dsc04353.JPG

Colored over the flower images with a Versamark marker and heat embossed with fine detail clear embossing powder and a heat gun.

dsc04354.JPG

dsc04355.JPG

Stamped the face image of my Stamp a ma jig plastic sheet and then used it for placement.

dsc04356.JPG

Stamped face image by first loading the stamp with Versamark and then Chocolate Chip ink before stamping.

dsc04357.JPG

Heat embossed image using fine detail clear embossing powder and a heat gun.

dsc04358.JPG

Colored the face using a Prismacolor Buff marker.

dsc04359.JPG

Colored her eyes with a Prismacolor Light Blue marker.

dsc04360.JPG

Sponged on Soft Sky Ink using a circular motion.

dsc04361.JPG

Sponged Ginger ink around the face image using a circular motion.

dsc04362.JPG

Getting darker yet, sponged Chocolate Chip ink around the face image.

dsc04363.JPG

Sponged on Stream ink in a circular motion to the left of the face and a little on the top and bottom.

dsc04364.JPG

Stamped Flourish with Soft Sky ink.

dsc04365.JPG

Assembled card and here it is completed measuring 5″ x 6.5.

dsc04367.jpg

Hope your day is one of sweet smelling flowers!

Until my next post. . . . . . .

Michelle

48 thoughts on “Floral Friendship – Tutorial

  1. Terri's avatar Terri

    Michelle, this is stunning! I would never think about getting a stamp like the face of this beautiful girl. This looks like a painting! Lovely! One question, after you heat embossed the flowers, you inked up the face stamp and embossed it as well. Did you wipe the ink from the face off the flowers before applying the embossing powder for the face? Thanks for your awesome tutorials!

    Like

  2. Terri asked “after you heat embossed the flowers, you inked up the face stamp and embossed it as well. Did you wipe the ink from the face off the flowers before applying the embossing powder for the face?”

    Terri, no, I didn’t wipe it off. It usually just melts right into the layer below it. 🙂 You have to watch using black it. It will stain your previous layers or make them a yucky gray. 🙂

    Like

  3. Evelynn----Ks.stamper's avatar Evelynn----Ks.stamper

    As I said before this is just awsome, and I don’t think there is anything in the world of stamping that you can’t do. I just love this, and think I need those stamps……LOL
    Evelynn

    Like

  4. Debra Hogg's avatar Debra Hogg

    Just unbelievable!!! As always – you take my breathe away. I want/need those stamps now [as with everyone you use, finally got my Drama Queen]

    Like

  5. nina's avatar nina

    I’ve been seeing innovative stamps more and more. Just wasn’t sure how to use them. Thanks for the tutorial. You make this look easy!
    nina

    Like

  6. Woooowwwww, this is absolutely stunning. Not like most of your work isn’t! 🙂 I have been watching your gallery on SCS for quite some time, but luckily yesterday I decided to visit your blog. Again, I am blown away. Terrific card, Michelle. These are lovely colors with this face image. I really need this stamp set, too, now. 🙂 Kelly

    Like

  7. Another stunning creation. Gorgeous! Many thanks for providing tutorials! I may not be able to do it, but now I know how You did it…:o) and you make it looks so easy. I always look forward to see what is coming next.

    Like

  8. Laurie Helgason's avatar Laurie Helgason

    I still can’t get over how you start stamping the images in the middle of the sheet and keep adding more layers.

    Another home run.

    Like

  9. mary's avatar mary

    Dazzling! Your creativity amazes me. I’ve been looking for a really cool b’day card idea for my sister – I think you have just given me a nudge in the right direction.
    -mary

    Like

  10. Sue's avatar Sue

    This is the most beautiful card I have ever seen. I am totally blown away, and you make it look so easy. How on Earth did you ever think to do all this xxx

    Like

  11. Laurie's avatar Laurie

    This stamp is gorgeous! I love that you showcased something a little different here. I would not have thought to use this type of technique with a face. Your card is absolutely beautiful as always.

    Like

  12. Sandy's avatar Sandy

    How much more elegant can you get? This is so beautiful. I still can’t imagine the hair melting behind the flower petal. It just doesn’t seem possible. You are a genius. Fabulous!!!

    Like

  13. OhioMary's avatar OhioMary

    Very lovely. So how do you remove the ink from your emboss resist images so that color doesn’t get smeared into another area?

    Thanks!

    Like

  14. Grace from Toronto's avatar Grace from Toronto

    Michelle, you’re an absolute guru in the art industry. This card is like a graphic design but handmade. It’s a work of a genius! Thank you for sharing.

    Like

  15. OhioMary asked “So how do you remove the ink from your emboss resist images so that color doesn’t get smeared into another area?”

    Mary, I use an old rag and just carefully wipe it off the embossed images.

    Like

  16. Carol's avatar Carol

    One of your absolute best works yet, this is fabulous! Thanks for all your hard work and efforts to help us become better stampers! You totally rock!!!!

    Like

  17. Kim's avatar Kim

    As usual this is simply beautiful, Michelle! Thanks so much for continuing to share your talent with us.

    I have a marker question for you…how do you decide which kind to use (e.g., prismacolor versus copic versus stampin’ write)? I’m gradually expanding my stamping/art supplies and wanted to make informed decisions about what I need next 😉 Any suggestions/tips you have would be greatly appreciated (beyond what’s in your FAQ section) 🙂

    Like

  18. Kim asked” have a marker question for you…how do you decide which kind to use (e.g., prismacolor versus copic versus stampin’ write)? I’m gradually expanding my stamping/art supplies and wanted to make informed decisions about what I need next. ”

    Kim, I’m no marker expert, but I do love the Primsacolor markers when I comes to solvent based. Copics I’m sure are wonderful, but I can’t justify the price for what I use them for and that is card making. There is also a fond place in my heart for the Stampin’ Up markers. They are great for watercoloring since they are waterbased. 🙂 A complete different animal than the solvent based Prismacolor or Copics.
    My suggestion if you have money for both solvent and waterbased, buy both of them!

    I love having both on hand. There is my two cents on the subject. 🙂

    Like

  19. Pingback: I think I need chocolate!!! « EnchantINK

Leave a reply to Cindy H. Cancel reply