Heart Felt Thank You – Tutorial #100

dsc05460.JPG

Supplies:

Stamps: Stampin’ Up Lovely As a Tree & Holidays & Wishes, Cornish Heritage Farms Hinges
Paper: Stampin’ Up Whisper White, Bashful Blue, Brilliant Blue
Ink: Stampin’ Up Brilliant Blue, Chocolate Chip, Close to Cocoa, Bashful Blue, Basic Black, Barely Banana, More Mustard
Accessories: Stampin Up Black & Gray Markers, Post it Notes, Brayer, Corner Round Punch, Gold Brads


dsc05463.JPG

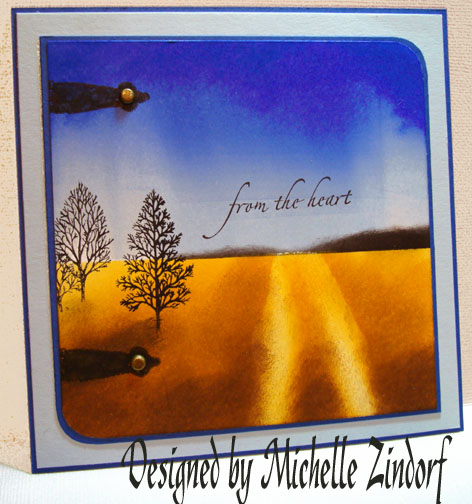
Starting out with a 4.5″ x 4.5″ piece of Whisper White card stock.

dsc05435.JPG

Mask a little under half of the bottom of the card stock with a post it note.

dsc05436.JPG

Brayered on Bashful Blue ink at the top of the card stock.

dsc05437.JPG

Brayered on Brilliant Blue ink not covering the Bashful blue ink entirely.

dsc05438.JPG

Sponged Brilliant Blue ink at the top of the card stock very heavily to create some drama in the sky.

dsc05439.JPG

Sponged a bit of Black ink at the edge of the Post it Note mask to create a couple of hills in the distance.

dsc05440.JPG

Removed Post it note Mask.

dsc05441.JPG

Masked Sky area with a clean Post it Note.

dsc05442.JPG

Brayered on Barely Banana ink on the unmasked section of the card stock.

dsc05443.JPG

Tore a piece of post it note in a triangle shape to mask a section to create a road.  This is an experiment, I have not tried this before.  The sticky part of the Post it note is at the bottom of the card stock.

dsc05444.JPG

Brayered on More Mustard ink.

dsc05445.JPG

Removed triangle post it note, but left the post it note that is masking the sky on.

dsc05446.JPG

Sponged More Mustard ink in the middle of the Road.

dsc05447.JPG

Sponged Close to Cocoa ink in the middle of the road and the bottom of the card stock, not covering the More Mustard ink entirely.

dsc05448.JPG

Sponged Chocolate Chip ink at the very bottom of the card stock.

dsc05449.JPG

Took the Post it Note off of the Sky.

dsc05450.JPG

Colored in the middle tree with a black marker, huffed on it and stamped it.

dsc05451.JPG

dsc05452.JPG

Colored in the two trees on the right side of the stamp with a black marker, huffed on it and stamped it to the left of the first tree I stamped.

dsc05453.JPG

Sponged a bit of black ink under and to the left side of the trees to create a shadow.

dsc05454.JPG

Used my corner rounder punch on two corners of my main image panel and the Brilliant Blue panel that will go under it.

dsc05455.JPG

Stamped two hinges on with Basic Black ink and colored them in a bit with a gray marker.

dsc05456.JPG

dsc05457.JPG

Assembled card, added a gold brad to each hinge and then stamped my sentiment using Basic Black ink.

dsc05458.JPG

Here you have it, the conclusion of tutorial #100 with the finished card measuring 5.25″ x 5.25″.

dsc05460.JPG

May your day be filled with dreamy scenery.  Thanks again for your encouragement!

Until my next post. . . . . . . . . . . .

Hugs,

Michelle

61 thoughts on “Heart Felt Thank You – Tutorial #100

  1. Rebecca's avatar Rebecca

    Thanks for all the time your investing to keep this blog going. I hope you know how much it is appreciated. Please keep them coming. Any plans on visiting Florida in the future?!

    Like

  2. Laurie Helgason's avatar Laurie Helgason

    Congratulations on your 100 tutorials. I will be looking forward to the next 100+!

    For quite a few years, I have bought paper from Marco’s when they have a booth at the MN State Fair Stamp Expo. I love the quality of their paper and the reasonable prices. They also have someone demonstrating some interesting technique at the front table. I would love for you to should join them on their next trip to MN.

    I wish I could join the class in Ohio. Have a fun time.

    Like

  3. Congratulations and thank you for sharing your work with all of us! You’re an inspiration to us all.
    Hope you’ll share lots and lots of your artwork in the future… going to 500?

    you are wonderfull !

    Like

  4. scrappin beth's avatar scrappin beth

    WOW 100 Tutorials! What a marvelous milestone! Congratulations. By the way, thank you very much for the blog candy. I received it today! I also had a chance to look at the new SU catty. As I was looking through, I was thinking, now which of these would work for the Zindorf technique? Would you let us in your ideas/favourites??
    I have a long list, Fresh Cuts, Upsy Daisy, Inspired by Nature, Nature Silhouettes to name a few.
    Thanks for sharing all 100!
    Beth Greco

    Like

  5. Carolyn Sharkas's avatar Carolyn Sharkas

    Wow, you have been very busy, and we have been enjoying every single one of them, ( I have yet to try one, but hopefully I will have time soon). I still read all of them and ooh and ahh over them. You do such beautiful work, like little works of art.
    Thanks so much for sharing with us. I wish I could take one of your classes, if you are ever planning on coming to the Sunshine State, let us know, please, so that we can all attend.

    Like

  6. You’re work is truly unbelievably amazing !!! When I first saw this card I got very emotional….it’s just so moving and beautiful. Thank you not only for posting the card but for also posting such a fantastic tutorial….you’re AMAZING !!!!

    Like

  7. Wow, your work is absolutely beautiful. I found this site yesterday and had to go downstairs and try it. I have never used a brayer before and your tutorials are so easy to follow. I am going to post and let people know about you.
    Thanks so much for the inspiration!!!!

    Joanne

    Like

Leave a reply to Laurie Helgason Cancel reply