I apparently have Java on my mind this morning. I drink a pot of it each day.
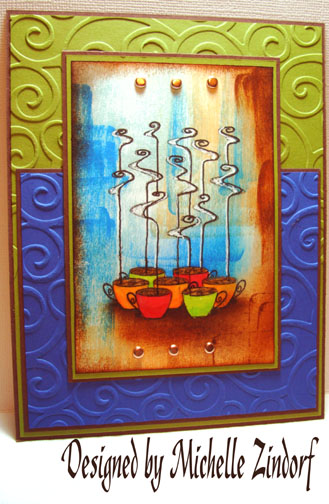
Stamp set I used today is by Impression Obsession “Smell the Coffee”. I don’t normally use bright colors, but these cups just screamed “make me bright”.
Let’s get going on the tutorial. 🙂
Supplies:
| Stamps: Impression Obsession “Smell the Coffee” |
| Paper: Stampin’ Up Whisper White, Old Olive, Brilliant Blue & Chocolate Chip |
| Ink: Palette Noir Black, STampin’ Up Creamy Caramel, Adirondack Ginger, Sail Boat Blue, Peach Bellini, Aqua, Espresso |
| Accessories: Versamark Marker, Fine Detail Clear embossing powder, heat gun, Prismacolor markers, White Gel Pen, Faber Castell fine point marker, Sponge, Brads, Cuttlebug embossing folder |

Stamped image with Palette Noir Black ink.

Colored image with Prismacolor markers, starting with Yellow Orange.

Added Magenta

Added Chartreuse

Colored over the bottom of the coffee cups with the same colors used already. This creates a darker shadow effect.

Colored coffee Light Tan.

Went over the coffee cup handles to make them darker by using a fine point black marker.

Colored over the cups with a Versamark marker and heat embossed using fine detail clear embossing powder and a heat gun.


Sponged on Creamy Carmel.
Note: The embossed image will resist the ink put on it now, hence the name of the technique emboss resist.

Used the direct to paper technique by dragging the Aqua ink pad edge over the card stock.

Used the direct to paper technique with a Peach Bellini ink pad.

Used the direct to paper technique using a Sail Boat Blue pad.

Sponged on Ginger ink below the coffee cups and around the edge of the card stock.

Sponged on Espresso ink right under the cups to give them a really dark shadow and then added some Espresso ink with a sponge along the edges of the card stock.

Out lined the right side of the steam with a fine point black marker.

Added white gel pen to the right side of the steam.

Embossed two of my panels with a Cuttlebug folder.

Assembled card and added brads. Here it is finished measuring 5″ x 6.5″.
I hope this tutorial will inspire you to use the emboss resist technique along with the direct to paper technique to come up with interesting backgrounds in your projects.
May your day start off right and stay bright all day.
Until my next post. . . . . . . . . . . .
Hugs,
Michelle
Note: Links to all my tutorials can be found here: http://zindorf.blogs.splitcoaststampers.com/tutorials-ive-written/
Here is a link to my workshop calendar if you want to get info on beginner and advanced Brayer workshops: http://zindorf.blogs.splitcoaststampers.com/workshop-calendar/

23 thoughts on “Coffee Anyone? – Tutorial #115”