Frosty Tree – Tutorial #126

dsc06211.JPG

When I woke up this morning I decided to check out the Color Challenge on Split Coast Stampers  http://www.splitcoaststampers.com/forums/showthread.php?t=386411

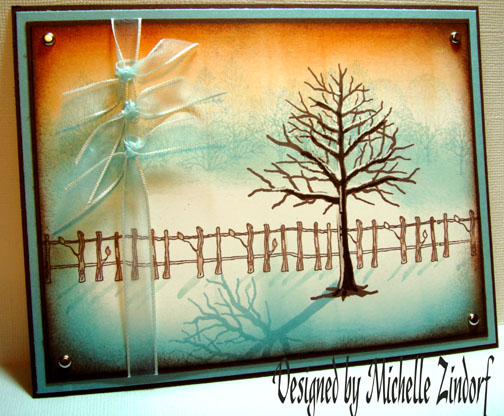
The color challenge today was to use Stampin’ Up colors Baja Breeze, Really Rust and Chocolate Chip.  This combo really intrigued me so I gave it a whirl.  This is what I came up with.  The Baja Breeze really gives an icy feel to this piece.  I know, I know, I know it is Autumn, not Winter yet, but this is what came to mind.

Let’s get started.  🙂

Supplies:

Stamps: Impression Obsession “Branches of a Tree”, The Saltbox Studio “Fences” & Stampin’ Up “Lovely as a Tree”
Paper: Stampin’ Up Whisper White, Baja Breeze & Chocolate Chip
Ink: Stampin’ Up Baja Breeze, Really Rust & Chocolate Chip
Accessories: Chocolate Chip marker, White Gel Pen, Aqua Painter, Sponge, Ribbon, Silver Brads, Brayer

dsc06212.JPG

Brayered Baja Breeze ink at the very bottom of a 4.5″ x 6″ piece of Whisper White card stock.

dsc06197.JPG

Brayered Really Rust at the very top of the card stock.

dsc06198.JPG

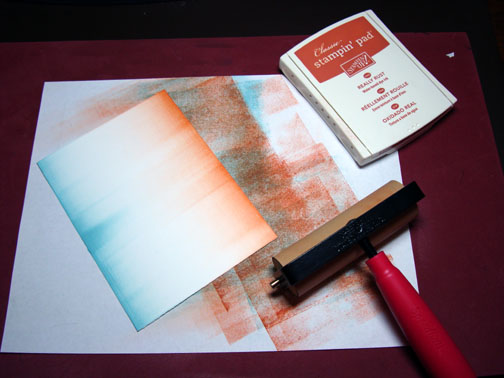
I decided to not use any emboss resist this morning, so this scene is being built from the background to the foreground, so I had to keep in mind to go from lighter objects to darker ones.  So the darker (foreground) objects cover up the lighter ones underneath them.  Clear as mud?

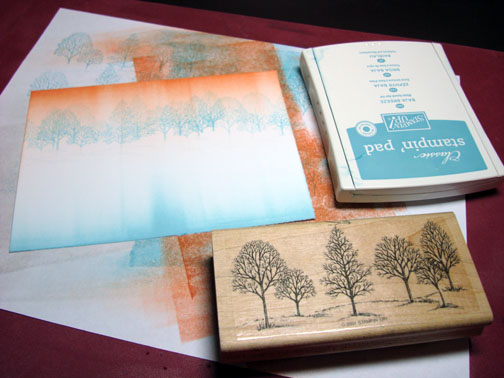
Stamped trees from Lovely as a Tree set with Baja Breeze ink, by stamping off on my scrap paper first to make them lighter (this is called second generation stamping).

dsc06199.JPG

Stamped fence with Chocolate Chip ink.

dsc06200.JPG

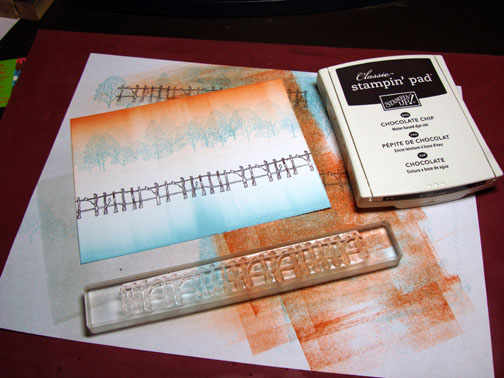
Stamped large tree with Chocolate Chip ink.

dsc06201.JPG

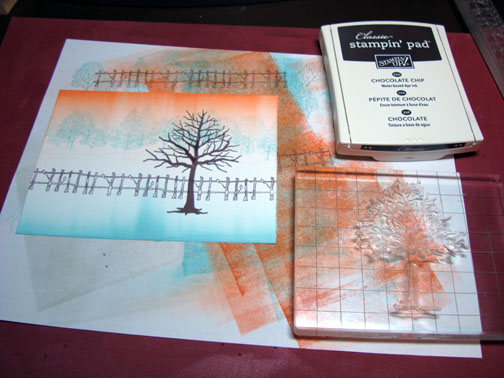
Stamped tree again to make a shadow using Baja Breeze ink. 

Note, I did not ink up the root part of the tree trunk in order to omit it.

dsc06202.JPG

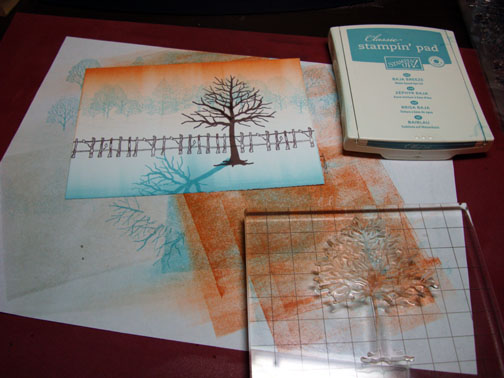
While my Baja Breeze stamp pad was closed, I squeezed it to make a pool of ink in the lid of the stamp pad.   I used the pool of ink and an Aqua painter to make shadows for the fence posts.  I made the ink pretty watery here.

dsc06203.JPG

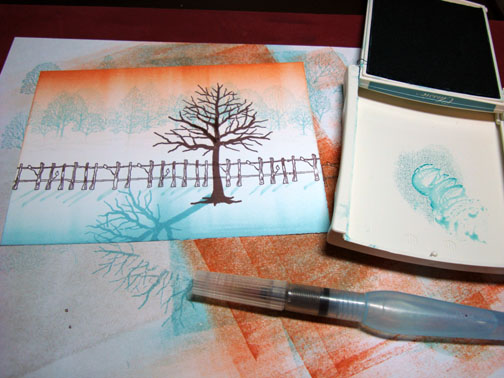
Used the Aqua Painter again with a watery Chocolate Chip ink to color in the fence posts.

dsc06204.JPG

Sponged Baja Breeze along the bottom of the background trees and around the sides and bottom of the card stock.

Note:  I use a dry sponge when sponging.  If you are getting dots and streaks you don’t want, keep adding more ink until they disappear.  Another problem could be you are using a card stock that is not super smooth.

dsc06205.JPG

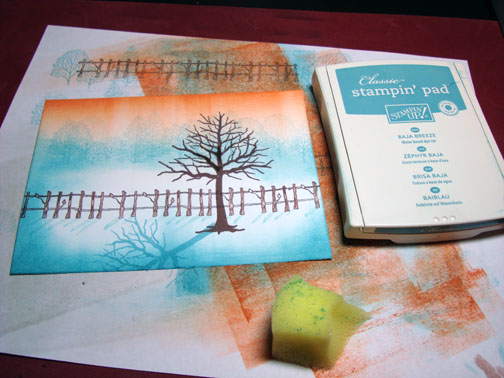
Sponged Really rust at the very top of the card stock.

dsc06206.JPG

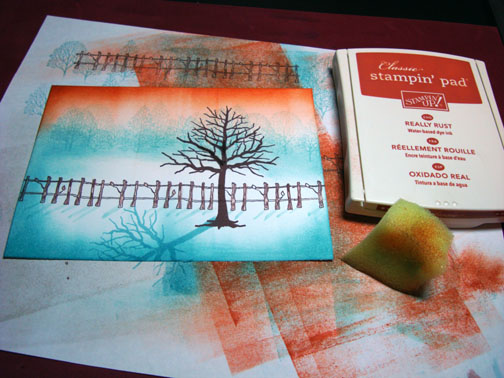
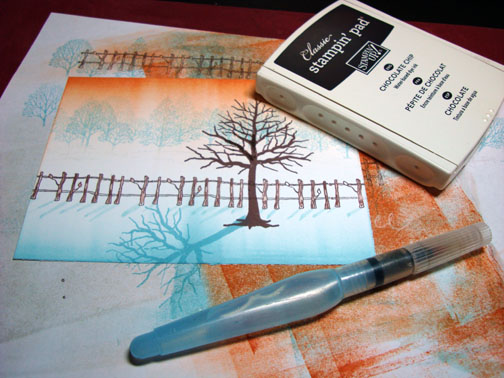
Darkened some of the large tree branches with a Chocolate Chip marker.  Added some snow on the branches with a White Gel Pen.

dsc06207.JPG

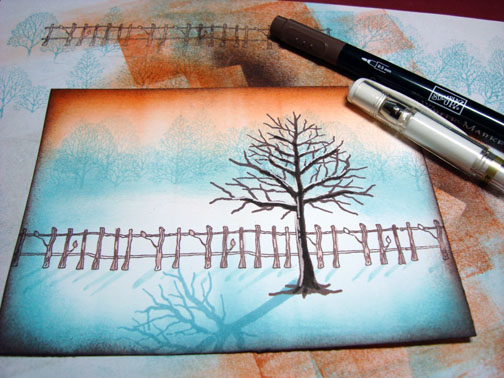
Added Panels, Front to back, Main image panel, Chocolate Chip Panel, Baja Breeze Panel, Chocolate Chip panel.

Assembled card front and here it is finished measuring 5″ x 6.5″.

dsc06211.JPG

I hope you enjoyed this icy scene tutorial and will give this color combo a try.

May your day be filled with laughter and joy.

Until my next post. . . . . . . . .. . .

Hugs,

Michelle

Links to all my tutorials can be found here:  http://zindorf.blogs.splitcoaststampers.com/tutorials-ive-written/

Here is a link to my workshop calendar if you want to get info on beginner and advanced Brayer workshops:  http://zindorf.blogs.splitcoaststampers.com/workshop-calendar

45 thoughts on “Frosty Tree – Tutorial #126

  1. michelle's avatar michelle

    Wow! This is so pretty! As always, you are an inspiration…..and I love your tutorials. They are very clear…….but I would love to see a video tutorial!!! Thanks for sharing!!!

    Like

  2. Anna's avatar Anna

    Very pretty! I can feel the chill in the air even here in Florida. The Baja Breeze gives it a nice icey touch. Thanks so much for your morning tutorials. They always leave me thinking creatively as I go thru my day.

    Like

  3. Phyllis's avatar Phyllis

    Good morning Michelle! Funny you woke up this a.m. with thoughts of winter, I did too. Like, is it EVER going to get here??? It’s cool in the a.m. here (Texas) but in the 90s in the afternoon. What’s up with that??? Your card is stupendous! I’m trying that shadow effect with the aqua painter. Here again, I appreciate you getting up each morning to create and then share your art. You’ve heard it before but you are fantastic!

    Like

  4. Stephanie C.'s avatar Stephanie C.

    Wow! Love this card. Thank you for the sponging tips. I am going to get sponges like the ones you use in your tutorials. I think my spotting and streaking problems occur because my sponges are too porous.

    Like

  5. Sydnie's avatar Sydnie

    Your tutorials are just so beautiful and inspiring as said so many times before and a huge thank you (again) for always sharing your technique…I had been “resisting” buying a brayer, but now finally have one on hold at my favorite stamp store to get this week! Can hardly wait to try your methods…thanks, thanks, thanks!!!

    Like

  6. Debbie's avatar Debbie

    Another Wowza!!!!! You truly captured a winter wonderland in your card… It is so beautiful when nature has ice on the trees… and your card really reflects that beauty…

    Like

  7. Stunning and my favorite so far! This is just too gorgeous for a card! I hope it is framed by its recipient! 🙂 I love all of the shadowing and the snow and the gorgeous color combination. This is truly jaw-dropping gorgeous!

    Like

  8. Niki Winchell's avatar Niki Winchell

    Wow. This card really invokes the feeling of winter. I think of the colors you used as warm, beach-y or fall colors. You magically turned them into winter. Amazing!

    Like

  9. Carla's avatar Carla

    Love this winter scene. Your tutorials are so clear, I believe you were born to teach! Thank you for the sponging info! I’ll give that a try. Now that you have mentioned the cardstock, I’m going to get stampin up’s and give it a try. Mine maybe to rough and I know it’s alot thinner than stampin up’s so the ink maybe soaking in much faster than if it were thicker. Thank you so so much for this info!

    Like

  10. Becky's avatar Becky

    This is absolutely breathtaking. Great job on the shadows. I never can figure out how to do that so it looks right. Now I may try it again since seeing how wonderful yours turned out. It’s such a refreshing piece of artwork. Thanks for sharing. Becky

    Like

  11. Bessey's avatar Bessey

    Michelle, Love this card. I like the fence, thanks for putting where you can get the stamps. Will have to put the fence stamp up. I picked up inkadinkadoo stamp Happy Haunting, just so I can make the card you did. lol Hope you had a wonderful day.

    Like

  12. Beth Cutwright's avatar Beth Cutwright

    totally gorgeous Michelle! I don’t even like winter, but this scene is breathtaking!
    I will have to try this ths weekend! Thanks so much for being so consistent with the tutorials…you are the best!

    Beth C

    Like

  13. Sandy in AZ's avatar Sandy in AZ

    This is such a beautiful work of art !!!! I love the colors, and the way you did the shadows and shading. Looking at this makes me feel like I’m there, and feeling very cool. Another great one !

    Like

  14. Joy's avatar Joy

    Michelle, The shadow of the tree caught my eye instantly. I thought to myself ‘how in the world did she do that’.. well lo’ and behold you never cease to amaze me.

    Thanks for sharing. It’s simply breathtaking..

    Like

  15. Terri H.'s avatar Terri H.

    Michelle, this could be your best tutorial ever! Not that they’re not all wonderful, but this card is superb! I love the colors and love how you did the shadowing. I may have to give this one a try! Thanks so much for continuing to share your talent!

    Like

  16. Doreen's avatar Doreen

    Michelle,
    I can’t even tell you how I came across your blog. What I can say is that it is my FAVORITE!!! Your inspiration and creativity just ooozzzzeeesss out of my computer screen! Hopefully some will rub off onto me! Thank you so much for all of your blogging. Doreen in Maryland. p.s. Lovely As A Tree is my favorite set. I love that you use it a lot!

    Like

  17. jules p's avatar jules p

    You just totally blow me away. EVERY TIME! I am in awe of you and your work, your skill or creativeness.
    And just when I don’t think I will be amazed, you show me I am wrong! 🙂

    Like

  18. Susan's avatar Susan

    I love your cards……………………….The first thing I do when I get to work is look on your web site to see if you’ve added another tutorial. I have never used a brayer before – After viewing your web site I went out and bought one and am using it every day. Thanks

    Like

  19. Margaret C's avatar Margaret C

    I love your work and aim to emulate it (so the tut’s are FAB!!!) My question is – do you use gloss or matt card. I know you use Whisper White Stampin’ Up but that is not available here in the UK. Hope you can helps!!

    Like

  20. Shirley's avatar Shirley

    Hi, I love your tutorials! I tried the brayer technique but just can’t get it…or it doesn’t look anything close to yours. Mine always has that line that seperates the colors. I’m about to give up trying. Did you ever consider a video tutorial? Also I like the way you added the ribbon to the card. It is as simple as it looks? Did you tie the ribbon around the card, then tye 2 pieces of ribbon to it? Thanks for sharing your beautiful card!

    Like

  21. Jaine's avatar Jaine

    OMG…Can’t believe I have had the good fortune to find your site and tutorials. I recently became a huge fan of brayering through a stamping company in England called Lavinia Stamps, and more recently of tree stamps through Elusive Images and Glenda Waterworth. Your cards are amazing, I agree with a previous post that they should be framed. Thankyou so much for the inspiration.

    Like

Leave a reply to Sandy in AZ Cancel reply