Fallen Leaves – Tutorial #132

dsc06352.JPG

A while back I asked the readers of this blog to leave me a comment telling me their most favorite thing about Autumn.  Close to half of the comments mentioned walking through fallen leaves, feeling them crunch beneath their feet.  I agree whole heartedly that it’s a wonderful thing in the Autumn months.  Today’s card is my version of fallen leaves to try to echo that feeling and put it on paper.

Let’s get started 🙂

Supplies:

Stamps: Stampin’ Up With Gratitude & Touch of Nature
Paper: Stampin’ Up Whisper White, Chocolate Chip & Old Olive
Ink: Stampin’ Up Close to Cocoa, Really Rust, Basic Black, Chocolate Chip & Old Olive
Accessories: Crop-a-dile, Eyelets, Brads, Raffia, Tim Holtz embellishment, Tim Holtz Ruler, Sponges, Prismacolor Markers, Versamark Pad and Marker, Dimensionals, Fine Detail Embossing Powder, Heat gun, Photo Corner Punch

dsc06358.JPG

Stamped acorns by first loading my stamp with Versamark and then loading it with Close to Cocoa ink before stamping it on a 4.5″ square piece of Whisper White card stock.

dsc06325.JPG

Heat embossed the images using fine detail clear embossing powder and a heat gun.

dsc06326.JPG

Colored the bottom half of the acorns with a Prismacolor Sienna Brown marker.

dsc06327.JPG

Colored the top half of the acorns with a Sand marker.

dsc06328.JPG

Stamped leaves by first loading my stamp with Versamark and then loading it with Really Rust ink before stamping them.

dsc06329.JPG

Heat embossed the leaves with fine detail clear embossing powder and a heat gun.

dsc06330.JPG

Colored the leaves with a Burnt Ochre marker.

dsc06331.JPG

Let the marker dry and then went over the darker parts of the leaves again with the Burnt Ochre marker to give a bit of variation in color.

dsc06332.JPG

Colored over the leaves and acorns with a Versamark marker and heat embossed the images with clear embossing powder and a heat gun.

dsc06333.JPG

dsc06334.JPG

Stamped the leaves a few more times by first loading my stamp with Versamark and then loading it with Always Artichoke ink before stamping them.  Heat embossed the images using clear embossing powder and a heat gun.

Note:  There is no need to wipe the Always Artichoke ink from the already embossed images before heat embossing them.  Once you heat emboss the Always Artichoke leaves the ink will magically disappear from the already embossed images.  Try it you will see.  🙂

dsc06335.JPG

Colored the green leaves with a Limepeel marker.

dsc06336.JPG

Added Light Olive marker to the darker parts of the green leaves.

dsc06337.JPG

Colored over the green leaves with a Versamark Marker and heat embossed them with clear embossing powder and a heat gun.

dsc06338.JPG

dsc06339.JPG

Sponged, using a circular motion, Chocolate Chip ink all over the card stock.

dsc06340.JPG

Decided I wanted a warmer tone to the background so I sponged Really Rust ink all over entire piece of card stock.  A girl can change her mind if she wants, right?

dsc06341.JPG

Over stamped the entire card stock with the leaf stamp using Chocolate Chip ink to create the look of brown leaves under the more colorful leaves.

dsc06342.JPG

Let the Chocolate Chip ink dry a moment and then wiped the Chocolate Chip ink off of the embossed images using a soft rag.

dsc06343.JPG

Sponged Basic Black ink around the edge of the card stock.

dsc06344.JPG

Ok, I’m not one for a bunch of embellishments.  It’s not that I don’t own a ton of embellishment.  I have drawers and drawers full of them.  I usually just can’t figure out what to do with them, lol.  I can spend more time trying to place just one embellishment on a card then it took me to create the rest of the entire card.  So I usually don’t embellish.

This is probably the most you will ever see me embellish, lol.

I added punched corners.

dsc06345.JPG

Used my Crop-a-dile to add eyelets.  Man those eyelets haven’t seen daylight in over a year, lol.

dsc06346.JPG

dsc06347.JPG

If you want a cheap solution to ribbon for your fall cards try Raffia.  🙂

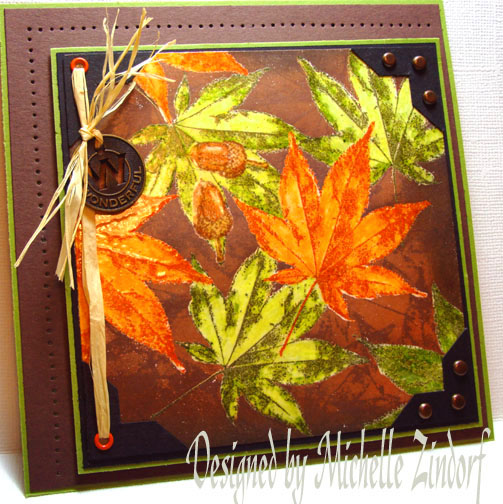
Added Raffia and a Tim Holtz embellishment that has the sentiment of Wonderful on it.

dsc06348.JPG

Frayed the raffia ends.

dsc06349.JPG

Pierced holes in two sides of my out card-stock layer using the Tim Holtz ruler and a push pin.

dsc06350.JPG

Dimensionals, Wow!  I really haven’t popped something up for the longest time.

I used lots of them, especially in the middle of the main panel so it wouldn’t cave in.  🙂

dsc06351.JPG

Here is my finished card front, popped up and embellished.  It measures 5.5″ square.

dsc06352.JPG

Hope you are able to get out today and enjoy the sites and sounds of a beautiful Autumn day.

Until my next post. . . . . . . . . . .

Hugs,

Michelle

Links to all my tutorials can be found here:  http://zindorf.blogs.splitcoaststampers.com/tutorials-ive-written/

Here is a link to my workshop calendar if you want to get info on beginner and advanced Brayer workshops:  http://zindorf.blogs.splitcoaststampers.com/workshop-calendar

39 thoughts on “Fallen Leaves – Tutorial #132

  1. Kathy's avatar Kathy

    WOW..very beautiful. Love those colorful fall leaves! Thank you so much for showing the entire process, including the final assembly of the card once you had created your image. Oh how gorgeous is this one!

    Like

  2. OMGosh, I just did something similar to this yesterday and posted it on my blog and in my SCS gallery! Mine does not look anything like yours! Yours is fantastic. I keep checking for those dates when you will be doing a workshop in New York! Are you coming soon! I need you!

    Like

  3. Carla's avatar Carla

    Just when I think you couldn’t possibly come up with another “leaf” card you do! You are so talented! I’m so thankful you are willing to share with us less talented! I almost bought this set and passed up because I couldn’t visualize how to use the leaf. Now I know I should have bought this set! Hope your weekend is filled with warm wonderful moments!

    Like

  4. Rukhshana's avatar Rukhshana

    Just love the colours. I’m the same as you with embellishments – I can’t stop buying them but I never know what to do with them. I know you haven’t used it on this card but how do you keep your brayer clean?

    Like

  5. JaneAnn's avatar JaneAnn

    Another incredible card. Walking through leaves, hearing the crunch and the smell. Brings back childhood memories of playing in the piles of leaves. Thank you for sharing!

    Like

  6. Becky's avatar Becky

    Michelle, All I can say is >>>> AWESOME JOB <<<< Now if this were laying on my front sidewalk I’d be trying to sweep them off the sidewalk. That is how real they look……you are sooooo talented. I look forward to seeing your wonderful creations everyday. Thanks for making my world brighter. Cheers to you my dear. 😀 and Happy STamping !!!!!

    Like

  7. Harriet Skelly's avatar Harriet Skelly

    Wow Michelle – you’ve really captured a piece of Autumn here! I never would have thought to stamp the brown leaves on the background to look like old leaves! So realistic! Have a great weekend!

    Like

  8. Gidget-Trish's avatar Gidget-Trish

    Wow! Beautiful colours and layout. Love it. It’s such an awesome day out there today and this card matches it perfectly. I also love the raffia….great idea.
    Trish

    Like

  9. Terri's avatar Terri

    Beautiful! I have a new leaf stamp and I’ve been trying to figure out how to make a card to send to my mother who has cancer. This is so bright and cheerful & I hope you don’t mind if I case this card to send to my mom!

    Love your work and your inspiration.

    Terri in Missouri

    Like

  10. Laurie's avatar Laurie

    Another Beauty! I always like to play a game with myself trying to figure out where you will start on any given card. I so lost. I did a double take and had to go back up to the card to see — you started with the two acorns! Who’d a thunk? Anyway it is beautiful as always!

    Like

  11. Phyllis's avatar Phyllis

    BEAUTIFUL. Thanks for taking part of your Saturday off and showing us how to create art. The comments you share regarding why you choose a specific color or tool really helps. I’m off to try these tips.

    Like

  12. Kim's avatar Kim

    Michelle – I’ve only been getting your emails for a week or so, but already you’ve inspired to me break out my scary brayer AND try my hand at some of the cards you’ve made. Thank you for making it seem doable for someone who isn’t that artistic!

    Like

  13. Betty McCommon's avatar Betty McCommon

    Keep up the fall theme, especially leaves. I have so many leaf stamps and no muse to get me moving this year. Love this card and the wolf yesterday….and I lent my wolf set to my DD 750 miles away so I can’t recreate.

    Like

  14. Janet's avatar Janet

    Michelle how pretty! We went up north today and saw so many trees that have turned, what a nice surprise to see you made a card with all their glory. Hope you had time to play outside also today.

    Like

  15. Bessey's avatar Bessey

    Beautiful Michelle! Will try to do this one myself. Love it. I too am still waiting to see the day when you hit New England for a show. I would definitely take the day off from work. lol I’m sure alot of us in this part of the country would do our darnest to get to see you. Keep it in mind. Springtime would be nice. Hint-hint.

    Like

  16. Susan's avatar Susan

    Wow! I’ll have to get out my embossing gun. Just have to get my twins out of my house so I can do it – alone! Thanks for sharing your gorgeous card and instructions.

    Like

  17. Octavia's avatar Octavia

    Michelle – You are remarkable!!! Your name was mentioned in the Marco Paper Newsletter by Greg, so I had to see what the hubbub was all about. You can’t tell, but right now I am giving you a standing ovation:) I wish I was able to attend your upcoming class in Ohio, but for right now I’ll just keep drooling at your works of art!

    Like

  18. Ashley Anderson's avatar Ashley Anderson

    Michelle – You really make me want to return to Connecticut where I grew up to see the fall leaves. Your colors are so gorgeous and full of life. I usually don’t emboss much due to the mess it makes, but after seeing this card, I really need to find it somewhere here in the craft room and make a card with my Touch of Nature set and leaf stamps. Thanks again for bringing back the memories in Connecticut.
    Ashley in Surprise, Arizona

    Like

  19. Carol Dee's avatar Carol Dee

    Your last two cards are some of my favorites. I also LOVE fall.
    I marvel at how easy you make this look! Time to give it a try.
    Happy Stamping…

    Like

  20. MSBetsyZ's avatar MSBetsyZ

    OMG, girl, this and the wolf card are AMAZING! I always love “watching” you work… the step-by-step photos are just fantastic. I know it must be VERY time-consuming to stop so often to take them, but rest assured they are so VERY APPRECIATED!

    Hugs,
    Betsy

    Like

  21. Karen's avatar Karen

    Wow! I just discovered you and I can see I am going to be spending lots and lots of time on your site. You are so incredibly talented and I love your work. Your tutorials are great and I know I’m going to learn so much. Thank you, thank you, thank you for sharing with us.

    Karen

    Like

  22. YANERI RODRIGUEZ's avatar YANERI RODRIGUEZ

    WOW! TRUELY INSPIRATIONAL. WHAT A BEAUTIFUL PIECE OF ART YOU HAVE CREATED. THANK U FOR SHARING YOUR WORK OF ART TO US VIEWERS. VERY KIND OF YOU TO SHARE HOW YOU CREATE YOUR PIECES. YOU HAVE OPENEND A NEW WORLD OF STAMPING IN A DIFFERENT WAY. THANK U FOR BEING SO INSPIRATIONAL. I SHOWED MY HUBBY AND HE WAS IN AWWW! PLEASE CONTINUE YOUR PIECES AND SHARING WITH US!!!
    GOD BLESS!!
    HAPPY THANKSGIVING AND HAPPY HOLIDAYS TO YOU AND YOURS!!!

    SINCERELY,
    YANERI – ORANGE COUNTY, CA

    Like

Leave a reply to Laurie Cancel reply