Night Owl – Tutorial #136

dsc06481.JPG

Happy Saturday!  I think I live for the weekends.  🙂

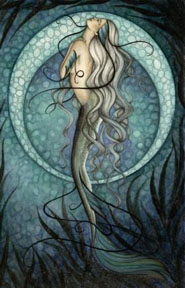
This morning I choose to be inspired by a fantasy art piece by Jessica Galbreth.  When I view art for inspiration I pick the elements from it that visually inspired me.  I’m sure you can see the elements that I pick out from this art piece.

jgmysticmermaidpjg-229.jpg

dsc06438.JPG Oh! before I forget, we have a blog candy winner!  Drum roll please. . . . . . . . . . . . .. . . .

The winner is out of 478 entries:

Emilie who wrote “OMG, I really really want to let you know how excited I am every time you do “blog candy” Some day I hope to be the lucky one. I look forward every single day to your creations and oooohhhh and ahhhhhh over each and every step and scroll up and down. I am just like a kid in a candy shop”.

Emilie, congrats, please e-mail your mailing address to mzindorf@aim.com and I will pop these stamps in the mail to you.

Thanks everyone for playing along!

Now on with the tutorial.

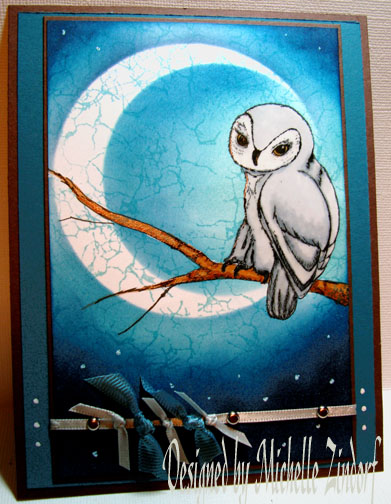
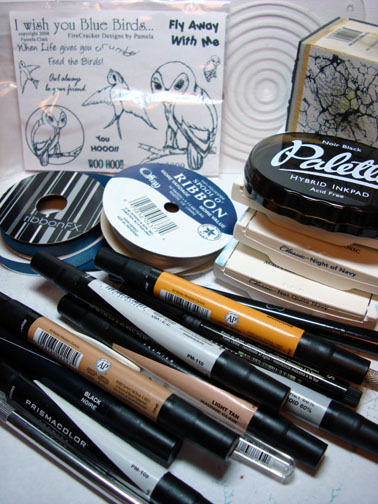
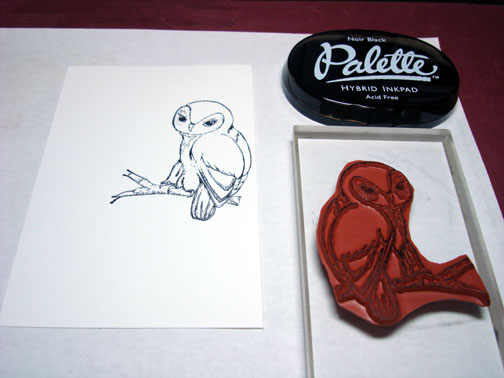
This beautiful owl stamp is from a Set from Firecracker Designs By Pamela.  Here is the link to her on line store:  http://www.safesecurestore.com/stores/merchant.mvc?Screen=PROD&Product_Code=4×5099&Category_Code=NEW&Store_Code=firecrackerdesignsbypamela

Supplies:

Stamps: Fire Cracker Designs by Pamela “Yoo Hoo” & Stampendous “Marble Texture Cube”
Paper: Stampin’ Up Whisper White, Not Quite Navy & Chocolate Chip
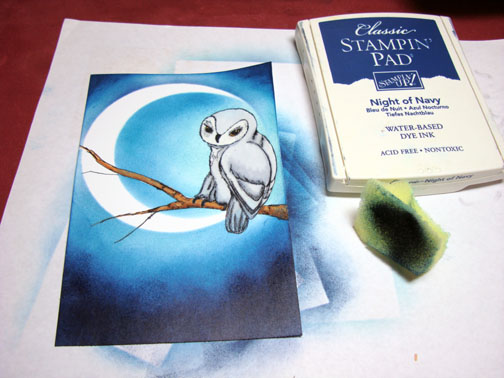
Ink: Stampin’ Up Night of Navy, Not Quite Navy & Baja Breeze, Palette Noir Black
Accessories: Sponge, Coluzzle, Versmark Marker, White Gel pen, Black fine tip marker, Prismacolor Markers, Ribbons & Silver Brads

dsc06480.JPG

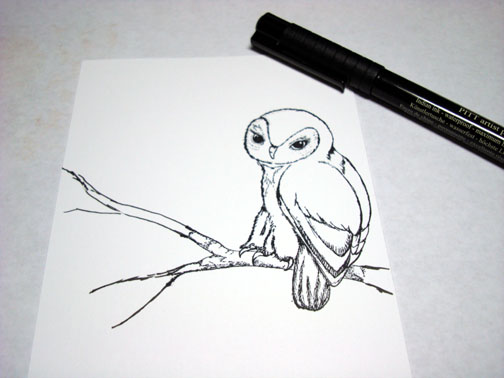
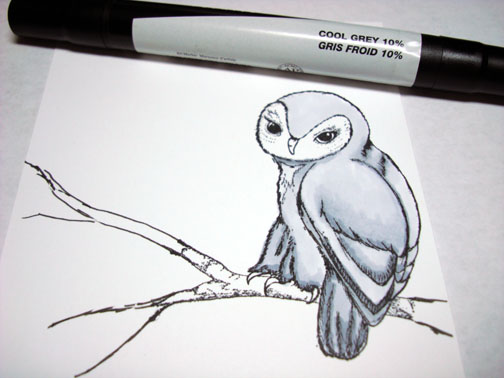
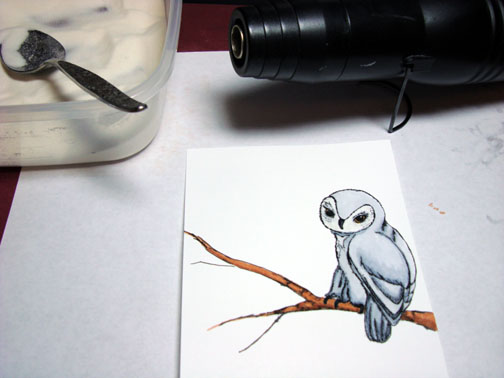
Stamped Owl with Palette Noir Black ink on a 4″ x 6″ piece of Whisper White card stock.

dsc06439.JPG

Extended the branch a bit with a fine tip black marker.

dsc06440.JPG

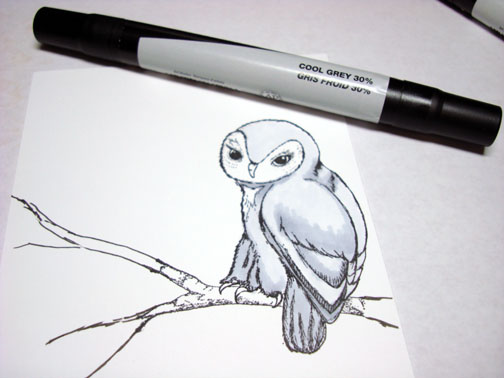
Colored the Owl with a Prismacolor 10% Cool Grey marker.

dsc06441.JPG

Added Prismacolor Cool Grey 30% marker to the dark parts of the Owl.

dsc06442.JPG

Went a little darker over the darker with a Cool Grey 60% marker, not covering the Cool Grey 30% marker entirely. 

 dsc06443.JPG

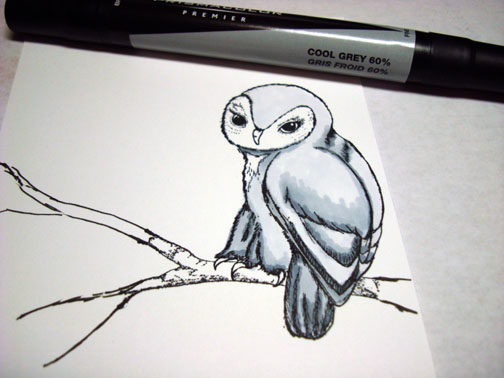
Colored over all of the grey areas again with the Cool Grey 10% marker to blend everything together and to get rid of any harsh lines where the colors meet.

dsc06444.JPG

Colored the eyes with Goldenrod.

dsc06445.JPG

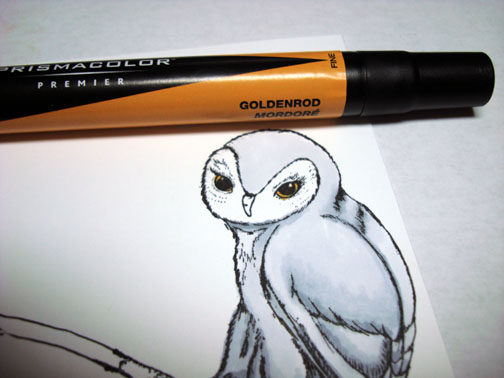
Added Cool Grey 10% around the eyes.

dsc06446.JPG

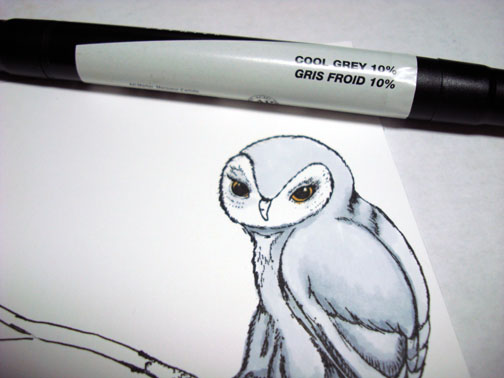
Colored the beak and claws black.

dsc06447.JPG

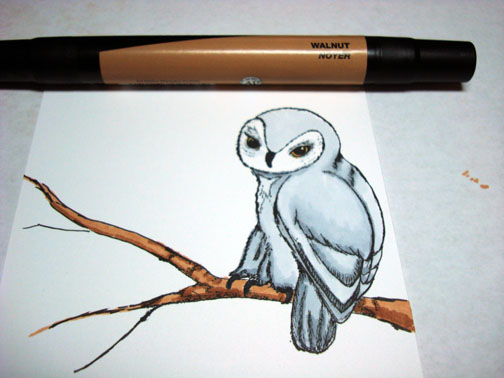
Colored the branch Light Tan.

dsc06448.JPG

Added a Walnut shadow at the bottom of the branch.

dsc06449.JPG

Colored over the entire image, branch in all with a Versmark marker.

dsc06450.JPG

Heat embossed the image using fine detail clear embossing powder and a heat gun.

Note:  My embossing powder looked a bit pitted the first time, so I went over it again with a Versamark marker and heat embossed it a second time with clear embossing powder.  I wanted to make sure my bird was going to stay grey and white and not turn blue when I put the background in.  🙂

dsc06451.JPG

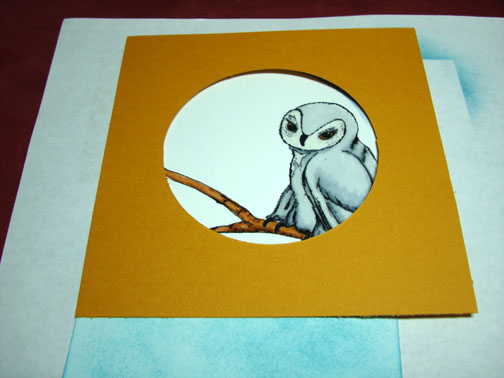
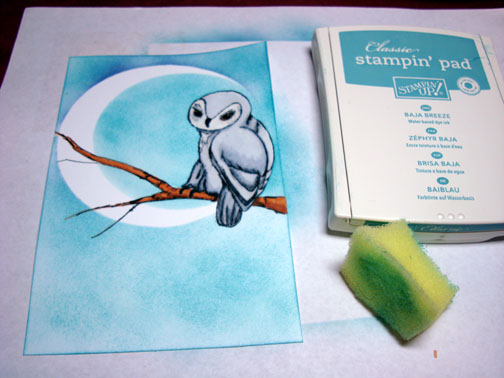
Cut a 3 5/8″ circle from card stock with a circle coluzzle template.

dsc06452.JPG

Used the circle as a mask for the moon and sponged Baja Breeze ink all over the card stock.

Tip: if your sponged ink looks really blotchy keep applying ink until it smooths out.

dsc06453.JPG

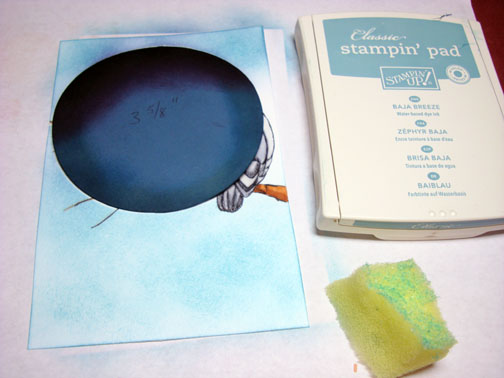
Cut a 3 1/8″ circle out of a piece of card stock with a Coluzzle.

dsc06454.JPG

dsc06455.JPG

Used the negative piece of card stock and put the opening to the right side of the moon I create and sponged Baja Breeze ink in the opening.

dsc06456.JPG

dsc06457.JPG

dsc06458.JPG

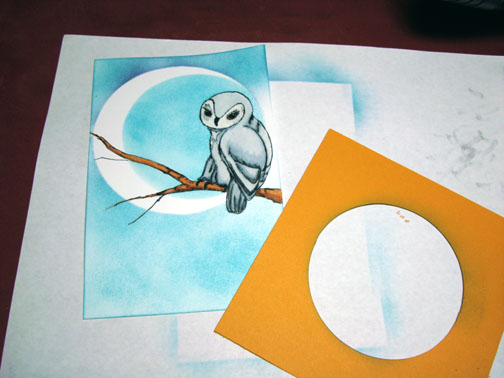
Sponged Baja Breeze ink to the right of the owl.

dsc06459.JPG

Put the circle mask back on and sponged Not Quite Navy ink around the top, left and bottom of the mask.  I left the right side of the mask light.

dsc06460.JPG

Removed the mask.

dsc06461.JPG

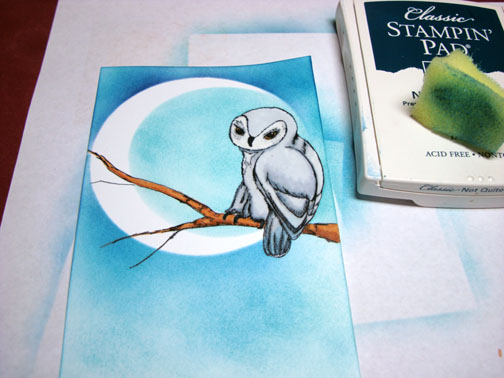
Put the negative piece of card stock back on and sponge Not Quite Navy at the top, left side and bottom of the opening, leaving the right side with not Not Quite Navy on it.

dsc06462.JPG

Removed mask.

dsc06463.JPG

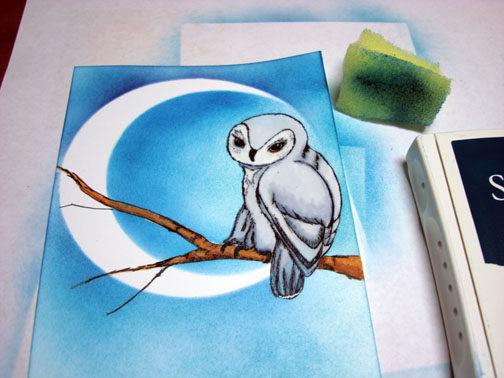
Heavily sponged Not Quite Navy ink at the top and bottom of the card stock.

dsc06464.JPG

Sponged Night of Navy ink at the top and bottom of the card stock, being very heavy at the bottom.

dsc06465.JPG

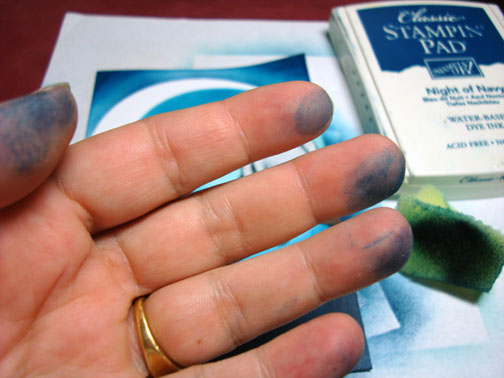
Time to clean up or I will for sure have a nice big blue fingerprint on my stark white moon.  🙂

dsc06466.JPG

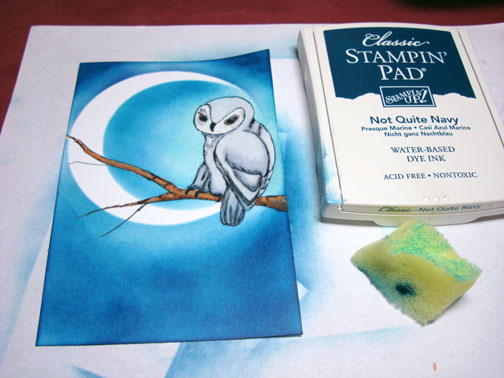
I liked unexpected texture in the background of the inspiration piece so I added a bit of marbling to mine.

Stamped side “C” of the Marble texture cube with Baja Breeze ink all of the card stock, while holding my breath, lol.  You just never know if you are pushing a piece to far.  🙂

dsc06467.JPG

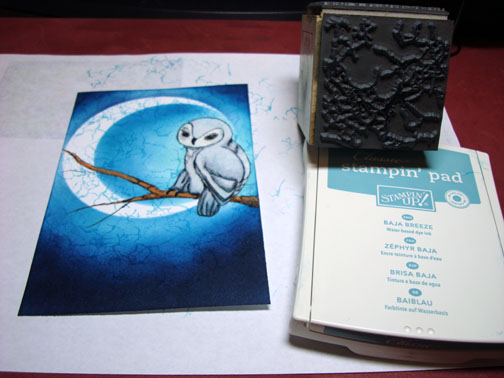
Whew, let my breath out.  It looks fine.

Wiped the ink from the embossed images with a soft rag.

dsc06469.JPG

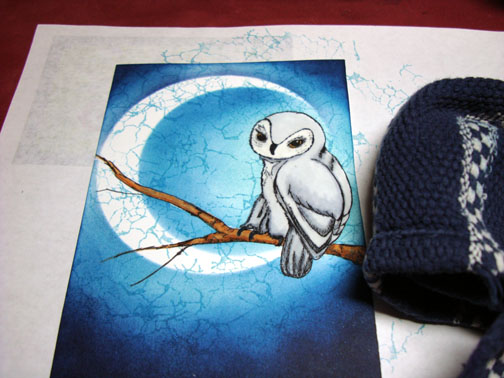
Assembled card front and added ribbon and silver brads.

Tip:  you can piece through your ribbon and cardstock with a piecing tool to get your brads started.

dsc06471.JPG

Almost forgot to put some stars in the sky.

Added stars by dotting randomly a bit of White Gel pen in the darkest areas of the card stock.

dsc06473.JPG

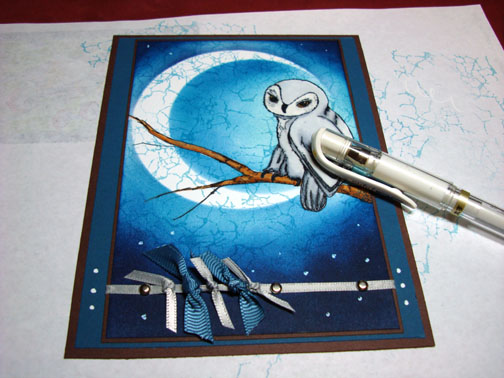
Here you have it, the finished card measuring 5″ x 6.5″.

dsc06481.JPG

I hope this tutorial inspired you to look at art and pull from it some really fun shapes to include in your own stamped art.

May your Saturday be all that you want it to be.

Until my next post. . . . .. . . . . . . .

Hugs,

Michelle

Links to all my tutorials can be found here:  http://zindorf.blogs.splitcoaststampers.com/tutorials-ive-written/

Here is a link to my workshop calendar if you want to get info on beginner and advanced Brayer workshops:  http://zindorf.blogs.splitcoaststampers.com/workshop-calendar

Frequently asked questions answers:  http://zindorf.blogs.splitcoaststampers.com/frequently-asked-questions/

43 thoughts on “Night Owl – Tutorial #136

  1. Oooh another wonderful work of art Michelle. I love your techniques so much that I have actually ordered a Versamark pen – I’ll probably wonder how I ever managed without it in next to no time. Thank you so much for sharing your fantastic ideas and talent with us.

    Like

  2. Shelly Schmidt's avatar Shelly Schmidt

    I look forward to your blog post every day- this is outstanding- as usual. Michelle- you have got tyhe touch!!! THanks for sharing your talent!

    Like

  3. Gidget-Trish's avatar Gidget-Trish

    Love the night owl. The prismacolor markers with the variations of the same shade do such a great job of giving depth to your pieces the way you use them. And I really love the moon and the texture in it. Another awesome piece!
    Trish

    Like

  4. Mary Campbell's avatar Mary Campbell

    I love all your posts and don’t always comment but just had to today. I love this! Thanks for walking us through the steps to recreat one ourselves. I want to try that moon. Love it , love it , love ot. Thanks again for sharing. Mary

    Like

  5. Sandy K's avatar Sandy K

    This card is fabulous. That is one sexy looking owl! It has such a sweet face. I guess that’s another stamp set I’ll have to buy. I haven’t been able to find that marble stamp you use? Is it still available or do you know of one that is somewhere else that is similar? Thanks for the inspiration as usual.

    Like

  6. Betts's avatar Betts

    You are sooooo clever! That moon is out of this world! Really… I am waiting for that stamp set to come. I ordered it when I ordered the swan one after seeing that card. I told the gal at Firecracker Designs that it was all your fault; enticing me to spend, spend, spend. She didn’t respond and she seemed out of sorts that day.
    I am impatiently waiting for these stamp sets to come in. I think I ordered four. I’m hopeless…

    Like

  7. WOW! This is sooo gorgeous!! I love the crackle image you put into it!! 🙂 Thanks for sharing your inspiration!! Now that I design for FireCracker Designs by Pamela, I must use at least ONE of your techniques!! 🙂

    Like

  8. MSBetsyZ's avatar MSBetsyZ

    Oh, oh, OH! Simply magnificent! You’ve outdone yourself on this one, Michelle! (I know, I say or think that almost every day, lol!) The overall picture is great, the owl is wonderful!

    Like

  9. Seriously? Do you wake up in the morning and think to yourself, “Man, am I ever awesome.”? The art you create blows my mind. I tried my hand at your style on a couple of cards this week. I’d be honored if you’d stop by my blog and tell me what you think! Take care!

    Brandi

    Like

  10. Cynde's avatar Cynde

    Michelle this card is Beautiful! Love the serene feeling it gives off. It truly is Gorgeous…..
    Thanks for sharing all your talent, I look forward to your blog daily, even if I don’t always post.
    Cynde

    Like

  11. Ursula's avatar Ursula

    Simply amazing!! You always just blow me away, Michelle! Thanks for another terrific tutorial! I’m always so impressed with the wonderful images you create with Pam’s stamps! The crackle moon is just phenominal! And I really need a set of those markers! ;o)
    Ursula

    Like

  12. Phyllis's avatar Phyllis

    Congrats to Emile! Isn’t it wonderful to be a Zindorf Blog Winner!!! Here again, I’ve got to say how much I appreciate the step by step narratives. It is reassuring to know you get “pitted” embossing too. I just didn’t know to go over it again! What a simple solution…..why didn’t I think of that? Your piece is beautiful and I especially enjoyed the comment you made regarding holding your breath as you stamped over the piece with the “C” side of the marbling stamp. I had thought in my mind Michelle you’re going to stamp over WHAT???? Alass, it turned out beautiful. AND YES I WENT OUT AND GOT A MARBLE CUBE SOME WEEKS BACK JUST BECAUSE OF YOU! So now, you just Have to do more with the cube!!! Thanks and you have an awesome weekend too.

    Like

  13. OK, THIS is definately a new FAVORITE! I really love how you can let an inspirational piece of artwork blossom into a beautiful and creative representation of your own! WOW! Great job, Michelle!

    Like

  14. Margie's avatar Margie

    Hi Michelle, I was making this card today. The Stampendous cube stamp you stated to use the “C” side– it is the “A” side. Love your work!!! Could you find time to make a card EVERYDAY? Just Kidding!!! Beautiful work.

    Like

  15. Margie stated “The Stampendous cube stamp you stated to use the “C” side– it is the “A” side.”

    Margie, Our cubes must be different because the side I used is the “C” side on my cube. 🙂

    Like

  16. Mimi2six's avatar Mimi2six

    On a previous entry you wrote that Joy was your enabler as she introduced you to a new stamp company, well I’ve just figured out that you are my enabler. The thing is, I now buy almost all of the sets that you’ve done a tutorial on, lol……I’m broke! I love your work and I’m hoping that with a lot of practice, or when I grow up, whatever comes first, I will be half as good as you are. Thanks for sharing your work and introducing me to all that a brayer can do, my pocketbook and my husband thank you too 😉

    Like

  17. Pingback: COPIC Marker Class | LunAria Design Studios

Leave a reply to Tracy Welter Cancel reply