Vase of Stems for You – Tutorial #146

dsc06755.JPG

Hi Everyone, I took a couple of days off from blogging.  Sometimes I just don’t feel like stamping, GASP!  No fear, the mood was back with me this morning, so here I am with another tutorial.

I rarely paper piece things on my projects, but I love to make easy to create vases out of circles and ovals, such as the one I did in this morning’s tutorial.

Let’s get started. 🙂

Supplies:

Stamps: Stampin’ Up Stem Silhouettes and Frames with a Flourish
Paper: Stampin’ Up Whisper White, Basic Black & Bravo Burgundy
Ink: Adirondack Cranberry, Raisin, Lake Mist & Espresso, Distress Inks Frayed Burlap & Antique Linen
Accessories: Sponges, Coluzzle, Stamp-a-ma-jig, Raisin Marker, White Gel Pen, Post it Notes, Brads

dsc06757.JPG

Cut a 2 1/8 circle out of Whisper White card stock using my coluzzle.

dsc06732.JPG

Cut a piece off of the top and bottom of the circle to create a vase shape.

dsc06733.JPG

Put a post it note on a 5″ square piece of Whisper White card stock.  I put the top edge of the post it note where I want the top of the vase to be in my finished piece.   I held the vase shape to the post it note and drew a line along the top flat edge of the vase to indicate how wide the opening of the vase is.  This gives me some indication where to stamp my stems so they will appear to fit in the vase.  🙂

dsc06734.JPG

dsc06735.JPG

I stamped the stems 3 times using Cranberry ink and a Stamp-a-ma-jig for placement.

dsc06736.JPG

dsc06737.JPG

dsc06738.JPG

Stamped the stems again to put a shadow on the wall for them using Lake Mist ink and the Stamp-a-ma-jig for placement.

dsc06740.JPG

Removed the square post it note mask and put another post it note on to mask the wall so I can sponge in my table top using Raisin ink.

dsc06742.JPG

Added some Espresso ink with a sponge to the top of the table, along the post it note edge.

dsc06743.JPG

Removed the post it note mask and stamped the flourish twice using Espresso ink and the Stamp-a-ma-jig again for placement.

dsc06744.JPG

dsc06745.JPG

Time to color my vase shape.  Dragged the Antique Linen ink pad across the cut out vase.

dsc06746.JPG

Used the Frayed Burlap ink pad and dragged it on the 3 edges of the vase shape.

dsc06747.JPG

Sponged on Antique Linen lightly on the wall portion of the panel using very little ink on the sponge and also using a swiping motion, back and forth.

dsc06748.JPG

Added some Raisin marker to the right side of some of the twig leaves.

dsc06749.JPG

Added a bit of white gel pen highlights to some of the leaves.  This is hard to see in the photos.

dsc06750.JPG

Glued my vase on my main image panel using my favorite all time adhesive, Tombo Mono Multi.  I no longer use a dry adhesive.  I got tired of my cards falling about.

dsc06751.JPG

Sponged Frayed Burlap ink around the edge of the main image panel.

dsc06752.JPG

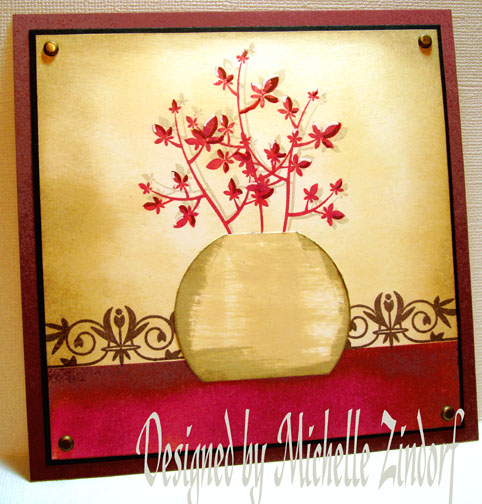
Assembled my card and added brass brads to each corner of the main image panel.  Here is the completed card measuring 5.5″ square.

dsc06755.JPG

Now I know you have some flower stamps just waiting for a vase.  Give one a try!

May your day be filled with flowers and friends.

Until my next post. . . . . .. . . . . . . .

Hugs,

Michelle

Links to all my tutorials can be found here:  http://zindorf.blogs.splitcoaststampers.com/tutorials-ive-written/

Here is a link to my workshop calendar if you want to get info on beginner and advanced Brayer workshops:  http://zindorf.blogs.splitcoaststampers.com/workshop-calendar

Frequently asked questions answers:  http://zindorf.blogs.splitcoaststampers.com/frequently-asked-questions/

23 thoughts on “Vase of Stems for You – Tutorial #146

  1. Nice card! I love stamping, but every now and again I do step away from it as well. I always come back to my old love, but sometimes you need a break to do other creative things and then come back with more ideas and enthusiasm. This card is wonderful-I think everyone would have some stamps that would ‘work’. Thanks so much for sharing with us!

    Like

  2. Phyllis's avatar Phyllis

    Welcome back into the fold Michelle! And what a come back! I especially like the way you used the flourish stamp along the table top edge. Very nice touch. Here again your combination of colors is amazing. I’m off to see what I can come up with. I need to master the art of “dragging” the ink pad across the paper. I have gotten some pretty astounding results, not many of which appeal to my eye. HA! I am assuming one should use a fairly light touch when doing this???? Thanks for starting my day off with good wishes and the same goes for you too.

    Like

  3. Carol's avatar Carol

    Thanks so much for taking the time to share with us. I have learned more from you than I have anywhere. So much of the card making elsewhere has beome too mechanical: patterned papers, stickers, rub-ons. You have brought what I have been looking for: art. Thanks so much again and hope you have a good day!

    Like

  4. Gidget-Trish's avatar Gidget-Trish

    Love the vase and shadows on the wall. I’m happy every time I see a new card from you but I’m glad you take some much needed time off on occasion. You’ve shared so much of your talent and I thank you for that. I know what a huge job it can be. Take care of yourself.
    Trish

    Like

  5. Sandy in AZ's avatar Sandy in AZ

    Such a clean, simple look. I love it ! Keep up the good work. I missed you, but glad you’re back. I’m happy for you that you took a break.

    Like

  6. MSBetsyZ's avatar MSBetsyZ

    I was hoping you were just off relaxing! You put so much work into this for all of us to enjoy, it’s good to know you take time for yourself as well!

    Love the depth in this card!

    Like

  7. Amy's avatar Amy

    Lovely card, Michelle. I always enjoy receiving the emails with your new creation.

    May I suggest you try Scrappy Glue. I love Tombo, but the Scrappy Glue seems to dry faster and hold GREAT!!!! I buy mine at my LSS (not Michael’s or ACMoore).

    Thanks again for the bouquet!!!! Have a wonderful day!

    ~Amy

    Like

  8. Joanne Valente's avatar Joanne Valente

    Michelle,
    You deserve the break from stamping, and you always come back refreshed with a smashing design. This is so pretty and yet again, you open my eyes to new techniques. This one looks easy, so you can bet I will give it a try. Your #1 NE fan – Joanne

    Like

  9. carmen's avatar carmen

    Michelle all your cards are beautiful, the are a great inspiration for me and I,m sure for others too. Thanks for sharing them. Keep up the good work.

    Thanks
    Carmen

    Like

  10. Adele's avatar Adele

    Love the card……as usual! I like how you take the circles or punches and cut them to make vases. I had never thought of doing that. I love how they look and that small technique is so easy. I have horrible results when I drag the pad across paper. They sure do not look like yours. I will keep practicing. Thanks again for sharing!

    Like

  11. Christine A's avatar Christine A

    you always come up with the best colour combinations. I love this card, the vase is so simple and stunning, my sponging and dragging never look like this.
    Christine

    Like

  12. Sandy's avatar Sandy

    You are like the Everready Battery, just keep on coming! I love your techniques (all of them, sponging, color combinations, shading, etc). Hope you come to Huntsville, Al some day..I would love to attend one or more of your workshops.

    Sandy

    Like

  13. Vicki K's avatar Vicki K

    Michelle, You are just fabulous! I so appreciate your taking so much time to create tutorials for all your cards. Certainly gives me inspiration!

    Like

Leave a reply to Gidget-Trish Cancel reply