Oh My, I have so very much going on in my life right now, but I don’t want to neglect you faithful blog readers. So today’s tutorial is one using yet another retired set from Stampin’ Up called “Roll On” dating back to 2005.
Before we get going on the tutorial I have an exciting announcement to make. I’m going to be in Wheaton, Illinois doing Beginner and advanced workshops March 13 & 14. E-mail me at mzindorf@aim.com to sign up. Spots tend to fill up fast.
Now on with the tutorial. 🙂
Supplies:
| Stamps: Stampin’ Up Retired set “Roll On” |
| Paper: Stampin’ Up Whisper White, Taken with Teal |
| Ink: Stampin’ Up Taken with Teal, Glorious Green, Tempting Turquoise, Palette Noir Black, Adirondack Stream |
| Accessories: Prismacolor Markers, Brayer, Versamark marker, White Gel Pen, Clear embossing Powder, Heat Gun, Sponge |

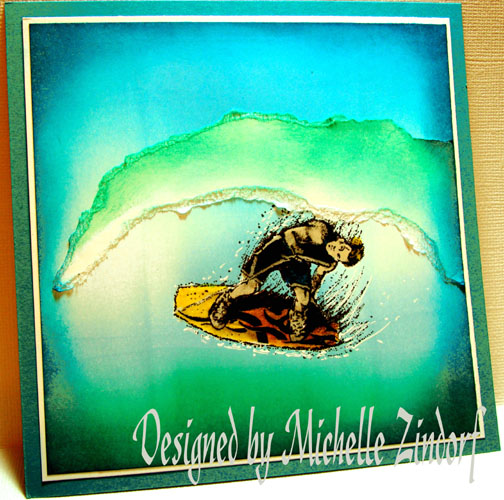
Stamped the image on a 5″ x 5″ piece of Whisper White card stock using Palette Noir Black ink.
Note: If you heat set the ink a bit with a heat gun before coloring it doesn’t smear as badly.

Colored the front of the surf board with a Sunburst Yellow Prismacolor Marker.

Colored the back of the surf board with a Yellow Orange Marker.

Colored his skin with a Buff Marker.

Went over his shirt and shorts with a Peacock Blue Marker. It is hard to see, sorry.

Colored his hair with The Sunburst Yellow Marker.

Carefully colored over the image with a Versamark marker. Color the light areas first and clean your marker well on scrap paper to try not to smear the black parts of the image.
I wasn’t to careful and his skin lots a little dark. Oh well he has just been out in the sun too long, lol.

Heat embossed the image using clear embossing powder and a heat gun.

Brayered Taken with Teal ink on the bottom of the card stock.

Brayered Glorious Green at the bottom of the card stock not covering the Taken with Teal ink entirely.

Brayered Tempting Turquoise at the top of the card stock. See how I left a light area in the middle.

Tore a wave shape from a piece of Whisper White Card stock.

Sponged Glorious Green ink at the top of the wave shape.

Sponged Taken with Teal ink in the middle area of the wave shape.

Adhered the wave shape to the card stock.

Sponged Stream ink around the entire outside edge of the card stock.

Added White Gel pen streaks and dots around the surfer and surf board.

There you have it! The finished card measuring 5.5″ square.
I wasn’t sure how this card was going to come out. I took a risk and found out that I really like it. I hope you do too. 🙂
May your day be filled with excitement and joy!
Until my next post. . . . . . .. . . . . . .
Hugs,
Michelle
Links to all my tutorials can be found here: http://zindorf.blogs.splitcoaststampers.com/tutorials-ive-written/
Here is a link to my workshop calendar if you want to get info on beginner and advanced Brayer workshops: http://zindorf.blogs.splitcoaststampers.com/workshop-calendar
Frequently asked questions answers: http://zindorf.blogs.splitcoaststampers.com/frequently-asked-questions/

37 thoughts on “Under the Wave – Tutorial #167”