By the Golden Pond – Tutorial #175

dsc07691.JPG


Supplies:

Stamps: Stampin’ Up Lovely as a Tree
Paper: Stampin’ Up Whisper White, Basic Black & More Mustard
Ink: Stampin’ Up So Saffron, Always Artichoke, Real Red, Basic Black, Really Rust & More Mustard
Accessories: Post it notes, Black marker, Brayer & Sponges

dsc07693.JPG

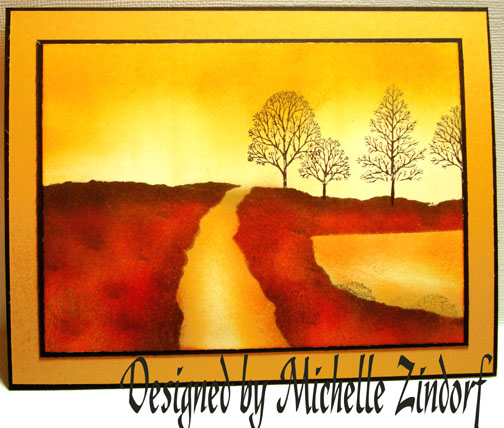
Brayered So Saffron Ink all over a 4″ x 5.5″ piece of Whisper White card stock.

dsc07672.JPG

Brayered More Mustard ink at the top of the card stock.

dsc07673.JPG

Tore some post it notes to mask the sky area, the road and the pond.  Leave the sticky part of the post it note on your mask.

dsc07674.JPG

Brayered Really Rust over the unmask portion of the card stock.

dsc07675.JPG

Sponged dots of Real Red ink around the ground area.

dsc07676.JPG

Sponged some dots of Always Artichoke ink around the ground area and edges of the post it note masks.

dsc07677.JPG

Heavily sponged Basic Black ink at the horizon line edge of the post it note and a bit around the road mask.

dsc07678.JPG

Removed masks.

dsc07679.JPG

Inked my tree stamp up, but only put ink on the trees, not the ground portion of the stamp.

dsc07680.JPG

Stamped the trees.  See how they do not have trunks.

dsc07681.JPG

Put the trunks of the trees in with a black marker.

dsc07682.JPG

Sponged some really rust ink around the road and the pond to soften the hard lines.

dsc07683.JPG

Sponged More Mustard ink heavily at the top of the sky and sponged some More Mustard ink on the road and the pond.


dsc07685.JPG

Held a piece of card stock on for a mask and stamped the very tips of the tree stamp at the bottom of the pond to look like brush.

dsc07686.JPG

dsc07687.JPG

dsc07688.JPG

Assembled the main image panel with some simple black and More Mustard panels and here you have the finished card measuring 5″ x 6.5″.

dsc07691.JPG

I hope the tutorial has inspired you to see what objects you can put in your scenes using torn post it notes.

May your day be golden!

Until my next post. . . . . . . . . . .

Hugs,

Michelle

Links to all my tutorials can be found here:  http://zindorf.blogs.splitcoaststampers.com/tutorials-ive-written/

Here is a link to my workshop calendar if you want to get info on beginner and advanced Brayer workshops:  http://zindorf.blogs.splitcoaststampers.com/workshop-calendar

Frequently asked questions answers:  http://zindorf.blogs.splitcoaststampers.com/frequently-asked-questions/


31 thoughts on “By the Golden Pond – Tutorial #175

  1. Dalek's avatar Dalek

    Thank you for sharing your tutorial; your card is beautiful and eye-catching. without web share tutorials some of us would never be able to attend course and classes, thank you from Over the Big Pond. x

    Like

  2. WOW! This scene is so peaceful. I am amazed at what you can do with post it notes. And, no embossing powder?!!! This is a wonderful tutorial. Thanks for taking the time to share with us.

    Like

  3. Rebecca's avatar Rebecca

    This is very nice! I think I can actually do this one. One of these days maybe some of mine will be nice like yours! Thanks for all the great pictures!

    Like

  4. Joanne's avatar Joanne

    Michelle,
    I don’t think you have any idea how much you inspire me with your art work. It’s one of the highlights of my day when I see your name pop up as I think – OOOOH OOOH What has she created today…and then “Voila”, there’s another creative card. I love to take in the whole creative process step by step through your tutorials. Thanks for being the bright spot in my day today!

    Like

  5. Adele's avatar Adele

    I love it! I just got this stamp set and am eager to try it out. Once again, I soooo appreciate the detail you give us in your tutorials. YOU ROCK, GIRL!

    Like

  6. Susan's avatar Susan

    Treemendous!! Really peaceful card, makes you want to just slow down, .. sit down, breathe deeply, … sip some tea …, close your eyes, … yup, that’s a great card!

    Like

  7. Janet's avatar Janet

    I can never get enough of this set, it is my favorite. Every card you make with this set are outstanding! The colors you choose today are beautiful together. I like how you created a pond and used the tops of the trees for brush. Thanks for the great tutorial.

    Like

  8. Barb (GrandmaUpNorth)'s avatar Barb (GrandmaUpNorth)

    This is really, really, really AWESOME. Thank you for sharing it with us. I love your tutorials – they are so easy to understand. Thank you.

    Like

  9. Pingback: By the Golden Pond - Tutorial #175 | Tutorials | Scrapbook Faves

  10. Jeanette's avatar Jeanette

    I love the colors!!! I have tried one of your witch in the sky tutorials tackling only the sponging technique. I was very pleased with the outcome. I cannot wait to try the brayer method, although I am a little intimidated ;). Thanks so much for sharing your ideas with us.

    Like

  11. I was thinking that every time I come here, I make the same comment – AMAZING! And I hate to repeat but AMAZING! Each card and technqiue you show us is just AMAZING! Did I repeat again? There’s just no other words. I LOVE your cards!

    Like

  12. Phyllis's avatar Phyllis

    So sorry to be late on my response to this beauty! Feeling much better now!! I have struggled a long time trying to do a road and here you have made it soooo simple! Thank you!

    Like

  13. Karen's avatar Karen

    I love the warmth of this card. The night before you did this tutorial I was trying to come up with a “warm” card. I came up with nothing, but yours is gorgeous! Great timing on your part. 🙂

    Like

Leave a reply to Kim P Cancel reply