Red Moon Floral – Tutorial #198

dsc08512.JPG

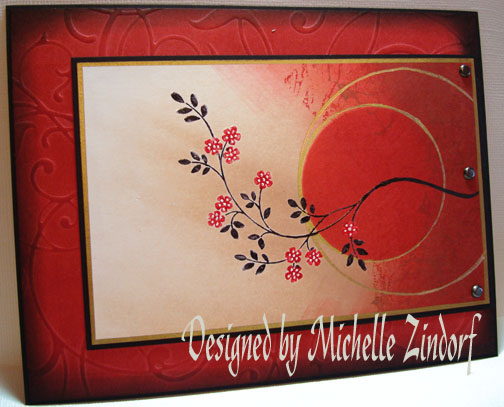
I had a little fun with Circles this morning.  I also used a lot of red in this creation, which I never do.  It gave it a bit of Oriental feel, don’t you think?

 Let’s get right into the tutorial  🙂

Supplies:

Stamps:Stampin’ Up Thoughts & Prayers, Stampendous Marble Texture Cube
Paper: Stampin’ Up Riding Hood Red, Whisper White, Basic Black
Ink: Stampin’ Up Creamy Caramel, Basic Black, Riding Hood Red, Close to Cocoa
Accessories:Versamark Pad, Sharpie Gold Paint Marker, Gold Gel Pen, Black Marker, Brayer, Sponge, White Gel Pen, Stampin Up Markers 

Please don’t forget you can order your Stampin’ Up products from me 24-7 from this link:  http://michellezindorf.stampinup.net or e-mail me at mzindorf@aim.com if you are within the United States.  Also, please consider being part of my Stampin’ Up Team.  We have valuable monthly meetings in Miamisburg, Ohio.

dsc08513.JPG

Stamped Floral image by first loading the stamp with Versamark and then colored colored the flowers with a Real Red Marker and the leaves and branch with a Basic Black marker an then huffed on it and stamped it on a 3.5″ x 5.5″ piece of Whisper White card stock.

dsc08488.JPG

Heat embossed the image using clear embossing powder and a heat gun.

dsc08489.JPG

Now that my image is heat embossed it will resist ink put over it. 

Brayered Creamy Caramel ink at an angle on the card stock.

dsc08490.JPG

Cut a circle from with my Curvy Cutter out of a scrap piece of card stock. 

dsc08491.JPG

Used the Negative piece as a mask and sponged on Riding Hood Red ink inside the masked area.

dsc08492.JPG

dsc08493.JPG

Brayered Riding Hood Ink at an angle on the card stock.

dsc08494.JPG

Stamped Side “A” of the Marble Texture Cube using Riding Hood Red Ink.

dsc08496.JPG

Stamped side “C” of the Marble Texture Cube using Close to Cocoa Ink.

dsc08497.JPG

Sponged Close to Cocoa ink on the right side of the card stock.

dsc08498.JPG

Used the cut out circle and put it over the sponged circle on the card stock and then traced around it with a Gold Gel Pen.

dsc08499.JPG

Used a Larger Negative Circle and traced around it to create the second gold circle.

dsc08500.JPG

Used a Gold Sharpie Paint Marker and went around the outside edge of the card stock.

dsc08501.JPG

Used a Big Shot Texture Plate on a Riding Hood Red panel and then Brayered Riding Hood Ink on it to bring out the design more on the card stock.

dsc08503.JPG

dsc08504.JPG

Extended the branch to go over to the edge of the main image panel.  Also used a white gel pen to make the dots on the flowers more predominate.

dsc08505.JPG

Sponged Basic Black ink around the edge of the Riding Hood Red panel.

dsc08506.JPG

Assembled the card and here it is finished measuring 5″ x 6.5″.

dsc08512.JPG

May your Saturday be super fun!  I am off to play. 🙂

Until my next post. . . . . . . . . . . . .

Hugs,

Michelle

Get ready for Brayer Workshops!  I am coming to:

3-small.jpg

Fort Smith, Arkansas

Dayton, Ohio

Savannah, Georgia

Covington, Indiana

Buffalo, Minnesota

Webster, New York

New Johnsonville, Tennessee

Stoughton, Wisconsin

Castro Valley, California

Yardley, Pennsylvania (near Philadelphia)

Knox, Maine

Broomfield, Colorado

Lynchburg, Virginia

Columbia, Missouri

Portland, Michigan

Here is a link to my workshop calendar where you can see all of my travel schedule and to get info on beginner and advanced Brayer workshops:  http://zindorf.blogs.splitcoaststampers.com/workshop-calendar

Link to my Stampin’ Up website were you can order all of your must have Stampin’ Up products from me 24-7:  http://michellezindorf.stampinup.net

Here is a link to all of my tutorials:  http://zindorf.blogs.splitcoaststampers.com/tutorials-ive-written/

Frequently asked questions answers:  http://zindorf.blogs.splitcoaststampers.com/frequently-asked-questions/

31 thoughts on “Red Moon Floral – Tutorial #198

  1. Gidget-Trish's avatar Gidget-Trish

    Very attractive and dramatic with the red and gold and black. Yes it definitely has an Oriental feel to it. I love what you did with the circles. Wow! Happy Easter to you and yours. 🙂
    Trish

    Like

  2. MSBetsyZ's avatar MSBetsyZ

    Oh, my….color me officially “wowed”! This is gorgeous, Michelle! I have now been completely pushed over to needing the circle cutter, lol…

    Like

  3. Phyllis Johnson's avatar Phyllis Johnson

    Absolutely gorgeous Michelle. Do you happen to know the kit # for that texture plate you used. I have looked all over and can’t seem to lay my hands on that one.
    Thanks for all your hard work posting these wonderful tutorials.
    Phyllis

    Like

  4. Michelle! I’ve been thinking about coloring over VersaMark with markers!! I have lots and lots of solid stamps – I really like the technique of blending on them. I’ve thought about trying it with your brayer embossing technique but had done done it yet. Thank you for this tutorial! I’m gonna try!!

    Take care and STAY POSITIVE!

    Like

  5. Ad K.'s avatar Ad K.

    You should do red more often, if you can make it look this good! Another great card. Have a wonderful weekend and Happy Easter to you and yours.

    Like

  6. Phyllis's avatar Phyllis

    Awe MAN OH MAN this is a beauty!!!! I’m so glad you used the Cube. I went out and got one some time ago and then didn’t use it again since I finished that one project. Red and Close to Coco!!! I would never have thought to put those two together for the marbling and I love the effect. Michelle you’re a genious!!!! I don’t have all the colors or a die cutter but I think I can “fake” it. Thank you for doing these outstanding tutorials! Happy Easter to you and yours.

    Like

  7. Stunning card Michelle! I don’t use red very often either. It always reminds me of Valentines or Christmas. This card, however, does not remind me of those things. Very elegant and peaceful. Thanks for sharing the tutorial with us!

    Like

  8. Patty Stabile's avatar Patty Stabile

    Michelle…I didn’t see this until Easter evening. What a beautiful, peaceful card. We are all blessed to have you sharing your artistic abilities. Thank you…
    Have a blessed Easter…Patty

    Like

  9. Karen's avatar Karen

    Lovely card Michelle.
    This one really inspired me to have a go, and I managed to produce 3 lovely cards which I am very proud of. I will be enjoying another brayer/sponging session today, expanding on yesterday’s playtime.
    thank you for your inspiration….. Karen

    Like

  10. Evelyn----Ks.stamper's avatar Evelyn----Ks.stamper

    Wow this is so dramatic I really like it a lot, and the colors blew me away. Yes Michelle as some one just said you are a genius. TFS
    Evelynn

    Like

  11. Michelle … this card is simply stunning! I love it and want to try it … I have that stamp set and can’t wait to use it! However, my samples never come out as nice as yours! hehehe!

    Like

  12. Pixie's avatar Pixie

    This is an awesome tutorial! Was just surfing and came across it, to my surprise, by YOU! I’m hoping you will demo this technique when you are in Buffalo. TFS, Pixie

    Like

  13. Katy's avatar Katy

    I love the red! Please use more of it, even though you say you don’t usually like doing so. This is a winner among winners. Love the dramatic feel of it that just seems to jump off the card.

    Like

Leave a reply to Steph Cancel reply