Lounging in the yard last night gave me the inspiration to create a butterfly card. I actually stayed up late last night, midnight to be exact, stamping this. If you know me, you know that is way, way, way out of character for me. I am an early to bed, early to rise person, so that must have been some inspirational force to make me stay up late. I’m such a party animal, lol.
This tutorial is an example of what can be achieved with two layers of card stock. 🙂 I know that 15 layers is the current fad, but it is nice not to have such a heavy card to mail, now and again.


But before we get started I have some blog candy to award in the “Name that Bird” contest. The bird now has a name. It was extremely hard to pick one from all of the entries. First, I made the long list. Then I created the short list. Then I actually had to pick a name and the winner is out of 398 entries.
Drum-roll, please. . . . . . . . .. . .. . . . . . . . . . .. . .. .
Linda who wrote “Obviously, his/her color jumps right out off the page…The shade of blue reminds me of the Carribean…which leads to Buffet and Marley Music…which makes me think “Marley” would be an awesome name! Parrothead might not work, huh!? LOL Of course an Aqua Cosmo if one of my favorite drinks, so “Cosmo” might work too! HA”
Linda, I have named my bird Marley! I love the Buffet tye in. 🙂 Linda, please e-mail your address to mzindorf@aim.com and I will pop these two stamp sets in the mail to you.
Thank you to everyone that played along. You really came up with some fun and interesting names. Here is my short list from your entries, Sunny, Turq, Mojo, Muse, Ranger, Elvis, Percy, Picasso, Peetry, Sinbad, Clyde, Merlin, Skyler, Art, Brazee, Stampson, Bubo, Rudy & Bosco.
Now on with today’s tutorial 🙂
Supplies:
| Stamps: Stampin’ Up Retired set “Wonderful Wings”, Stampendous Marble Texture Cube |
| Paper: Stampin’ Up Whisper White & Basic Black |
| Ink: Stampin’ Up So Saffron, Pumpkin Pie, Close to Cocoa, Really Rust, More Mustard & Basic Black |
| Accessories: Versamark Pad and Marker, Stampin’ Up Markers, Sharpie Metallic Gold Paint Marker, Sponges |
Are you inspired by this Blog? One way you can help support this blog is by ordering your Stampin’ Up products through me. You can order from me 24-7 from this link: http://michellezindorf.stampinup.net or e-mail me at mzindorf@aim.com if you are within the United States. Want a copy of the current mini catalog, just e-mail me your address and I will pop one in the mail to you. Want to become a Stampin’ Up Demonstrator and earn instant income? Consider being part of my Stampin’ Up Team.

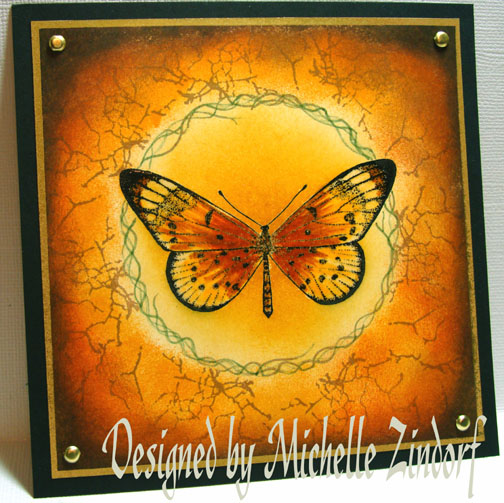
On a 4 7/8″ piece of Whisper White card stock, stamped the butterfly by first loading my stamp with Versamark and then Basic Black ink before stamping it in the center of the card stock.
Sorry folks, this Stampin’ Up set is retired and is no longer available, but you can you use any butterfly you have in your stamp collection for this project.

Heat embossed the butterfly using clear embossing powder and a heat gun.

Colored the Butterfly in with a Stampin’ Up Apricot Appeal Marker.

Added some More Mustard marker to the butterfly.

Added Pumpkin Pie marker to the center of the butterfly’s wings.

Colored over the butterfly with a Versamark marker and then heat embossed the image using clear embossing powder and a heat gun.


Now I keep a pile of old circular mask. This piece of card stock has a 3 1/8″ circle cut out of it.
I placed this over the butterfly image and then drew squiggly lines around the inside of the mask with an Always Artichoke marker.

Removed the mask and sponged So Saffron ink on the card stock in a pouncing motion.

Sponged More Mustard ink on the card stock in a pouncing motion.

Sponged Pumpkin Pie ink on the card stock using a pouncing motion.

Sponged Really Rust ink on in a circular motion.

Stamped side “C” of my Stampendous Marble Texture Cube using Close to Cocoa ink repeatedly until I achieved the look I wanted.

Sponged Close to Cocoa ink on the card stock using a circular motion.

Sponged Basic Black ink around the edge of the card stock using a circular motion.

Sponged More Mustard ink on the inside of the circle using a circular motion and leaving a light ring around it.

Outlined my card stock using a Metallic Gold Sharpie Paint marker, by holding the marker half on the card stock and half off the card stock and pulling straight down. Repeat this for each side of the card stock.

Added my Basic Black panel and some gold brads in the middle. Here it is my two layer card measuring 5.25″ square.
May your day be filled with the wonderful sight of Flutterbys.
Until my next post. . . . . . . . . . . . . . . . .
Huge Hugs,
Michelle
 Get ready for Brayer Workshops! I am coming to:
Dayton, Ohio
Webster, New York
New Johnsonville, Tennessee
Stoughton, Wisconsin
Columbia, Missouri
Lynchburg, Virginia
Greenwood, Indiana
Castro Valley, California
Yardley, Pennsylvania (near Philadelphia)
Knox, Maine
Broomfield, Colorado
Moore, Oklahoma
Nashville, Indiana
Portland, Michigan
2010
Phoenix, Arizona
Monroe, Louisiana
Jacksonville, Florida
Mechanicsville, Virginia
Raleigh, North Carolina
Colleyville, Texas
Colorado Springs, Colorado
Salem, Oregon
Here is a link to my workshop calendar where you can see all of my travel schedule and to get info on beginner and advanced Brayer workshops: http://zindorf.blogs.splitcoaststampers.com/workshop-calendar
Link to my Stampin’ Up website were you can order all of your must have Stampin’ Up products from me 24-7: http://michellezindorf.stampinup.net
Frequently asked questions answers: http://zindorf.blogs.splitcoaststampers.com/frequently-asked-questions/

33 thoughts on “Butterfly Season – Tutorial #227”