Fall Lake – Tutorial #279

dsc01490.JPG

I noticed last Monday when I was driving to Ohio from Oklahoma that most of the leaves were off of the trees but the grass was still green in a lot of areas.   This tutorial is my interpretation of what I saw. 

Tomorrow morning I will be traveling to Nashville, Indiana to teach my brayer technique there.  Driving from location to location is so very inspiring.  I cannot wait to hit the road once again!

The Stampin’ Up Set, Branch Out is on the dormant list with Stampin’ Up! so it can still be ordered although it is not in the current catalog, item #113200. 

This is one of my longer tutorials so grab a cup of your favorite warm drink and hang out a while.

Supplies:

Stamps: Stampin’ Up Branch Out, En Francais, Falling Leaves Sentiment
Paper: Stampin’ Up! Whisper White & Basic Black
Ink: Stampin’ Up! Basic Black, Old Olive, Apricot Appeal, Bashful Blue, Creamy Caramel, Going Gray & Chocolate Chip
Accessories: Stampin’ Up! Chocolate Chip Ribbon, Bashful Blue Brads, White Gel Pen, Stamp-a-ma-jig, piercing tool & Sponges

Want a free 39 page, Stampin’ Up Mini catalog?  If you are a resident of the United States,  just e-mail your mailing address to me and I will get one in the mail to you.  Are you inspired by this Blog?  One way you can help support this blog is by ordering your Stampin’ Up products through me.   You can order from me 24-7 from this link:  http://michellezindorf.stampinup.net or e-mail me at mzindorf@aim.com.  If you are within the United States.  Want a copy of the brand new 2009-2010 Stampin’ Up Catalog for $9.95 with free shipping, just e-mail me at mzindorf@aim.com and I will get one in the mail to you.  Want to become a Stampin’ Up Demonstrator and earn instant income?  Consider being part of my Stampin’ Up Team.  Also check out the Stampin’ Up specials, click this link to check it out:  http://www.stampinup.net/esuite/home/michellezindorf/promotions

dsc01493.JPG

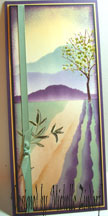
I wanted to do a large main image panel for this card.  Started out with a 4.75″ x 6.26″ piece of Whisper White card stock.  Masked over 1/2 of the card stock at the bottom with two large post it notes.

dsc01461.JPG

Brayered Apricot Appeal ink at the bottom of the unmasked area.

dsc01462.JPG

Brayered Bashful Blue at the top of the card stock.

dsc01463.JPG

Brayered Going Gray ink at the top of the card stock, not covering the Bashful Blue ink entirely.    I think I have found another great winter sky color combo.  🙂

dsc01464.JPG

Using the edge of the Old Olive ink pad, streaked in some color at the bottom of the unmasked area.

dsc01465.JPG

Sponged some Chocolate Chip ink over the Old Olive, not covering it entirely.

dsc01466.JPG

Moved the post it note mask down 1/2 inch.

dsc01467.JPG

Streaked in some Old Olive ink in the white unmasked area with the edge of the Old Olive ink pad.

dsc01468.JPG

Sponged some Chocolate Chip ink at the bottom of the unmasked area.

dsc01469.JPG

Sponged some Basic Black ink right at the post it note edge.

dsc01470.JPG

Stamped the tree from the Stampin’ Up Branch Out set across the card stock using Basic Black ink.

dsc01472.JPG

Took the inky post it notes off of the card stock.  Turned the card stock upside down and masked the sky area of the card stock with two clean post it notes.

dsc01473.JPG

Brayered Apricot Appeal ink on the card stock.

dsc01474.JPG

Brayered Bashful Blue ink on the card stock.

dsc01475.JPG

Brayered Going Gray ink over the Bashful Blue ink, not covering it entirely.

dsc01476.JPG

Lightly sponged a bit of Old Olive ink over the Apricot Appeal ink.

dsc01477.JPG

Sponged on a little Chocolate Chip ink at the post it note edge.

dsc01478.JPG

Marked on the side of my wood block with a marker to indicate where the trunk of the tree is so when I stamp it I can line up the reflection tree trunk with the Original stamped images trunk.

dsc01479.JPG

Used the clear plastic sheet that came with my Stamp-a-ma-jig to mask the top of the card stock so I can still see the original stamped trees.

dsc01480.JPG

Stamped the reflection trees using Going Gray ink and lining the tree trunks up with the original trees that are stamped with Basic Black.

dsc01481.JPG

Added White Gel pen streaks in the water area.

dsc01482.JPG

Sponged Basic Black ink around the edge of the card stock.

dsc01483.JPG

Stamped the Stampin’ Up Background stamp, En Francais using Creamy Caramel ink on the left third of the card stock.

dsc01484.JPG

Stamped the “Grateful” sentiment from the Stampin’ Up set Falling Leaves using Chocolate Chip ink.

dsc01485.JPG

Added Chocolate Chip Ribbon and Bashful Blue brads.

dsc01486.JPG

Finished assembling card.  Here it is finished measuring 5″ x 6.5″.

dsc01490.JPG

I hope this tutorial has inspired you to look at what surrounds you so you can put it on paper.  🙂

Until my next post. . . . . . . . .

Huge Hugs,

Michelle

dsc01434.jpg  Get ready for Brayer Workshops!  I am coming to:

Nashville, Indiana

Portland, Michigan

2010

Dayton, Ohio at Marco Paper

Phoenix, Arizona

Monroe, Louisiana

Jacksonville, Florida

 St. Louis, Missouri

Mechanicsville, Virginia

Raleigh, North Carolina 

Colleyville, Texas

Colorado Springs, Colorado

 Boise area of Meridian, Idaho

Riverside, California (Southern California)

Salem, Oregon

Wheaton, Illinois

St. Cloud, Minnesota

Rockville, Maryland

North Chili, New York (near Rochester)

New Johnsonville, Tennessee

Kenova, West Virginia

Helena, Montana

Middleburg Heights, Ohio

Venice, Florida

Grinnell, Iowa

Piedmont, Alabama

Auburn, Washington (near Seattle)

Elk Grove Village, Illinois

Atlanta, Georgia

Soledad, California

Here is a link to my workshop calendar where you can see all of my travel schedule and to get info on beginner and advanced Brayer workshops:   http://zindorf.blogs.splitcoaststampers.com/workshop-calendar 

Link to my Stampin’ Up website where you can order all of your must have Stampin’ Up products from me 24-7:  http://michellezindorf.stampinup.net

Frequently asked questions answers:  http://zindorf.blogs.splitcoaststampers.com/frequently-asked-questions/ 

93 thoughts on “Fall Lake – Tutorial #279

  1. Evelyn Runge's avatar Evelyn Runge

    Absolutely gorgeous! You are amazing! I don’t know how you do it (traveling, stamping, writing tutorials). I wish I had half your talent and ability!

    Looking forward to Mechanicsville, VA in 2010

    Like

  2. Darlene's avatar Darlene

    Michelle, this is one of those pieces that just took my breath away. It popped up on my comptuer screen and all I could think of was “Oh wow, now that is gorgeous!”
    Thank you for another wonderful tutorial – you make me think I could even try it.

    Like

  3. Karen's avatar Karen

    Michelle, this is absolutely breath-taking. I LOVE how you simply “streaked” in the background trees. And using the clear plastic from the Stamp-A-Ma-Jig, how clever.
    I must, must try this one. It’s simply stunning. Thank you for your inspiration!
    Karen from Michigan.

    Like

  4. Oh my goodness, this one is just amazing!!! I say that about all of your tutorials but this one definitely takes the cake!

    I saw that you’ll be on the road to Nashville, IL this week-end and that got me all excited because it was the one seminar closest to me and I had thought about attending until you clued me in about the STL seminar in late Feb. so I am now beginning to get psyched up for that and looking forward to learning a little more about brayering with some practical tips and tricks from such an awesome pro! I am so thrilled that you were able to work out a deal with the powers that be to stay a demo….you are truly a talented artist! I can’t believe they haven’t had you on stage doing a WS wow…what are they thinking???

    Jan Hoyt

    Like

  5. This is one of your best Michelle – absolutely breathtaking! It almost looks like a photograph. And what a fantastic idea to use the plastic sheet from the stamp-a-ma-jig!

    Angela

    Like

  6. Octavia's avatar Octavia

    This card is simply fabulous!

    I so badly want to get to one of your workshops in the near future…my brayer has been collecting dust:)

    I sure do miss being in Ohio…I did get to pop into Marco’s Paper when I was making a trip from Virginia to Illinois…but it was a bummer knowing I had to leave again…oh well!

    Like

  7. Tracy's avatar Tracy

    Well, I’m happy to annouce that this is my favorite card that you have ever made. Just stunning! I just attended one of your workshops in Colorado and I “know” I won’t be able to recreate this masterpiece Ü It is just beautiful, Michelle. Could you make one on a piece of canvas that’s approximately 5′ x 20′ for over my fireplace? Oh, fantastic!

    Like

  8. Pauline's avatar Pauline

    This card is absolutely stunning! The colours capture Autumn just right.

    I’d love to be able to attend one of your workshops. But living on the other side of the big pond ie in England, UK reading your tutorials will have to do. 🙂

    Hugs, Pauline

    Like

  9. Jillian's avatar Jillian

    Gosh – $279 seems a bit steep for a tutorial .. 😉
    just kidding lol

    I lvoe this card – you do such a great job in making them, let alone making the tutorial and inspiring people.

    Like

  10. Karli's avatar Karli

    This card should be framed and displayed in an art gallery or museum– next to the Mona Lisa! Just absolutely incredibly amazingly STUNNING!!!! I can’t wait to take your brayering classes when you come to California 🙂

    Like

  11. Your cards are gorgeous, something I’d like to put in a frame, not send away! thanks for the tutorials, they are great and very detailed. I’ve become addicted to sponging on nearly every project I do for my card club ladies. They are getting used to leaving with stained hands. I’m still not up on the brayering, it’s so frustrating that I admit I’ve given up the idea of making it work, but with this card I’m inspired to give it a go one more time. Any tips for the brayer challenged? The lines!

    Like

  12. Shanti's avatar Shanti

    Michelle, this has to be one of the most awesome card you have done. Its certainly a work of art. If it was mine, I would have to frame it up for my wall! Absolutely stunning creation. Thanks for this amazing tutorial.

    Like

  13. Pingback: My Blog Picks and Posts from Here and There Around the Web #16 « Rogue Thoughts…Jean's Stamping Studio in the Rogue Valley

  14. Helen V's avatar Helen V

    Your tutorials are always a must see in my book. And on this one you’ve outdone yourself — the tutorial is very clear and the scene is absolutely spectacular. I so appreciate how you share your creativity and your zest with all of us — thank you!

    Like

  15. Wow! You have made me a follower of your blog. I love creating sunsets and different skies and will learn so very much from you. Should you ever get to Ketchikan, Alaska, with your brayer workshop, I will definitely make the 3 hour ferry ride and take a day or two off from work top come. 🙂 This card is absolutely stunning! I like your idea of marking the bottom of a stamp on the side of its block. Thanks so much!
    Sue

    Like

  16. Kim's avatar Kim

    Absolutely AMAZING!!! I’ve never been a big fan of brayering as it seems to take much more work than I like to do (I’d rather spend that time watercoloring!!) but this card is something I’m going to try. Now I’m off to look at more of your beautiful creations…hopefully I’ll be inspired some more!! Thanks for sharing and thanks for the tutorial!!

    Like

  17. Karen in MN's avatar Karen in MN

    HOLY MOLY!!!!!!!!!!!!!!!!! This is simply beautiful…I’ve watercolor painted and this soooooo resembles that…I have got to take your class coming to St Cloud…hope to see and learn from you soon…

    Like

  18. Pingback: Reflection « Stamping Down Under

  19. Carmel Apis-Yee's avatar Carmel Apis-Yee

    HI Michelle you so inspired me to make this for my Mom. Although I used a spiritual stamp it is the most beautiful things I’ve every made. With your technique it’s amazing that a novice like me could do something like this. I don’t have a blog right now but I will post on STampin up! just so demos can see the artwork you have helped others create.
    Thank you so much for sharing. I made a composition book for my mother so she can write her thoughts an prayers.

    Like

Leave a reply to Susan S. Cancel reply