
I’m back for the second time today. This time I have a tutorial for you.
Let’s get right into it. . . .
Supplies:
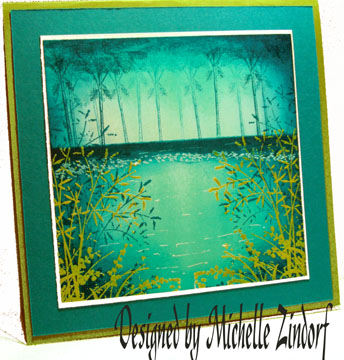
| Stamps: Stampin’ Up! Asian Artistry |
| Paper: Stampin’ Up! Whisper White, Brilliant Blue and Apricot Appeal |
| Ink: Stampin’ Up! Dusty Durango, Apricot Appeal, Brilliant Blue, Old Olive, Creamy Caramel, Chocolate Chip and Bashful Blue |
| Accessories: Stampin’ Up Markers – Certainly Celery, Brilliant Blue and Basic Black, White Gel Pen, Whisper White Ribbon, Brayer, Glass Pad, X-acto knife and sponges |
Live in the USA and need a copy of the Summer Mini Catalog? E-mail your mailing address to mzindorf@aim.com and I will get one in the mail to you. ![]() Are you getting inspiration from this blog? One way you can help support it is to order your Stampin’ Up products through me. Click HERE to place an order. Want to become a Stampin’ Up Demonstrator , receive a 20% discount on product and earn instant income on orders? Consider being part of my Stampin’ Up Team and start your own business. Click HERE for more information.
Are you getting inspiration from this blog? One way you can help support it is to order your Stampin’ Up products through me. Click HERE to place an order. Want to become a Stampin’ Up Demonstrator , receive a 20% discount on product and earn instant income on orders? Consider being part of my Stampin’ Up Team and start your own business. Click HERE for more information.

Brayered Apricot Appeal ink on a 4″ x 4.5″ piece of Whisper White card stock.

Brayered Dusty Durango ink at the top of the card stock, not covering the Apricot Appeal ink completely.

Using a Stampin’ Up glass mat and X-acto knife, cut a scrap piece of card stock. Keep both pieces.

Masked the bottom of the card stock using one of the cut pieces. I am holding this mask in place with my hand and sponging Creamy Caramel ink on .

Added Chocolate Chip ink right at the masks edge.

Took the bottom mask off and put the top mask on.

Sponged Bashful Blue ink in the unmasked area.

Sponged Brilliant Blue ink at the masks edge.

Added a few lines of Brilliant Blue marker around the curves.

Stamped the plant and dragonfly with Old Olive ink.


Added some Brilliant Blue marker lines in the water at the base of the plants.

Colored in the flowers with a Brilliant Blue marker.

Added Certainly Celery marker tothe middle of the dragonfly. Also darkened his legs and eyes with a Basic Black marker.

Added Basic Black marker shadows to the undersides of the leaves and highlights to the tops of them using a White Gel Pen. Also added White Gel Pen water lines and colored in the dragonfly’s wings.

Sponged around the edges of the card stock using Brilliant Blue ink.

Cut a 5.25″ square piece of Apricot Appeal card stock and brayered Dusty Durango ink at the top of it.

Cut a section of the side of a Top Note Die cut.
Assembled card and added Whisper White Ribbon. Here it is finished measuring 5.5″.
May your day be one of peace and harmony.
Until my next post. . . . . . .
Hugs,
Michelle
 Get ready for Brayer Workshops! I am coming to:
St. Cloud, Minnesota (1 spot available)
North Chili, New York (near Rochester)
Kenova (Huntington), West Virginia
Middleburg Heights, Ohio (Sold Out)
Piedmont, Alabama (Near GA border close to Cedartown)
Auburn, Washington (near Seattle)
Here is a link to my workshop calendar where you can see all of my travel schedule and to get info on beginner and advanced Brayer workshops: http://zindorf.blogs.splitcoaststampers.com/workshop-calendar
Link to my Stampin’ Up website where you can order all of your must have Stampin’ Up products from me 24-7: http://michellezindorf.stampinup.net
Frequently asked questions answers: http://zindorf.blogs.splitcoaststampers.com/frequently-asked-questions/

24 thoughts on “A Day at the Pond – Tutorial #334”