Hey All,
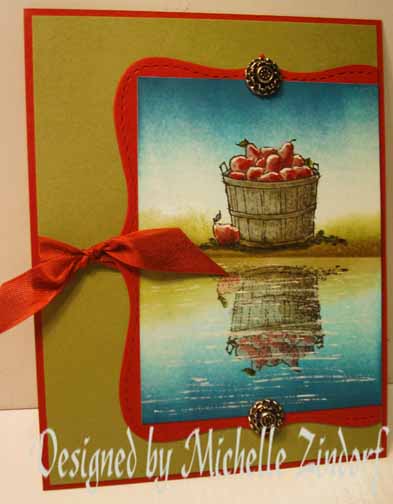
Here is a little reflection number for you using a stamp from the up and coming Stampin’ Up! Holiday Mini Catalog that will be in effect September 1, 2011. I created this card for my Stampin’ Up’s Down Line Technique Swap. The technique for this month was reflections. Hope you like this little sneak peak.
After quite a few requests, I have decided to share my recipes from the canning of salsa, bread, muffins and cookies I made the other day using my veggies from my garden. I will put them at the end of this post. Enjoy!
Let’s get started. . . . .
Supplies:
| Stamps: Stampin’ Up! Always Thankful |
| Paper: Stampin’ Up! Whisper White, Cherry Cobbler and Old Olive |
| Ink: Stampin’ Up! Basic Black, Soft Suede, Old Olive, Tempting Turquoise and Not Quite Navy |
| Accessories: Stampin’ Up Markers (Sahara Sand, River Rock, Pink Pirquette, Rose Red, Regal Rose, Old Olive), White Gel Pen, Brayer, Sponges, Top Note Die, Big Shot Machine, Cherry Cobbler Seam Binding, Antique Brads |
| Techniques: Brayering, Reverse image |
Get your copy of the new 2011-2012 Stampin’ Up! Idea Book & Catalog by sending $9.95 to me at P.O. box 116, West Alexandria, Ohio 45381 or via paypal to mzindorf@aim.com, shipping is free. Want a free copy of the new Summer Mini Catalog ? E-mail your mailing address to mzindorf@aim.com and I will get one in the mail to you. ![]() Are you getting inspiration from this blog? One way you can help support it is to order your Stampin’ Up products through me. Click HERE to place an order. Want to become a Stampin’ Up Demonstrator , receive a 20% discount on product and earn instant income on orders? Consider being part of my Stampin’ Up Team and start your own business or become a Hobby Demo just for the discount. Click HERE for more information.
Are you getting inspiration from this blog? One way you can help support it is to order your Stampin’ Up products through me. Click HERE to place an order. Want to become a Stampin’ Up Demonstrator , receive a 20% discount on product and earn instant income on orders? Consider being part of my Stampin’ Up Team and start your own business or become a Hobby Demo just for the discount. Click HERE for more information.
Brayered Tempting Turquoise at the top and bottom of a 3″ x 4″ piece of Whisper White card stock.


Brayered Not Quite Navy ink at the top and bottom of the card stock, not covering the Tempting Turquoise entirely.

Stamped the image from the soon to be released Stampin’ Up! set “Always Thankful” using Basic Black ink. Also created the reflection image by stamping the image with Basic Black ink on a Stamp-a-ma-jig plastic sheet and then flipping the sheet over and rubbing the back side of the plastic to transfer it onto the card stock.

Masked the bottom of the card stock and sponged Old Olive ink at the post it note edge creating the ground.

Flipped the post it note around so it mask the upper part of the card stock and sponge Old Olive at the post it note edge.

Removed the mask and colored the Baskets in with Sahara Sand marker. Colored the upper basket twice so it is darker in tone.

Colored the apples in using a Pink Pirquette Marker. Coloring the upper apples twice.

Added Regal Rose marker to the bottom apples and Rose Red to the upper apples.

Colored the shadowed side of the baskets using a River Rock marker. Colored over the upper basket shadow twice.

Added Old Olive marker to the ground under the upper basket and to the leaves of the upper basket.

Masked the bottom of the card stock again and added Soft Suede to the bottom of the ground area.

Moved the mask to mask the upper part of the card stock and added Soft Suede ink to the bottom of the reflection side.

Added White Gel pen highlights tot he upper apples and then created white gel pen highlights in the water.

Assembled the card, adding a Cherry Cobbler Top Note Die cut, Cherry Cobbler Ribbon, Antique brads, Old Olive panel and Cherry Cobbler panel.

Here is the finished card measuring 4.25″ x 5.5″.
Now for some recipes for the bread, cookies, muffins and salsa I made the other day. I froze loaves of bread, cookies and muffins. They defrost perfectly by setting out a little while.
Zucchini Cookies
Ingredients
- 1/2 cup margarine, softened
- 1 cup white sugar
- 1 egg
- 1 cup grated zucchini
- 2 cups all-purpose flour
- 1 teaspoon baking soda
- 1/2 teaspoon salt
- 1 teaspoon ground cinnamon
- 1/2 teaspoon ground cloves
- 1 cup raisins
Directions
- In a medium bowl, cream together the margarine and sugar until smooth. Beat in the egg then stir in the zucchini. Combine the flour, baking soda, salt and cinnamon; stir into the zucchini mixture. Mix in raisins. Cover dough and chill for at least 1 hour or overnight.
- Preheat oven to 375 degrees F (190 degrees C). Grease cookie sheets. Drop dough by teaspoonfuls onto the prepared cookie sheet. Cookies should be about 2 inches apart.
- Bake for 8 to 10 minutes in the preheated oven until set. Allow cookies to cool slightly on the cookie sheets before removing to wire racks to cool completely.
Zucchini Muffins (these muffins and dense, not cake like) only sweetened with honey, they are a healthier choice.
Ingredients
- 2 cups whole wheat flour
- 1 tablespoon baking powder
- 1/2 teaspoon salt
- 1 teaspoon ground cinnamon
- 3/4 cup nonfat milk
- 2 egg whites
- 1/4 cup vegetable oil
- 1/4 cup honey
- 1 cup grated zucchini
Directions
- Preheat oven to 375 degrees F (190 degrees C). Grease muffin tins lightly with oil or spray with a non-stick cooking spray.
- Combine whole wheat flour, baking powder, salt and ground cinnamon, mix thoroughly.
- Mix the milk, slightly beaten egg whites, oil, honey and shredded zucchini together. Pour into the dry ingredients and stir until just barely moistened. Batter should be lumpy. Fill muffin tins 2/3 full with batter.
- Bake at 375 degrees F (190 degrees C) for 20 minutes or until lightly browned.
Zucchini Pineapple Loaf
Ingredients
- 2 eggs
- 1/2 cup vegetable oil
- 1 cup white sugar
- 1 cup grated zucchini
- 1/2 cup crushed pineapple, drained
- 1 teaspoon vanilla extract
- 2 cups all-purpose flour
- 1 teaspoon baking soda
- 1/2 teaspoon baking powder
- 1/2 teaspoon salt
- 3/4 teaspoon ground cinnamon
- 1/4 teaspoon ground nutmeg
- 1/2 cup chopped walnuts
Directions
- Preheat oven to 350 degrees F (175 degrees C). Grease one 9x5x3 inch loaf pan.
- Beat eggs, oil, and sugar in a large bowl. Stir in zucchini, pineapple, and vanilla.
- In another bowl, measure and combine flour, soda, baking powder, salt, cinnamon, nutmeg, and nuts. Pour all at once into batter. Stir to moisten. Pour into greased loaf pan.
- Bake in 350 degree F (175 degree C) oven for 1 hour until bread tests done. Cool for 10 minutes. Turn loaf out of pan to cool on rack. Wrap. Cut in thin slices and spread with butter.
Zesty Salsa (from the Ball Blue Book Guide to Preserving)
Ingredients
10 cups chopped, seeded peeeled, cored tomatoes
5 cups chopped and seeded long green peppers
5 cups chopped onions
2 1/2 cups chopped and seeded hot peppers
3 cloves garlic
2 tablespoons cilantro, minced
3 teaspoons salt
1 1/4 cups cider vinegar
1 teaspoon hot pepper sauce
Combine all ingredients in a large saucepot, adding hot pepper sauce, if desired. Bring mixture to a boil. Reduce heat and simmer 10 minutes. Ladle hot salsa into hot jars, leaving 1/4 inch headspace. Adjust two-piece caps. Process 15 minutes in a boiling water canner.
May your day be filled with love.
Until my next post. . . . . . . .
Hugs,
Michelle
 Get ready for Brayer Workshops! I am coming to the following locations, click the location name for more information.
Jefferson, Louisiana (New Orleans Area)
Here is a link to my workshop calendar where you can see all of my travel schedule and to get info on beginner and advanced Brayer workshops, along with the newly added Direct to Paper Workshop: http://zindorf.blogs.splitcoaststampers.com/workshop-calendar
Don’t see a workshop in your State? Interested in hosting the workshops in your area Click HERE to get hostess information.
Link to my Stampin’ Up website where you can order all of your must have Stampin’ Up products from me 24-7: http://michellezindorf.stampinup.net

Pingback: Apple Basket Reflection – Tutorial #444