Oh Baby It’s Paradise – Tutorial #103

dsc05548.JPG

Summer is not over yet.  After having an unseasonably cool week here in Ohio last week, the heat was back over the weekend.  Bad thing is our pool water is freezing cold and will need to warm back up.  So yesterday was one I spent on the deck lounging, after washing the car, cleaning the house, washing two giant dogs.  Hmmmm, I guess I didn’t do that much lounging. . . . .

Here is a beach scene to warm you up. 

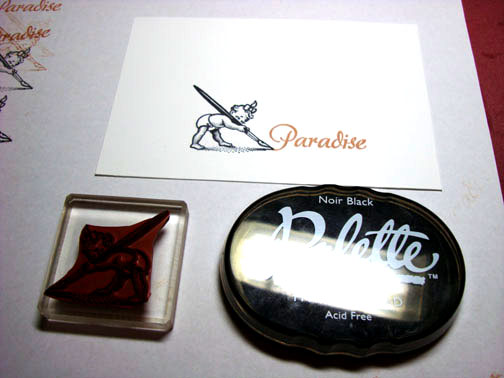
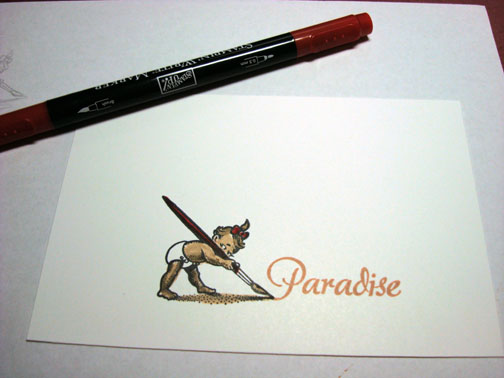
This cute little baby stamp is from http://www.mypapermoon.com    Isn’t she just adorable. 

Ready, let’s go to the beach.  🙂
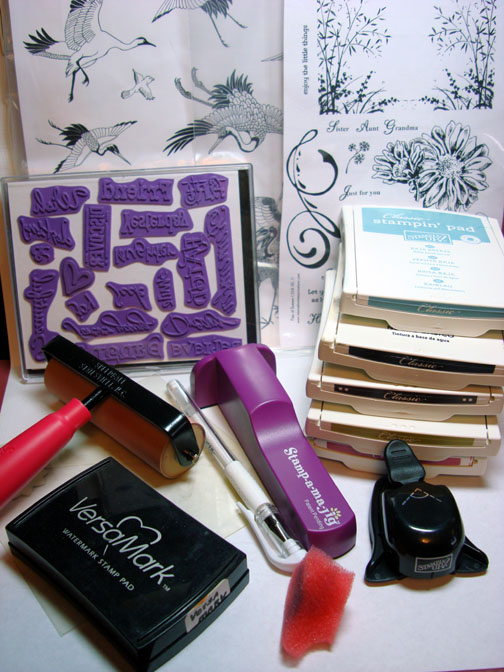
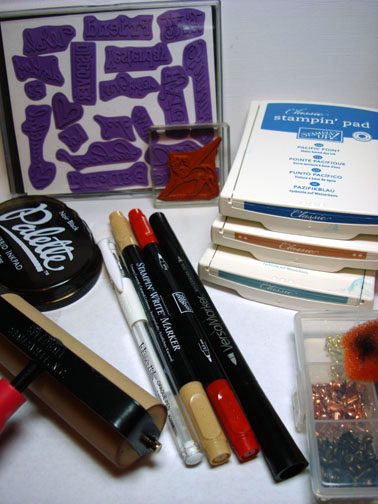
Supplies:

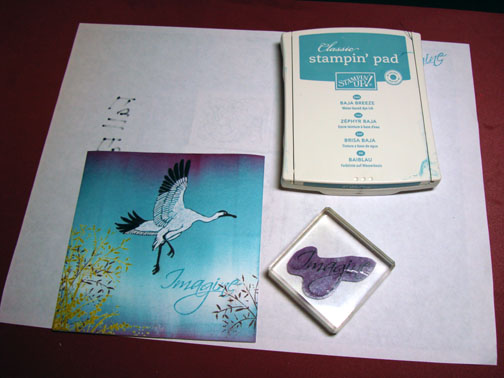
Stamps: mypapermoon.com “baby” & Inque Boutique “A word or Two”
Paper: Stampin’ Up Whisper White, Baja Breeze & Pacific Point
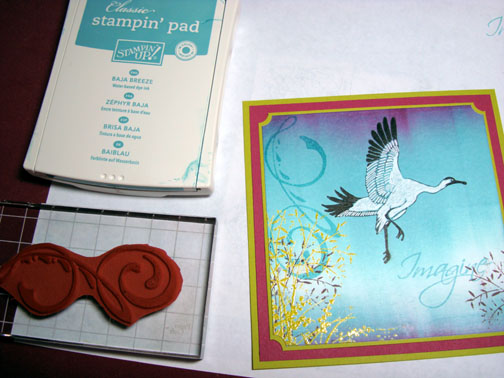
Ink: Stampin’ Up Creamy Caramel, Baja Breeze & Pacific Point, Palette Noir Black
Accessories: Real Red & Creamy Caramel markers, Silver Brads, White Gel Pen, Brayer, Fine Detail Clear embossing Powder, Heat Gun, Versamark marker, Stamp-a-ma-jig

dsc05551.JPG

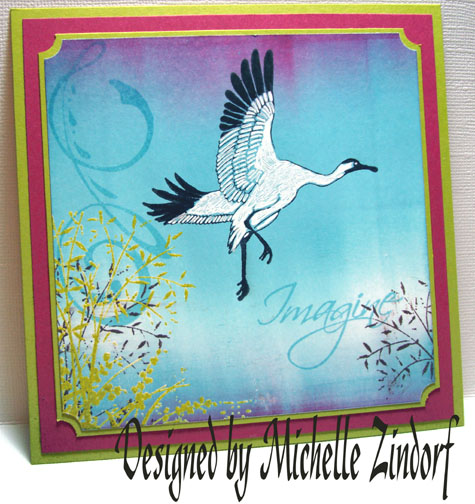
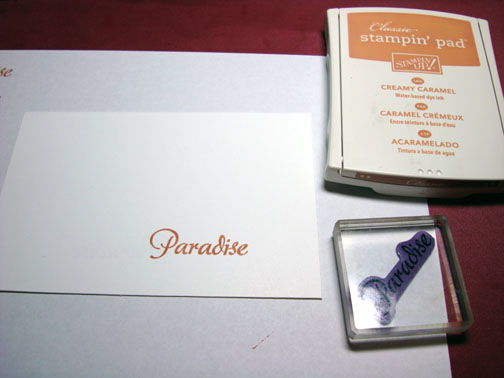
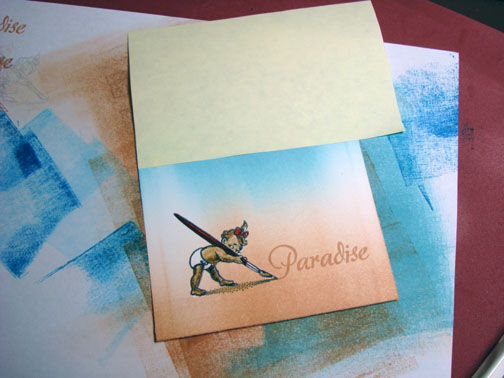
Stamped Sentiment with Creamy Caramel ink on Whisper White card stock.

dsc05533.JPG

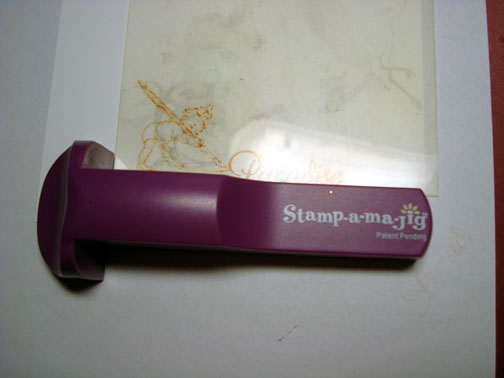
Using my Stamp-a-ma-jig for placement, stamped the baby with Palette Noir Black ink.

dsc05534.JPG

dsc05535.JPG

Colored the baby, baby’s shadow and paintbrush point with a Creamy Caramel marker.

dsc05536.JPG

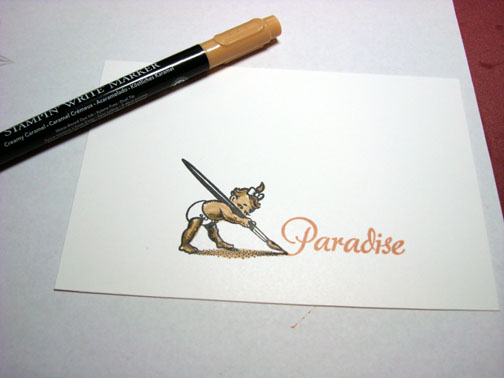
Colored the bow in her hair and the paint brush handle with a real red marker.

dsc05537.JPG

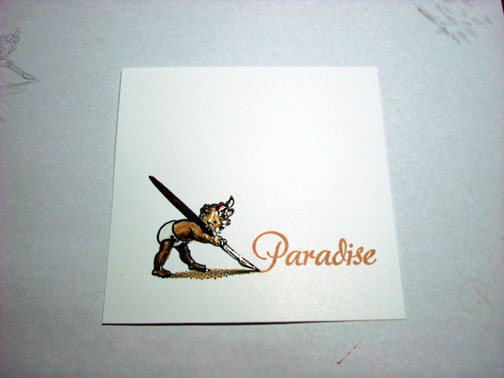
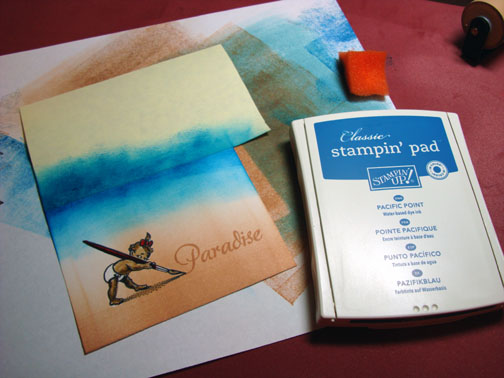
Missed taking a photo, oops!  Cropped the sides of my card stock.  It now measures 4″ x 4″.   Colored over the baby and the paint brush with a Versamark marker and heat embossed the image using fine detail clear embossing powder and a heat gun.  

dsc05538.JPG

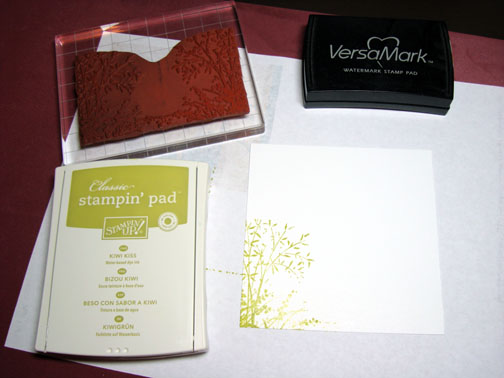
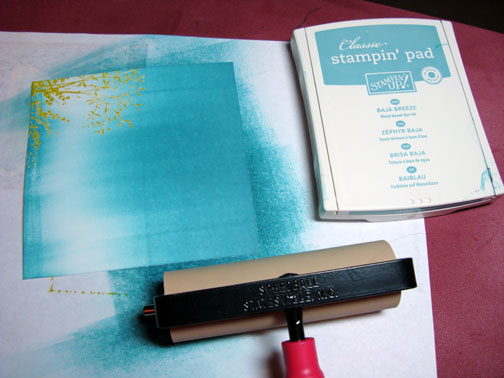
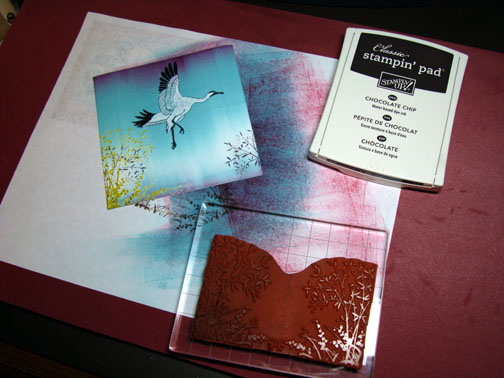
Brayered Baja Breeze ink on the top of the card stock.

Note:  I do have a new brayer.  It is a Speedball brayer just like my old one, but the handle looks different.  The roller is the same as my old one.  It says “Soft Rubber” on the package.   I can’t believe four of you readers commented on my last post about the new brayer, very observant!

dsc05539.JPG

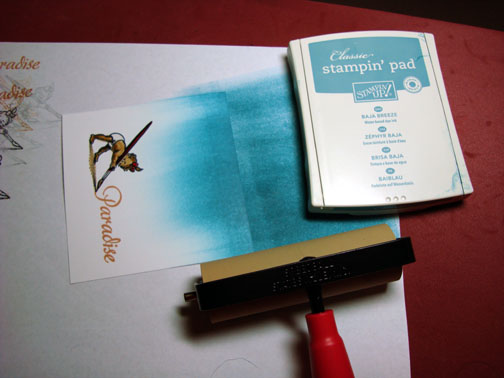
Brayered Creamy Caramel ink at the bottom of the card stock.

dsc05540.JPG

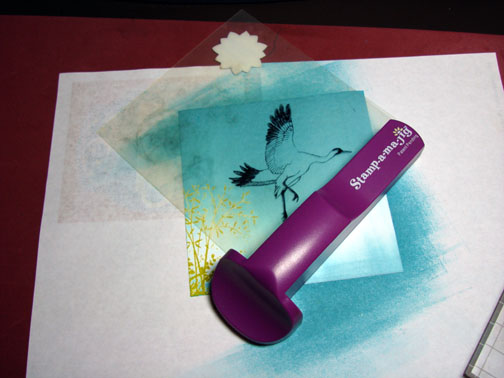
Masked the top 1/4th of the card stock with a post it note.

dsc05541.JPG

Sponged Pacific Point ink at the post it note edge.  Being darkest with the ink at the post it note edge and getting lighter toward the creamy caramel ink.

dsc05542.JPG

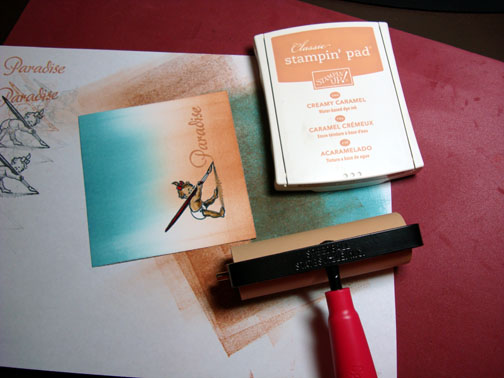
Removed the Post it note mask.

dsc05543.JPG

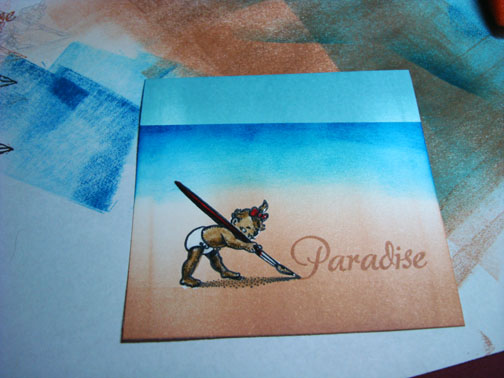
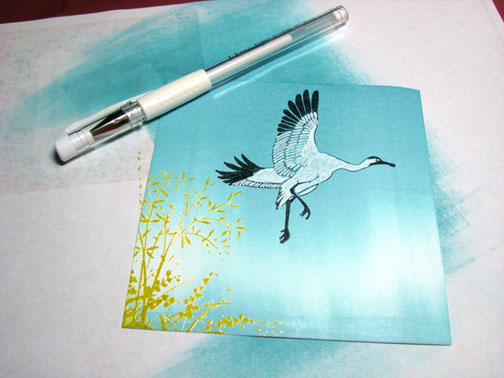
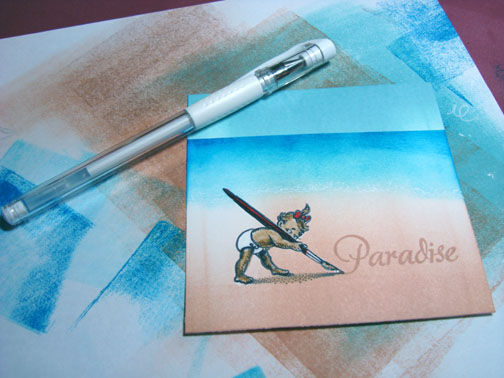
Made a whole lot of little dots with a white gel pen right were the blue ink meets the Creamy Carmel ink to create a look of foam at the waters edge.

dsc05544.JPG

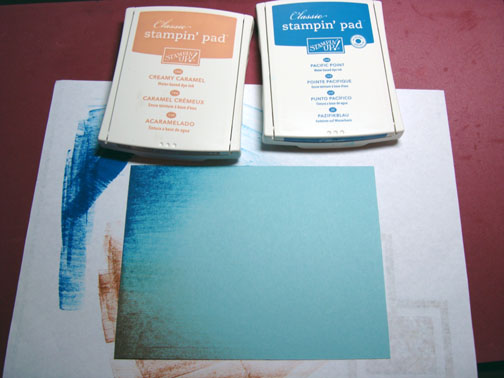
Used the direct to paper technique by smearing Creamy Caramel and Pacific Point ink pads directly on a panel of Baja Breeze.

dsc05545.JPG

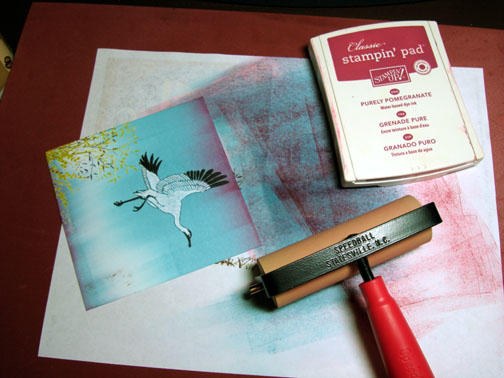
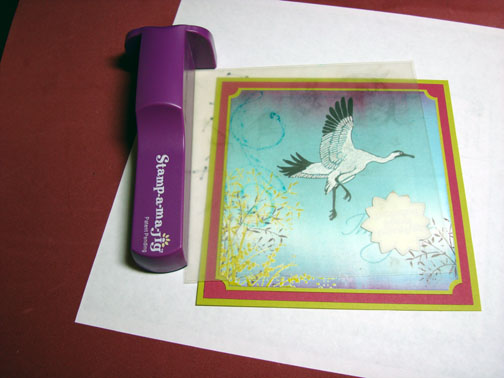
Assembled the card front and here it is measuring 5″ x 6.5″.

dsc05548.JPG

Hope your day is one of playing in the sand at the beach.

Until my next post. . . . . . . . . .

Hugs,

Michelle


Inspiration Imagine – Tutorial #102 and Blog Candy Winner

Happy Saturday!!!!!

dsc05504.JPG  One thing before I get going on today’s tutorial, we have a blog candy winner out of 137 comments, the random number generator selected  #26, LittleSeaOtter~Kecia , Who wrote “Oh, how I love this card. Makes me happy just looking at it.  Favorite thing about fall? That’s a no brainer…..Ohio State Football!!!”  Kecia, please e-mail your address to me at mzindorf@aim.com

 dsc05529.JPG

Alrighty then, about today’s piece.  Split Coast Stampers.com has a great challenge on Saturday mornings. It is the inspiration challenge and I love it.  I use inspiration pieces all the time to come up with my creations.  For example today’s inspiration piece is this swimwear.  I took the color palette and swirl from the inspiration piece.  Those are the elements from the swimwear that most inspire me.  I didn’t feel the need to work in any paisley, or try to duplicate the pattern exactly  🙂 

athleta2.jpg

Let’s get started.

Supplies:

Stamps:Innovative Stamp Creations “Flair of Summer”, Cape Arago “Bird”, Inque Boutique “A Word or Two”
Paper: Stampin’ Up Whisper White, Kiwi Kiss, Purely Pomegranate
Ink: Stampin’ Up Kiwi Kiss, Purely Pomegranate, Baja Breeze, Basic Black & Chocolate Chip
Accessories:Versamark Pad, Clear embossing Powder, Heat Gun, Stamp-a-ma-jig, Brayer, Ticket Corner Punch, White Gel Pen

dsc05532.JPG

Stamped half of the plant image on a piece of Whisper White card stock by first loading my stamp with Versamark and then Kiwi Kiss ink before stamping.   Note I only put the Versamark and the ink on the part of the image I wanted to stamp.   I then heat embossed the image using fine detail clear embossing powder and a heat gun.  Heat embossing the image makes the image resist any ink put on the panel (emboss resist technique).

dsc05509.JPG

dsc05510.JPG

Brayered Baja Breeze about 2/3rds the way down the card stock from the top and then 1/4 of the way from the bottom up leaving a very light space in between the two brayerings.

dsc05511.JPG

dsc05512.JPG

Using a Stamp-a-ma-jig for placement, stamped bird with Basic Black ink.

dsc05514.JPG

dsc05515.JPG

Colored the bird in with a White Gel Pen.  In the large open areas of the bird I tried to imagine which direction the feathers would go and that is the direction I colored in.

dsc05517.JPG

Stamp part of the plant image again by loading just part of the stamp with Chocolate Chip ink.

dsc05518.JPG

Brayered lightly Purely Pomegranate ink at the top and bottom of the card stock.

dsc05519.JPG

Oops, I got a smudge of ink at the bottom right corner of my panel.  Fixed it by stamping over it with the plant image again with Chocolate Chip ink.

dsc05520.JPG

This is my color palette that I used with my finished panel.

dsc05522.JPG

Stamped my sentiment with Baja Breeze ink.

dsc05523.JPG

Assembled card front and then decided to add the flourish with Baja Breeze ink.  Used my Stamp-a-ma-jig for placement.

dsc05524.JPG

dsc05526.JPG

Here is the finished card measuring 5.25″ x 5.25″.

dsc05529.JPG

Hey, give an inspiration piece a try.  Remember your piece only need to take small elements from the inspiration piece.  No need to try to recreate it. 🙂

May your day be filled with images that inspire you!

Until my next post. . . . . . . . . . .

Hugs,

Michelle


Announcement! I’m Going To Austin, Texas!

Good Morning!  I just got the word, I’m scheduled to teach Brayer workshops in Austin, Texas on September 20th & 21st.   I can’t wait to meet you Texans!  I know there are a lot of you too.  So if your interested contact: Lisa Itatani at litatani@pacbell.net or flatfishpaperarts.blogspot.com

Lydia from Texas will be hosting me. Visit her blog which is too funny at www.understandblue.blogspot.com

Also, there are a couple of spots left for the Dayton, Ohio Brayer workshops on September 6th.  Here is a great link to that workshop info with pictures of the projects:  http://marcopaper.com/classzindorf.htm

For more workshop dates and places check out the workshop calendar at the top of this blog. 🙂

Also, I really need to share a little something special.  I received this picture from a very proud Grandmother.  Her soon to be eight year old grandson, Noah created this using one of my tutorials.  His Grandmother is not the only one proud!  Way to go Noah!!!

noahs_tutorial_card1.jpg

I promise to have a tutorial up tomorrow morning along with the blog candy winner for this week.

Until my next post. . . . . . . . . . . . .

Enjoy the warmth of the sun on your face!

Hugs,

Michelle


Tool Time – Embossing Powder

dsc05508.JPG

I’m posting a bit late today.  You see, I’m a Virgo and my mind will absolutely not function in an unorganized workspace.   So when I woke this morning and look around at my craft-room it was very apparent I had to spend the morning organizing new purchases, putting away items used and give the area a really good dusting.

So after straightening up there was no time for a tutorial so today I am going to talk about one of my all time favorite tools, Fine Detail Clear Embossing Powder.  🙂

If you have read a few of my tutorials you know that I use a lot of Fine Detail Clear Embossing Powder.  It is one of three items that I keep within arms reach at all times when I am stamping.  The other two are my heat gun and my brayer.  I know you are all shocked, lol.

I get my fine detail clear embossing powder from Stampin’ Up and I have also used other brands that I have picked up here and there from craft stores.  I’ve not run into any that have not worked well.  As long as it says “fine detail” on the container I believe it will work great.  If you get clear embossing powder that is not fine detail it will look like crystals and will not work as well with intricate designed stamps.

I use clear embossing powder so I can stamp with any color of ink, apply the clear embossing powder and it becomes the color of the ink.  I don’t have to have a bunch of different colors of embossing powder hanging around.  If you are using dye based inks you will need to load Versamark on your stamp, then load the stamp with ink before stamping.  The Versamark will give the embossing powder something to hold onto.  If you are using pigment ink, it is wetter and the Versamark is not necessary.

I store my fine detail clear embossing powder in a sandwich sized plastic container so I don’t have to use any other tools and try to put in back in the very tiny container that it comes in.  I just keep an old spoon in the sandwich sized plastic container with the embossing powder and I’m ready to use it.

Well there you have it my two cents on Clear Embossing Powder. 

There was a couple of questions posted to me that I wanted to answer today also.  

Do you get ink on your hands?  Do you have trouble getting it off and if so, do you use a special cleaner to get it off?

Well let me answer by saying a big YES, I do get ink on my hands.  🙂  It is a rare day when I don’t have ink stains on my hands.  It is my badge of honor as an artist and it is small price to pay for all of the joy stamping has given me.

I don’t use a special cleaner and since I work with all dye based inks, I go around with ink on my hands until it wears off.  It usually only takes about 4 hand washings before it is not noticeable.  I don’t like wearing fingernail polish because it will definitely stick to that and never come off.

Get the picture, I’m not very glamorous, lol.

Well that is all for today.

May your day be one that is overflowing with Joy and Creativity!

Until my next post. . . . . . . . .

Hugs,

Michelle


Harvest Moon – Tutorial #101 and Blog Candy

dsc05504.JPG

It’s been unseasonally cool here in Ohio for August and it makes me want to think of fall.  Fall is my favorite, favorite, favorite season of all.  The colors just speak to my creative side.

Also, I wanted to use these great stamps by Fire Cracker Designs By Pamela.  Here is a link if you want to check them out: http://www.safesecurestore.com/stores/merchant.mvc?Screen=SFNT&Store_Code=firecrackerdesignsbypamela   Love them!

I’m always happy to get a set of stamps that has images, such as the corn stocks that are in different sizes.  Makes making scenes with depth so much easier.  So you stamp creators out there keep that in mind, please, lol.

Oh yeah, I’m giving this card away as blog candy!  

So to enter for a chance to win this card, please leave me a comment on this post telling me your favorite thing about the Fall Season.  If you are getting this blog update by e-mail you will need to click this link to leave a comment on this blog post:   http://zindorf.blogs.splitcoaststampers.com/2008/08/13/harvest-moon-tutorial-and-blog-candy/

I will use a random number generator to pick the winner on the morning of Saturday, August 16th. 

Ready for this tutorial?  It’s a long one today, so grab a cup of your favorite hot beverage and lets get started. 🙂

Supplies:

Stamps: FireCrackerDesignsByPamela
Paper: Stampin’ Up Whisper White, Baja Breeze, Basic Black
Ink: Stampin’ Up Baja Breeze, Night of Navy, Not Quite Navy, Basic Black, Old Olive, Close to Cocoa, Palette Noir Black
Accessories: Brayer, Clear Embossing Powder, Heat Gun, Piercing Tools, Brads, Prismacolor Markers, Versamark Pad and Marker, Sponges,Post it Notes, Coluzzle Circle Template, Fine tip Black marker

dsc05507.JPG

Stamped the scarecrow on a piece of 4.25″ x 5.75″ piece of Whisper White Card stock with Palette Noir Black ink.  I used this ink so I can color with Solvent based Prismacolor markers and don’t have to worry about it running.

dsc05469.JPG

Colored with Prismacolor Eggshell Marker.

dsc05470.JPG

Added Prismacolor Sand.

dsc05472.JPG

Added Prismacolor Cloud Blue.

dsc05473.JPG

Added Prismacolor Blue Slate.

dsc05474.JPG

Shaded tan areas by going over parts of them with the Eggshell marker.

Nice thing about Solvent based markers, you can shade by coloring and letting it dry and then going over parts of it to get a darker color.

dsc05475.JPG

Colored Shirt with Prismacolor Goldenrod.

dsc05476.JPG

Added Prismacolor Tuscan Red.

dsc05477.JPG

Shaded the Shirt by going over parts of it again with the Goldenrod marker.

dsc05478.JPG

Colored over the entire image with a Versamark marker and heat embossed using clear embossing powder and a heat gun.

dsc05479.JPG

dsc05480.JPG

Stamped small Cornstalks by first loading the stamp with Versamark and then Old Olive ink before stamping.

dsc05481.JPG

Heat embossed images using clear embossing powder and a heat gun.

Note:  you do not have to clean the ink or embossing powder off of the scarecrow.  It will melt right into the embossing powder on the scarecrow and disappear.

dsc05482.JPG

Colored in the stalks with a Prismacolor Eggshell marker.

dsc05483.JPG

Colored over the stalks with a Versamark marker and heat embossed using clear embossing powder and a heat gun.

dsc05484.JPG

dsc05485.JPG

Stamped large cornstalks by first loading the stamp with Versamark and then Close to Cocoa ink before stamping.

dsc05486.JPG

Heat embossed images with clear embossing powder and a heat gun.

dsc05487.JPG

Colored in the large stalks with a Prismacolor Sand marker.

dsc05488.JPG

Colored over the large stalks with a Versamark marker and heat embossed using clear embossing powder and a heat gun.

dsc05489.JPG

dsc05490.JPG

Cut a circle out of a Post it note being sure to have part of the circle cut from the sticky part of the Post it note.

dsc05491.JPG

Used the post it note circle as a mask for the moon.

dsc05492.JPG

Brayered on Baja Breeze ink at the top and bottom of the card stock leaving a light space in the middle.

dsc05493.JPG

Brayered on Not Quite Navy ink at the top and bottom of the card stock not covering the Baja Breeze ink entirely.

dsc05494.JPG

Brayered on Night of Navy ink at the top and bottom of the card stock not covering the Not Quite Navy ink entirely.

dsc05495.JPG

Removed post it note mask.

dsc05496.JPG

Sponge some Baja Breeze ink over the Moon using a swiping motion from side to side to streak it.

dsc05497.JPG

Sponged Basic Black ink around the card edge to get it really dark.  The darker you get the outside of the scene the more the lighter parts in the middle pop!

dsc05498.JPG

Assembled card front and used a Piercing tool and pierced around the moon edge. 

dsc05499.JPG

Drew a line with a fine tip black marker from pierced hole to pierced hole to create some faux stitching.

dsc05500.JPG

Used the Tim Holtz ruler and a piercing tool to pierce the middle panel edge.  Oops!  check out that crocked right pierced line.  Covered the mistake with a brad in the right upper and lower corner, lol.   And you thought I didn’t make mistakes!  Hah!!!

dsc05501.JPG

Added more brads and here is the finished card measuring 5″ x 6.5″. 

dsc05504.JPG

Whew, that was a long project! 

Hope your day is filled with early cool Fall breezes and moon lite night.

Until my next post. . . . .. . . .. . . . .

Hugs,

Michelle


Heart Felt Thank You – Tutorial #100

dsc05460.JPG

Supplies:

Stamps: Stampin’ Up Lovely As a Tree & Holidays & Wishes, Cornish Heritage Farms Hinges
Paper: Stampin’ Up Whisper White, Bashful Blue, Brilliant Blue
Ink: Stampin’ Up Brilliant Blue, Chocolate Chip, Close to Cocoa, Bashful Blue, Basic Black, Barely Banana, More Mustard
Accessories: Stampin Up Black & Gray Markers, Post it Notes, Brayer, Corner Round Punch, Gold Brads


dsc05463.JPG

Starting out with a 4.5″ x 4.5″ piece of Whisper White card stock.

dsc05435.JPG

Mask a little under half of the bottom of the card stock with a post it note.

dsc05436.JPG

Brayered on Bashful Blue ink at the top of the card stock.

dsc05437.JPG

Brayered on Brilliant Blue ink not covering the Bashful blue ink entirely.

dsc05438.JPG

Sponged Brilliant Blue ink at the top of the card stock very heavily to create some drama in the sky.

dsc05439.JPG

Sponged a bit of Black ink at the edge of the Post it Note mask to create a couple of hills in the distance.

dsc05440.JPG

Removed Post it note Mask.

dsc05441.JPG

Masked Sky area with a clean Post it Note.

dsc05442.JPG

Brayered on Barely Banana ink on the unmasked section of the card stock.

dsc05443.JPG

Tore a piece of post it note in a triangle shape to mask a section to create a road.  This is an experiment, I have not tried this before.  The sticky part of the Post it note is at the bottom of the card stock.

dsc05444.JPG

Brayered on More Mustard ink.

dsc05445.JPG

Removed triangle post it note, but left the post it note that is masking the sky on.

dsc05446.JPG

Sponged More Mustard ink in the middle of the Road.

dsc05447.JPG

Sponged Close to Cocoa ink in the middle of the road and the bottom of the card stock, not covering the More Mustard ink entirely.

dsc05448.JPG

Sponged Chocolate Chip ink at the very bottom of the card stock.

dsc05449.JPG

Took the Post it Note off of the Sky.

dsc05450.JPG

Colored in the middle tree with a black marker, huffed on it and stamped it.

dsc05451.JPG

dsc05452.JPG

Colored in the two trees on the right side of the stamp with a black marker, huffed on it and stamped it to the left of the first tree I stamped.

dsc05453.JPG

Sponged a bit of black ink under and to the left side of the trees to create a shadow.

dsc05454.JPG

Used my corner rounder punch on two corners of my main image panel and the Brilliant Blue panel that will go under it.

dsc05455.JPG

Stamped two hinges on with Basic Black ink and colored them in a bit with a gray marker.

dsc05456.JPG

dsc05457.JPG

Assembled card, added a gold brad to each hinge and then stamped my sentiment using Basic Black ink.

dsc05458.JPG

Here you have it, the conclusion of tutorial #100 with the finished card measuring 5.25″ x 5.25″.

dsc05460.JPG

May your day be filled with dreamy scenery.  Thanks again for your encouragement!

Until my next post. . . . . . . . . . . .

Hugs,

Michelle


Fenced View – Tutorial & Convention Shopping

dsc05405.JPG

Happy Sunday Everyone! 

I didn’t get a chance to post on Saturday due to the Stamp Away USA, Stamp Convention that was held in Sharonville, OH at the Convention Center.  This was my first time attending one of these stamp conventions and man oh man, can a Gal get into lots of trouble at one of these things. 

Below is a picture of my purchases and believe me I wanted just about everything, but I set a limit for myself before I went and only took that much in cash with me and left my credit cards at home.  That turned out to be a smart move on my part, lol.  I think I made wiser choices too.

The day was so enjoyable, Karen Barber let me drag her along on the road trip and I also met a few of you blog readers 🙂  A big hello to Colleen and her friends and to Priscilla.

dsc05386.JPG

Today’s tutorial was created with one of the stamps I purchased.  By the way this is tutorial number 99.  If you would like to see the other 98 tutorials check out the tab at the top of my blog that reads “all my tutorials”.

So let’s get started.  🙂

Supplies:

Stamps: Stamp by Judith T-40
Paper: Stampin’ Up Whisper White, Not Quite Navy, Kiwi Kiss
Ink: Stampin’ Up Baja Breeze, Not Quite Navy, Old Olive, Basic Black & Kiwi Kiss
Accessories: Post it Notes, Brayer, Markers, White Gel Pen, Sponges, ribbon, Brads

dsc05407.JPG

Brayered Baja Breeze ink at the top of a 5.5″ x 4.2″ piece of Whisper White Card stock.

dsc05388.JPG

Brayered Kiwi Kiss ink at the bottom half of the card stock.

dsc05389.JPG

Tore through the sticky part of two post it notes and used them to mask the ground portion of the card stock.

dsc05390.JPG

Sponged Baja Breeze ink at the torn edge of the card stock to create a horizon line and to put in a couple of mountain shapes.

dsc05391.JPG

Right at the torn edge of the post it notes sponged in Not Quite Navy to darken the horizon line so it would really stand out.

dsc05392.JPG

Removed post it note masks and sponged Not Quite Navy ink at the top of the card stock to create a more dramatic sky.

dsc05393.JPG

Sponged Old Olive ink at the bottom of the card stock to create some depth in the foreground.

dsc05394.JPG

Stamp my new “Stamp by Judith T-40” with Basic Black ink.

dsc05395.JPG

Colored the rocks with a Going Gray maker.

dsc05396.JPG

Colored the tree trunk with a Chocolate Chip marker.

dsc05397.JPG

Colored the fence posts with a Close to Cocoa marker.

dsc05398.JPG

Colored the tops of the fence posts with a Creamy Caramel marker.  Also created a shadows for the tree and fence post with the Creamy Caramel marker.

dsc05399.JPG

Colored the flowers in with a white gel pen.

dsc05400.JPG

Colored the flower stems with an Old Olive maker.

dsc05401.JPG

Added some Close to Cocoa to the center of my tree and fence post shadows.

dsc05402.JPG

Sponged Note Quite Navy ink on the edge of my Kiwi Kiss card stock panel.

dsc05403.JPG

Assembled card and here it is finished measuring 5″ x 6.5″.

dsc05405.JPG

Hope you enjoyed this country scene and will give it a try.

May your day be filled with soft scenery and daisies!

Until my next post. . . . . . . . .

Hugs,

Michelle


Flourish Butterfly – Tutorial

dsc05383.jpg

Announcement, Announcement!  I will be teaching brayer workshops in the following towns:

Dayton, Ohio at Marco Paper Store (http://www.marcopaper.com/) on September 6th

Fort Collins, Colorado on September 19th  & 20th

San Jose, California on October 24th & 25th

For information on these workshops or to host one in your town, please contact Lisa Itatani at litatani@pacbell.net or  http://flatfishpaperarts.blogspot.com/  while there are still spots open.  🙂

Come join me and let’s take the frustration out of using that brayer an create some dramatic skies together in the process. 🙂  Hope to see you soon.

Now on to today’s tutorial. 🙂  

Today’s project shows off the emboss resist technique.  Also, I thought I would celebrate the butterfly while they are still fluttering around in my yard.

Supplies:

Stamps: Stampin’ Up Kind Thoughts & Wonderful Wings
Paper: Stampin’ Up Whisper White, Soft Sky and Blush Blossom
Ink: Adirondack Stream & Aqua, Palette Noir Black
Accessories: Stampin’ Up markers More Mustard, Blush Blossom, Barely Banana, Almost Amethyst, Faber-Castell Black marker, Piercing Tools, Silver Brads, Versamark Marker and Pad, Sponge, Stamp-a-ma-Jig, Clear embossing Powder and Heat gun

dsc05385.JPG

Stamped butterfly with Palette Noir Black ink on a 4.5″ x 4.5″ piece of Whisper White card stock.

dsc05365.JPG

Colored the part of the Butterfly’s wings and the body with an Almost Amethyst marker.

dsc05366.JPG

Colored a part of the Butterfly’s wings with a Blush Blossom marker.

dsc05367.JPG

Colored part of the Butterfly’s wings with a Barely Banana Marker.

dsc05368.JPG

Colored part of the butterfly’s wings with a More Mustard marker.

dsc05369.JPG

Darkened the black lines on the butterfly with a Faber Castell black marker to make the butterfly really pop!

dsc05370.JPG

Colored over the entire butterfly, being very careful to stay within the design area, with a Versamark marker.

dsc05371.JPG

Heat embossed the butterfly with clear embossing powder and a heat gun.

dsc05372.JPG

Using a Stamp-a-ma-jig for placement, stamped the flourish by first loading it with Versamark and then with Stream ink before stamping.

dsc05373.JPG

dsc05374.JPG

Heat embossed flourish with clear embossing powder. 

Note:  it was not necessary to clean the stream ink off of the butterfly, it just melts right into the embossing on the butterfly when heated.

dsc05375.JPG

Sponged Aqua ink onto the flourish area in a circular motion.

dsc05376.JPG

Colored in the flourish with a white gel pen to make it stand out.

dsc05378.JPG

After assembling card front, used piercing tools and pierced each corner of  of the main image panel.

dsc05379.JPG

Added a silver brad to each side of the flourish.

dsc05381.JPG

Here you have it the finished card measuring 5.25″ x 5.25″. 

dsc05383.jpg

Hope you enjoyed today’s tutorial and will give emboss resist a try.  🙂

May your day be filled with filtered light and colorful butterflies.

Until my next post. . . . . . . . . . .

Hugs,

Michelle


Moon Light Cool Cat – Tutorial

dsc05361.JPG

A couple times a year I have to get this old Stampin’ Up set “Cool Cat” out and work with it.  Love this cat!    This morning I felt like getting out the bright colors to liven things up a bit.

Let’s get started.  🙂

Supplies:

Stamps: Stampin’ Up “Cool Cat”
Paper: Stampin’ Up Whisper White, Basic Black & Tempting Turquoise
Ink: Stampin’ Up Tempting Turquoise, Summer Sun, Chocolate Chip, Ruby Red, Basic Black & Wild Wasabi
Accessories: Stamp-a-ma-jig, Coluzzle, Tim Holtz Distressing Tool and Ruler, Piercing Tool, White Gel Pen, Bordering Blue marker, Blush Blossom Marker, Black Marker, Sponges

dsc05364.JPG

Cut a 2.5″ circle with my Coluzzle out of card stock.

Note:  This morning I used a circle cut previously and used in a different project.  Nice to keep these things on hand and re-use them.

dsc05336.JPG

Used the circle as a mask for the moon.  I just held it in place as I worked.

dsc05335.JPG

Traced a fine line around the mask with a Bordering Blue marker on a 4″ x 4″ piece of Whisper White card stock.

dsc05337.JPG

Sponged on some Summer Sun ink.

dsc05338.JPG

Sponged on Some Tempting Turquoise ink.

dsc05339.JPG

Sponged on some Wild Wasabi ink.

dsc05340.JPG

Sponged on some Ruby Red ink.

dsc05341.JPG

Sponged on some Chocolate Chip ink.

dsc05342.JPG

Removed mask.

dsc05343.JPG

Sponged some Summer Sun ink inside of the moon to the left side.

dsc05344.JPG

Using my Stamp-a-ma-jig for placement, stamped Cool Cat with Basic Black ink.

dsc05345.JPG

dsc05346.JPG

Sponged some Black ink at the bottom of the card stock.

dsc05347.JPG

Used a white gel pen to color in the whites of the cat’s eyes.

dsc05348.JPG

Colored in the Cat’s ears with a Blush Blossom Marker.

dsc05349.JPG

Added some dots to the background to look like distant stars.

dsc05350.JPG

Figured out what layout I wanted to use and cut my panels.

dsc05351.JPG

Distressed the main image panel and the Tempting Turquoise panel with a Tim Holtz distress tool.

dsc05354.JPG

Dragged the edges of all sides of the main image panel over the black ink.

dsc05353.JPG

sponged Tempting Turquoise ink around the edges of the Tempting Turquoise panel.

dsc05356.JPG

Drew in lines using a Tim Holtz ruler and White Gel pen to create a look of brick.

dsc05355.JPG

Drew a black line under the cat to create the top of the wall and colored in the top bricks with the black marker to make it flow better from one layer to the next.

dsc05358.JPG

The Tim Holtz ruler has holes in it that you can use your piercing tool with to create a faux stitching look. 

Punched my holes around the edge of the card  stock and then used a white gel pen and ran it from one hole to the next to create the stitching.

dsc05359.JPG

Here you have it the finished card measuring 5″ x 6.5″.

dsc05361.JPG

May your day be sunny and your night sky be bright!

Until my next post. . . . . . . . .

Hugs,

Michelle


Tool Time – Red Rubber Stamp Sheets

dsc05331.JPG

Today’s post will help take some of the mystery out of buying Deeply etch red rubber stamps, such as this sheet from Innovative Stamp Creations “Friendship”.

When you get your stamp sheet it will look like the picture above.    I cut mine out and cut them very closely to the design.

After they are all cut out I paint Aleene’s Tack it over and over on the back sides of the stamps and let dry for about an hour.  It doesn’t take much of this glue.  The glue goes on white in color but dries clear and is tacky to touch and stays that way.  The tackiness lets you stick the stamp to your acrylic block over and over.

dsc05334.JPG

Next, I stick the stamps to a clear transparency sheet.

dsc05332.JPG

I put the transparency sheet with the stamps on it and the index sheet that came with the stamps in a large plastic store bag.  I write the name on the top of the bag with a
Sharpie Marker. 

Note:  A copy of the index sheet also goes in my stamp binder for easy viewing and selection.

dsc05330.JPG

The Baggie then gets stored away standing up right in a box, sorted by manufacturer.  It is very easy to look through them to find what I need.  They also take very little room to store, love it! 

I found that no foam pad is necessary with these good quality, deeply etched red rubber stamps to get a good stamped image.

Here is the link to Innovative Stamp Creations store:  http://www.innovativestampcreations.com/ischomepage.html

There are definitely a million ways to store stamps out there.  I just wanted to share my storage and prep solution with you.   Hope this took a little of the mystery out of buying red rubber stamp sheets.

May your day be filled with good impressions!

Until my next post. . . . . . . .

Hugs,

Michelle