Blog Candy Winner and Thinking of Fall-Tutorial

dsc05327.JPG

I’m getting back into the swing of things today after my week off line. 

First things first, we have a blog candy winner!!!

dsc05257.JPG  

The winner is comment number 133 out of 234.   Congratulations to Linda Patti who wrote “please enter me for the blog candy.. LOVE the framed art work!”  Linda, please e-mail me your address so I can get this out to you.

Thanks everyone for playing along.  🙂

Now for today’s tutorial.  I used the stamp sheet from Innovative Stamp Creations “Marvels of Nature” that can be purchased from their online store found here:  http://www.innovativestampcreations.com/ischomepage.html

Supplies:

Stamps: Innovative Stamp Creations “Marvels of Nature”
Paper: Stampin’ Up Whisper White, Very Vanilla, Soft Sky & Not Quite Navy
Ink: Stampin’ Up Really Rust, Not Quite Navy, Soft Sky, Distress inks Old Paper, Antique Linen, Brushed Corduroy & Peeled Paint
Accessories: Brayer, Clear embossing powder, heat gun, Coluzzle Circle Template, Chocolate Chip, Going Gray & Black markers, Post it notes, Ruler

dsc05328.JPG

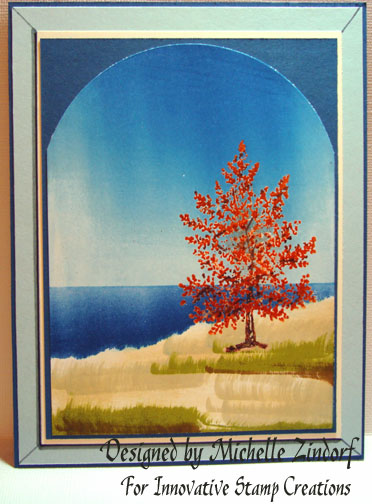
Loaded tree stamp with Versamark, then Really Rust ink, tapped the brush end of a Chocolate Chip marker on the leaf area of the stamp and colored in the trunk before stamping it on a 4″ x 5.5″ of Whisper White card stock.

dsc05304.JPG

Heat embossed it using clear embossing powder and a heat gun.

dsc05305.JPG

Cover 1/3rd of the bottom of the card stock with a Post it Note to mask it.

dsc05306.JPG

Brayer on Soft Sky ink over the sky area.  Then brayered on Not Quite Navy ink at the top of the card stock, not covering the Soft Sky ink entirely.

dsc05307.JPG

Tore the top of the Post it note to reveal a bit of the white card stock.

dsc05308.JPG

Masked the sky with another Post it note.

dsc05309.JPG

Brayered on Not Quite Navy ink in the unmasked area.   This created the water and horizon line.

dsc05310.JPG

Removed masks.

dsc05311.JPG

Sponged on Antique Linen Distress ink on the ground area using a sideways streaking motion.

dsc05312.JPG

The distress pads are great for direct to paper techniques since the pad is raised up from the plastic case.

dsc05313.JPG

Streaked one edge of the Old Paper ink pad in an upward motion to create grasses.

dsc05314.JPG

Added some Peeled paint grasses in the same manner as the last step.

dsc05315.JPG

Added a few Chocolate Chip marker branches to the center of the tree.

dsc05316.JPG

Added a couple of strokes of the Brushed Corduroy ink pad at the bottom of the Peeled paint grasses.

dsc05317.JPG

Rounded the top of the card stock using a circle Coluzzle template.

dsc05318.JPG

dsc05319.JPG

Assembled card front and added fine lines of Going Gray marker to the corners using a ruler to keep them straight.

dsc05320.JPG

dsc05321.JPG

Using the brush end of the Going Gray marker, added a thick line to the left and bottom of the Very Vanilla panel to create a shadow.

dsc05322.JPG

Added a fine line of black marker to the left and bottom of the Very Vanilla panel to enhance the shadow.

dsc05323.JPG

Here you have it the completed card measuring 5″ x 6.5″.

dsc05327.JPG

Hope your day is filled with cool ocean breezes and sunshine.  🙂

Until my next post. . . . . . .

Hugs,

Michelle


I’m back from California!

WOW!  What a great time I had teaching workshops at Lisa Itatani’s studio in San Jose, California.   The ladies that attended were all so sensational and fun to meet, plus super talented stampers.  They learned my techniques and are brayer masters now.  🙂

I just returned home late last night, but I wanted to share with everyone some of the workshop pictures that were taken and I will add more as they are e-mailed to me.

One of the Projects made:

   dsc04292_copy.jpg  

The fun we had:

zindorf_group_shot_007.jpg    zindorf_workshop_008.jpg

zindorf_workshop_day_two_001.jpg    zindorf_group_shot_004.jpg

marian-garcia-3.jpg  Marian Garcia and myself 🙂

A Big Thank you!

Thank you so much Lisa Itatani for hosting me!  You’re the best!  

Here is a link to Lisa’s blog where you can get info on her up coming workshops:

http://flatfishpaperarts.blogspot.com/

Future Zindorf workshops:

I don’t have dates yet, but the California workshops were just too fun not to do more so I will be scheduling workshops in the Dayton, Ohio area, Longmont area of Colorado and there is talk of another workshop possibly at the beach in the Carmel/Monterey area of California.  Give me a shout out if you would be interested in one of these workshops so I can figure out how many workshops to schedule in each area.  I like to keep the number of people in each workshop small so I can have one on one time with each person attending.

How about workshops in your area?

If you have a studio that can accomodate 6 people, plus me and would like to host some of my workshops for your area, please let me know (mzindorf@aim.com).  I would love to come and stamp with you.


We Have A Blog Candy Winner!

 I very much wish I could send blog candy to each and everyone of you who left a comment telling me what brought you to stamping.  I am amazed by the heartfelt stories and just how stamping has touch so many lives.  A few things I found out from your comments are:

1. There is a tremendous amount of scrapbookers out there that stamp.   I may have to do some scrapbook page tutorials in the future.  Although I haven’t scrapbooked in a very long time.  This might be the kick in the pants that I needed to start again.  🙂

2.  I am definitely not alone when it comes to using stamping as a stress reliever/therapy of sorts.  🙂

3.  There are a great number of you that has or had a major illness and stamping has been or is a big help in getting you through it.

4.  You are all my friends!  Much love and hugs to each and everyone of you!!!!

 dsc05240.JPG   And the winner of the Studio G Stamps out of a whopping 493 entries is ……………………………………………

Congratulations to Nancy T, who left me this comment:

“Like many others, I started out scrapbooking and originally tried to convince myself that I was not going to get into cardmaking. That thought didn’t last long. I found that card making and stamping are such a great stress reliever for me. I am a chronic pain patient and this is great therapy for me. I can do a card in a short period of time or I can spend hours on cards, depending on my mood, my pain threshold level. Especially now with all the great card ideas that you share, I’m even more excited about stamping. Thanks for always sharing your incredible talent with us!”

Nancy T, you will need to e-mail to your address to mzindorf@aim.com so I can mail out your stamps.  🙂

Thanks again everyone for sharing with me your stories and letting me get to know you a bit better!

Alrighty then, I’m officially off on vacation!  I’ll be back to ramble and share more stamping in 9 days!   For those of you who are signed up for my California workshops, I will see you next weekend.  I CAN’T WAIT TO MEET YOU!

Michelle


Framed Scene – Tutorial and More Blog Candy

dsc05257.JPG

I’m feeling generous today.  It is my last day at work before my vacation starts.  YIPEEEE!  So today I have a tutorial for you and the finished piece is being given away as blog candy.

So to enter for a chance to win this framed piece, please leave me a comment on this post telling me to enter you.  If you are getting this blog update by e-mail you will need to click this link to leave a comment on this blog post:   http://zindorf.blogs.splitcoaststampers.com/2008/07/25/framed-scene-tutorial-and-more-blog-candy/

I will use a random number generator to pick the winner on the morning of Tuesday, August 5th, which by the way is the next time I will be posting a stamping project.  I will be posting the winner of yesterdays blog candy tomorrow morning before I leave. 🙂

A little about the frame.  I don’t buy new frames for anything.  I like to poke around at thrift stores, flea markets and garage/barn sales for them.  When looking at framed pictures for sale, I’m really looking at the frame.  What is inside of the frame doesn’t matter, because I’m going to throw it away.   The little frame I used today is solid wood and has a nice easel back to it and I paid 25 cents for it.  I also buy really large wood framed pictures, generally not paying more than $2 for them and use them for my pastel paintings.  New they run from $50 to $75.  I found I can pick the frame before I do a painting and then paint it using the dimension I need so it will fit in the frame (cart before the horse I guess, lol).  I also cut my own mats, big savings also.

Ok, enough about that, on with the tutorial.  🙂

Supplies:

Stamps: Stampin’ Up Spring Solitude & Lovely as a Tree
Paper: Stampin Up Whisper White & Basic Black
Ink: Stampin’ Up Blue Bayou, Perfect Plum, Close to Cocoa, More Mustard, Basic Black, Soft Sky & Pale Plum
Accessories: Brayer, Post it Notes, Sponges, White Gel Pen, Fine point Black marker, Frame

dsc05262.JPG

Brayered Soft Sky ink on the top 1/2 of a 6″ x 3″ piece of Whisper White card stock.

dsc05242.JPG

Tore Post it Notes (through the sticky part) to use as a mask for the sky while I put in the horizon line.

dsc05243.JPG

Sponged on More Mustard ink being darkest at the post it note edge.

dsc05244.JPG

Removed mask and stamped bird with Basic Black ink.

dsc05245.JPG

Tore a new piece of post it note to use to mask the sky and create a mountain in the distance.  Sponged Pale Plum ink in the open area.  Opps!  Missed the photo of this.

dsc05246.JPG

Used torn post it notes again for a mask to create another mountain in the distance and sponged on Perfect Plum ink so it is a little darker than the first mountain. 

dsc05247.JPG

Removed masks and used a White Gel pen to define the birds wing and eye.

dsc05249.JPG

Used a fine point marker to put dots on the ground at the birds feet to simulate bird feed.

dsc05250.JPG

Sponged a little Blue Bayou ink at the top of the sky to give it some drama.

dsc05251.JPG

Stamped two pine trees at the left of the piece with Basic Black ink.

dsc05252.JPG

Sponged More Mustard ink on to create a shadow for the trees and for the bird.

dsc05253.JPG

Sponged on a little Close to Cocoa ink in the middle of the tree shadows to give a little more depth.

dsc05254.JPG

Added a Black card stock panel and here it is finished.

dsc05257.JPG

Everyone be safe and have a super pleasant and sunny day! 

Until my next post. . . . . . .

Hugs,

Michelle


Blog Candy and Getting to Know You

Times Up and we already have a winner!!!!

dsc05240.JPG

Do to some work commitments I was unable to stamp this morning. 😦   I really enjoyed last weeks comments letting me know where you are from.   Knowing about my readers helps to motivate me to continue sharing with you.   My Word! there are a lot of you readers out there!  My blog gets around 2,000 to 3,000 clicks a day and there are about 1,300 of you subscribed to this blog by e-mail.  The shear numbers freak me out a little, lol.

This week I want all of you to share with me, please what brought you to stamping?  In return I have some BLOG CANDY to give you a chance at!

So to enter for a chance to win these 16 Studio G, Series 6 stamp packs with a bonus Valentine pack, please leave me a comment on this post telling me what brought you to stamping.  If you are getting this blog update by e-mail you will need to click this link to leave a comment on this blog post:    http://zindorf.blogs.splitcoaststampers.com/2008/07/24/blog-candy-and-getting-to-know-you/

I will use a random number generator to pick the winner on the morning of Saturday, July 26th.

I will start by saying, my friend Claire Sharkey asked me to come along with her to a stamping workshop.  I didn’t care about rubber stamps and wasn’t all that interested, but I wanted to spend time with my friend, Claire, so I went along.  Next thing I know, I’m ordering my very first Stampin’ Up stamp set “Frosty”.  That was back in 2001. 

I almost felt guilty for stamping at first, because I like to paint with watercolors and pastels and there I was just stamping the images instead of drawing them.  But my stamping in time became more artist in nature and more satisfying too.  I know you don’t believe it, but I can pretty quickly do a scene now with stamps and ink.  Now I say quickly, but quickly to me is 1 hour.  I like the creative process and why rush it.  🙂   My paintings with pastel can take me, literally months to complete, so 1 hour to accomplish a scene seems super quick.

Alright, that is my beginning in stamping, what is yours?


SC186 Grapes – Tutorial

dsc05236.JPG

Hello Everyone!  I’m just trying to make it through this week.  Next week I am on vacation from my real job and my husband and I have rented a cabin in the Hocking Hills Region of Ohio for a few days at the beginning of the week and then on July 31st I’m off to sunny California for my first ever workshops.  Let me tell you, I’M EXCITED!!!!

But in the mean time, I checked out the Sketch Challenge SC186 this morning on Split Coast Stampers and decided to play along.  🙂  Here is the link to the challenge if you want to play too:  http://www.splitcoaststampers.com/forums/showthread.php?t=366251

Let’s get started with tutorial 94!  🙂

Supplies:

Stamps: Stampin’ Up Sun Ripened II & Baroque Motifis
Paper: Stampin’ Up Whisper White, Basic Black & Mellow Moss, Basic Grey Design paper
Ink: Stampin’ Up Really Rust, Mellow Moss, More Mustard & Apricot Appeal, Palette Noir Black
Accessories: Black Ribbon, Copper Brads, Clear embossing Powder, Heat Gun, Versamark Marker, Prismacolor Markers, Faber Castell Black fine point maker, Going Gray marker, Sponge, Cuttlebug Corner Die

dsc05239.JPG

Stamped grapes with Palette Noir Black ink on a 3″ x 4″ piece of Whisper White card stock.  Note:  I use Palette ink because it tends not to smear when using solvent based markers.

dsc05216.JPG

Colored the grapes with a Prismacolor Violet Mist Marker.

dsc05217.JPG

Colored the shadow parts of the graps with a Parma Violet marker.

dsc05218.JPG

Colored the leaf with a Mint Cream marker.

dsc05219.JPG

Colored the shadow parts of the leaf with a Light Olive Green marker.

dsc05220.JPG

Went over the entire leaf again with the Mint Cream marker to blend it some.

dsc05221.JPG

Colored the stem with an Eggshell marker and extended the stem some too.

dsc05222.JPG

Added some French Grey 30% marker to the stem.

dsc05223.JPG

Colored over the entire image with a Versamark Marker and then heat embossed the image with clear embossing powder and a heat gun.

dsc05224.JPG

Sponged on Apricot Appeal ink.

dsc05225.JPG

Sponged on More Mustard ink being more heavy with it on the right side.

dsc05226.JPG

Sponged on Really Rust ink being heavy with it on the right side.

dsc05227.JPG

Added a layer of Basic Black card stock and Cuttlebug Corners.

dsc05228.JPG

Added a thick line of Going Gray to the right side of the grapes and leaf to create a shadow.  Then added a very fine line along the right side of the grapes, leaf and under the branch.

dsc05229.JPG

Added highlights to the grapes and leaf with a white gel pen.  (Love white gel pens!)  Now that makes those grapes pop!

dsc05230.JPG

Sponge a bit of Really Rust ink on the left side of my two panels.  Also dragged the card stock across the Really Rust ink pad at the left edge.

dsc05231.JPG

Stamped the flourish with Mellow Moss ink on the left side of the panels.

dsc05232.JPG

Assembled card and added two copper brads.  Here it is finished measuring 5″ x 6.5″.

 dsc05236.JPG

May your day be filled with wonderful highlights and sweet fruit!

Until my next post. . . . . . . . . .

Hugs, 

Michelle


Birds on a Wire – Tutorial

dsc05209.JPG

The idea of birds sitting on a wire has been rattling around in my head for some time.  This morning it finally made it to paper. 

Here is the tutorial.  🙂

Supplies:

Stamps: Stampin’ Up Spring Solitude & Lovely as a Tree
Paper: Stampin’ Up Basic Black, Kiwi Kiss & Whisper White
Ink: Stampin’ Up Baja Breeze, Kiwi Kiss, Old Olive and Basic Black
Accessories: Ruler, Fine point black marker, Old Olive marker, White Gel Pen, Stampin’ Up Piercing Tools, Sponge & Brayer

dsc05215.JPG

Brayered Baja Breeze ink at the top 2/3rds of a 3.5″ x 8″ piece of Whisper White card stock.

dsc05198.JPG

Brayered Kiwi Kiss ink on the bottom 1/4th of the card stock.

dsc05199.JPG

Made a line across the card stock with a fine point black marker and a ruler.

dsc05200.JPG

Stamped birds with Basic Black ink.   I also extended their legs with a fine point black marker so they would reach the black line.

dsc05201.JPG

Inked only the trees, with Basic Black ink, on the tree stamp to omit the ground part of the stamp. Stamp it twice.

dsc05202.JPG

Used a white Gel pen to make the eye and wing of the birds more prominent.

dsc05203.JPG

Sponged Old Olive ink on the trees.

dsc05204.JPG

Made dots with a white gel pen on the left side of the trees to create highlights and show light direction.

dsc05205.JPG

Sponged a shadow under the trees with Old Olive ink that is slanting toward the right side.

dsc05206.JPG

Made dots on the right side of the trees with an Old Olive marker.

dsc05207.JPG

Assembled card front and pierced a line at the bottom of the card stock.

dsc05208.JPG

Added two silver brads and here is the completed card measuring 9″ x 4″.

dsc05209.JPG

On a personal note, I had a great time over the weekend playing, playing and playing some more with my beautiful Grand Daughter.  Here she is pictured with my Husband, Russ being silly.

dsc051971.jpg

Hope your day is filled with snack time and smiles!

Until my next post. . . . . . . .

Hugs,

Michelle


Catching the Light Tutorial and We Have a Blog Candy Winner!

dsc05192.JPG

Wow!  Did I ever have fun reading all of the comments left on yesterdays post telling me where all you readers are from.  May I say, I just want to hop in a car, boat or airplane and visit each and everyone of you.  Thank you so much for your comments.  I now feel like I know a little about all of you.  The Internet sure does make the world a little smaller.

And now for the grand announcement!  The winner, out of 428 entries, for Wednesday’s blog candy is, drum roll, please. . . . . . . . . . . . . . . . . . .

Beth Greco, who was comment number 317 and who left this comment:

This is yet another lovely card. Thanks for sharing on such a regular basis. I have saved a whole bunch of your tutorials onto my laptop so I can take you with me when I go on holidays -) I tried my hand at the Northern Lights one last night and it turned out pretty well.
Thanks for Sharing!
dsc05173.JPG  Beth e-mail me at mzindorf@aim.com your mailing address and I will get these in the mail to you.

Thanks to all for playing along!

Now, I do have a tutorial for you today.

Let’s get started.  🙂

Supplies:

Stamps: Stampin’ Up Art of Life & Baroque Motifs
Paper: Stampin’ Up Whisper White, Soft Sky and Not Quite Navy
Ink: Stampin’ Up Soft Sky, Blue Bayou, Not Quite Navy and Basic Black
Accessories: Sponges, Black marker, White Gel Pen, Versamark marker

dsc05195.JPG

Sponged Soft Sky ink on a 4″ x 4.5″ piece of Whisper White Card stock.  I sponged a bit darker on the right side of the card stock.

dsc05175.JPG

Sponged Blue Bayou ink at the top and right side of the card stock.

dsc05176.JPG

Stamped flowers with Not Quite Navy ink.

dsc05177.JPG

Sponged some Not Quite Navy ink at the top of the card stock.

dsc05178.JPG

Tore through the sticky part of two post it notes to create a mask for the sky area.

dsc05179.JPG

Sponge Not Quite Navy ink heavily on the un-masked ground area.

dsc05180.JPG

Added some Basic Black in at the bottom of the card stock with a sponge.

dsc05181.JPG

Darkened the right side of the flowers and stems with a Faber Castell black marker.

dsc05184.JPG

Put White Gel pen highlights at the top of the flowers and along the left side of the stems and leaves.

dsc05185.JPG

Assembled card front and stamped flourishes with Soft Sky ink. 

Note:  When stamping over multiple layers of card stock your image will have gaps in it, see photo.  I was able to correct the gaps with a Versamark marker since the design was stamp with Soft Sky ink on Soft Sky card stock.

dsc05186.JPG

Now that the image gaps are fixed, I highlighted the flourish with a White Gel pen on the left sides of the design.  

Note:  All of my highlighting with the gel pen was done on the left side of the flowers and flourishes and then along the top of the ground to try to create a sense of where my light source was coming from (right side).

dsc05189.JPG

Here is the finished card measuring 5″ x 6.5″.

dsc05192.JPG

Note:  I will not be posting this weekend due to my, soon to be 5 year old, Grand Daughter’s visit from Fort Campbell, Kentucky.  We are traveling today to get her. 

May your weekend be filled with gentle breezes and the sweet smell of flowers.

Until my next post. . . . . . . .

Hugs to all!

Michelle


No Stamping for me today.

Sadly, there is no time for stamping today.  A quick ditty this morning is all I have time for. . . .. . .

A lady and her co-workers go to a bar after a hard days work to unwind.  As she is sitting there the most gorgeous man she has ever seen walked in.  She couldn’t help but take little glances at him out of the corner of her eye.  Much to her disbelief he walked over to her and said “for twenty dollars I’ll do any thing you ask me to do”.  She thought for a moment, reached down and got a twenty out of her purse and said “Clean my house”, lol.

 That’s how I’m feeling today.  Much to do in way of housework.  We are having a birthday party for my Grand Daughter this weekend and I have a messy house to get ready for company.

There are so many comments on yesterday’s post, I’m so very amazed!  I would love to know where everyone is from.  Give me a shout out today by commenting on this post telling me were you live.  I’ll start by telling you I’m from West Alexandria, Ohio.

If you are getting my blog updates by e-mail and you want to comment, please click this link to take you to my blog:   http://zindorf.blogs.splitcoaststampers.com/2008/07/17/no-stamping-for-me-today/

 Don’t forget to stop by tomorrow, Friday, I will be announcing the winner of yesterday’s blog candy.

May your day be a peaceful and relaxing one. 

Until my next post.. . . . . . .

Hugs,

Michelle


In The Nest Tutorial & BLOG CANDY!

dsc05167.JPG

As I said before, I love feeding and watching the birds.  I’m a city girl (spent my first 43 years in the city) and then I moved to a rural town and I’m pretty much surrounded by farm land.   Well being a city girl, I got a lesson at the feed store, yep my town has a feed store, lol.  I went in and asked for bird seed.  I was promptly told you can’t grow birds with seed, what I was looking for was bird feed.  Now how did I make it all these years not knowing the correct term for bird feed. 🙂  Lesson learned!

NOTE:  TIMES UP FOR THE BLOG CANDY! THANKS TO ALL WHO ENTERED. 

Anyway, I have blog candy for you all today!  A set of (16) sixteen, Series 7, Studio G, Clear Stamps.  All you have to do to enter to win these stamps is leave a comment on this post.  If you are getting this by e-mail, please click this link to be able to leave a comment on the post:  http://zindorf.blogs.splitcoaststampers.com/2008/07/16/in-the-nest-tutorial-blog-candy/

I will use a random number generator and will announce the winner on Friday morning, July 18th.  Good Luck everyone!

dsc05173.JPG

Below is a picture of the new Stampin’ Up in colors I just received in the mail.  These colors won’t be available until the new Catty comes out.  I just couldn’t resist playing with them, so I used a couple of them in today’s tutorial.  Please forgive me, I just had to, lol.

Supplies:

Stamps: Stampin’ Up Soft as a Feather, Best Blossoms & French Script
Paper: Stampin’ Up Baja Breeze, Kiwi Kiss & Whisper White
Ink: Stampin’ Up Baja Breeze, Kiwi Kiss & Chocolate Chip
Accessories:Stampin’ Up markers, Versamark pad, 1 1/4 circle punch, Sponges, Stampin’ Dimensionals, Clear embossing powder & heat gun

dsc05141.JPG

dsc05172.JPG

OK, so I was so excited about my new color options, I started this project and realized that I wasn’t taking pictures, lol.  So the first 3 pictures were staged after the fact.  Bare with me it is 4:00 a.m after all. 🙂

Stamped Nest by first loading the stamp with Versamark then with Chocolate Chip ink before stamping on a 4″ x 4″ piece of Whisper White card stock.

dsc05145.JPG

Heat embossed image with clear embossing powder and a heat gun.

dsc05146.JPG

Colored the sides of the nest with a Going Gray marker.

dsc05147.JPG

Stamped the leaves by first loading the stamp with Versamark, then Kiwi Kiss ink, then dabbed a few dots of More Mustard marker on the stamp before stamping.  I like a little texture in my leaves.  🙂

dsc05151.JPG

Heat embossed leaves with clear embossing powder and a heat gun.

dsc05152.JPG

Sponged some Kiwi Kiss ink on the top left side of the card stock.

dsc05153.JPG

Randomly sponged some Baja Breeze ink on the card stock.

dsc05154.JPG

Used a 1 1/4″ circle punch and punched the center out of the nest.

dsc05155.JPG

Flipped the card stock over and stuck on Stampin’ Dimensionals and stuck it to a 4″ x 4″ piece of Black card stock.

dsc05156.JPG

dsc05157.JPG

Glued the punched piece of nest on the black card stock.

dsc05158.JPG

Stamped the French Script Stamp on the card stock using Baja Breeze ink.

dsc05161.JPG

Stamped two eggs on Whisper White card stock using Baja Breeze ink.  Cut them out.

dsc05162.JPG

Lightly pressed eggs on to the Kiwi Kiss ink pad to give them a hint of green.

dsc05164.JPG

Stamped leaves with Baja Breeze ink on a Kiwi Kiss card stock panel.

dsc05165.JPG

Sponged Baja Breeze ink around the card stock edge.

dsc05166.JPG

Assembled card and here it is finished measuring 5.25″ x 5.25″.

dsc05167.JPG

Don’t forget to comment to enter to win the Blog Candy for today!

Hope you feel safe and secure in your own nest today.  🙂

Until my next post. . . . . .

Hugs to all,

Michelle