Stardust Morning MZ – Tutorial

dsc05136.JPG

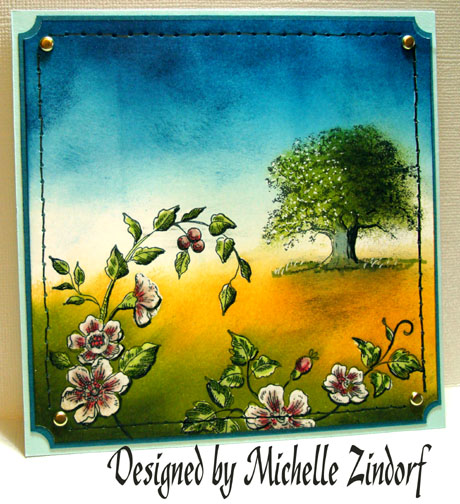
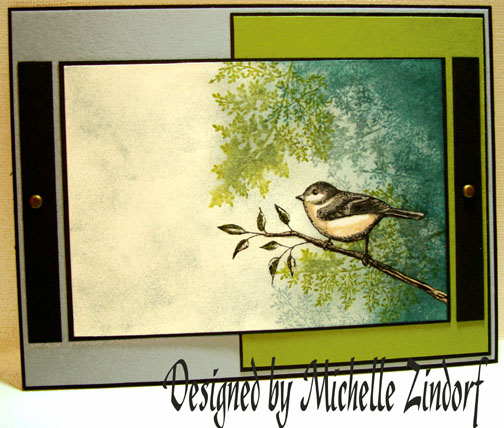
I decided to check out the Color Challenge on Split Coast Stampers this morning and found Emily had posted a very interesting color combination. 

The color challenge is to use Stampin’ Up So Saffron, Almost Amethyst and Wild Wasabi.  Here is a link to the challenge if you would like to play  along:  http://www.splitcoaststampers.com/forums/showthread.php?t=364002

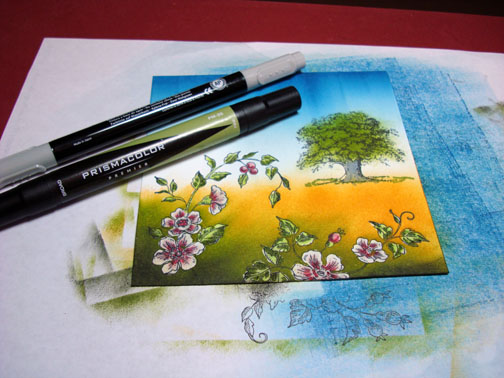
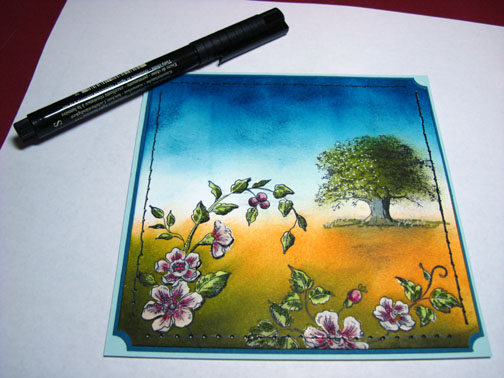
Here is my attempt and the tutorial for this piece.  🙂
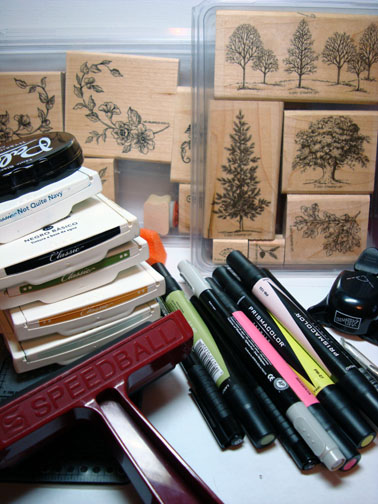
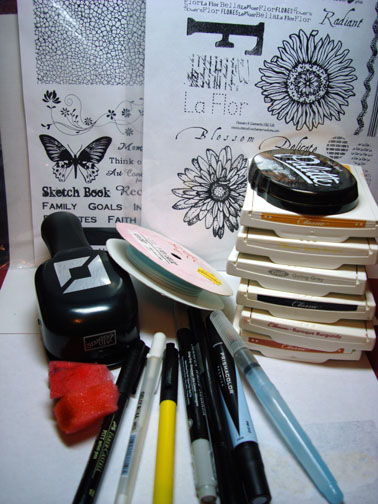
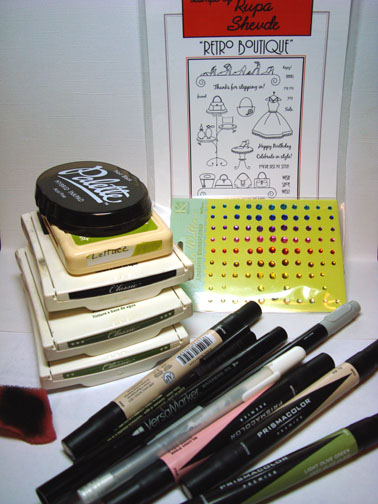
Supplies:

Stamps: Stampin’ Up Stardust & Lovely as a Tree
Paper: Stampin’ Up Whisper White, Basic Black & So Saffron
Ink: Stampin’ Up So Saffron, Wild Wasabi, Almost Amethyst & Basic Black
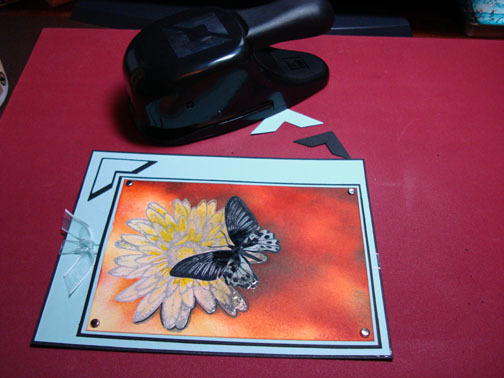
Accessories: Sponges, Stampin’ Up Markers So Saffron, Almost Amethyst & Basic Black, Gold Brads, Post it Notes, Photo Corner Punch

dsc05140.JPG

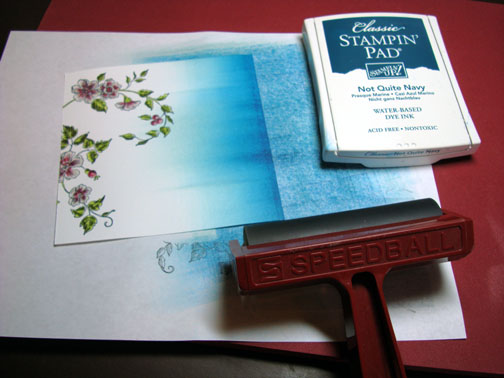
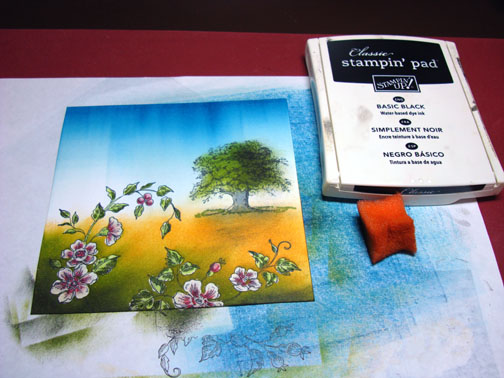
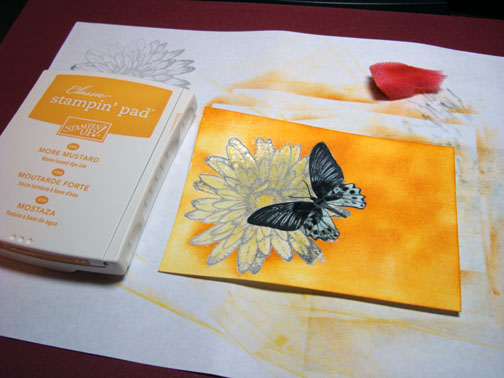
Stamped Sun on a 4.5″ x 4.5″ piece of Whisper White Card stock with Basic Black ink.

dsc05120.JPG

Sponged on So Saffron Ink, leaving a light spot in the middle of the sun.

dsc05121.JPG

Sorry about the photos, I can’t believe how blue this Almost Amethyst ink is looking in the photos.  It really is purple, lol.

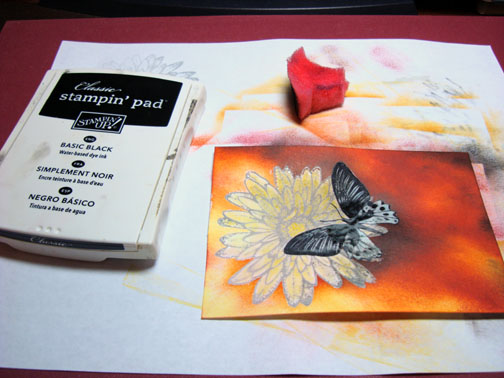
Sponged Almost Amethyst ink in the sky area of the card stock.

dsc05122.JPG

Tore post it notes through the sticky part to mask the sky area of the card stock.

dsc05123.JPG

Sponged on Wild Wasabi ink on the unmasked area to create a hill.

dsc05124.JPG

Sponged Basic Black in at the torn edge of the post it notes.

dsc05125.JPG

Removed mask.

dsc05126.JPG

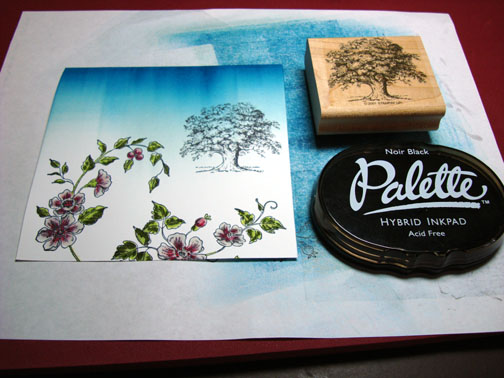
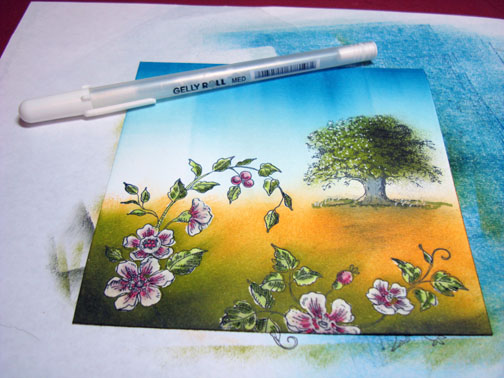
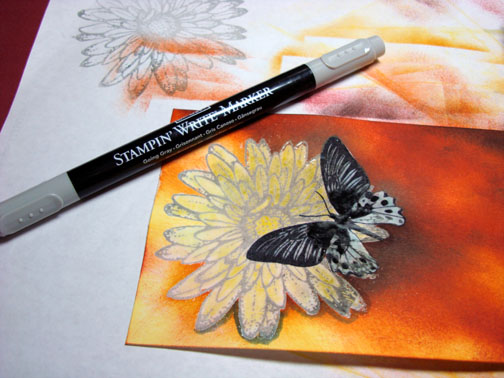
Inked only the tree part of the stamp (I didn’t want to stamp the grassy part of the stamp).

Stamped Trees with Basic Black ink on both sides of the sun.

dsc05127.JPG

Extended the tree trunks with a Black marker.

dsc05128.JPG

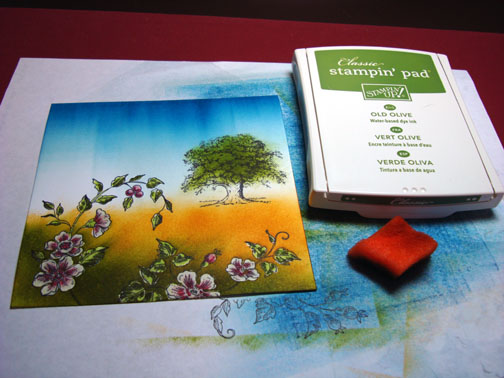
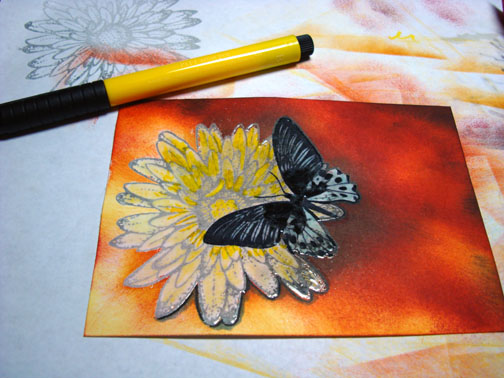
Added So Saffron Marker to the Sun image.

dsc05130.JPG

Colored a little bit of outline on the sun image with an Almost Amethyst marker.

dsc05131.JPG

Sponged a little Wild Wasabi ink on the trees.

dsc05132.JPG

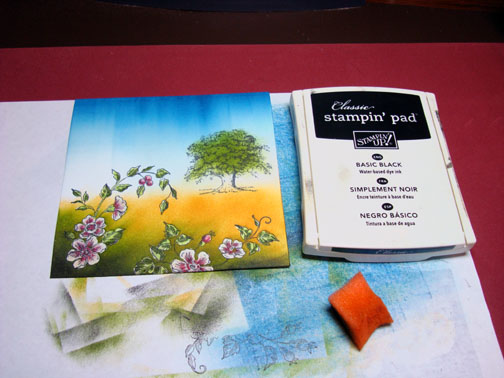
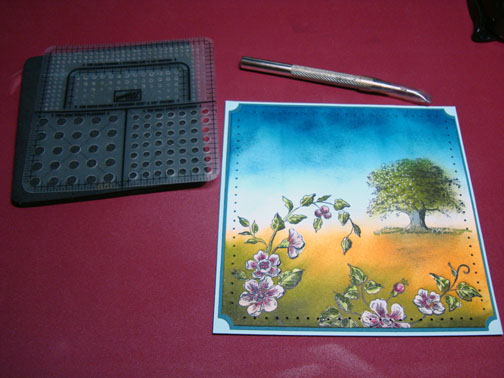
Attached a panel of So Saffron card stock to a panel of Basic Black card stock and punched small photo corners for each corner out of Basic Black card stock.

dsc05133.JPG

Assembled card front and here it is completed measuring 5.25″ x 5.25″.

dsc05136.JPG

Hope your day if filled with calm skies.

Until my next post. . . . . . . .

Michelle


Pond Life II MZ – Tutorial

dsc05118.JPG

I still had this set by papertreyink.com “Pond Life” on my desk from Friday so I decided to give it another go. 

Here is the tutorial.  🙂

Supplies:

dsc05119.JPG

Stamped Lily with Salmon ink on Whisper White Card stock.  Turned stamp upside down and stamped lily again with Aqua ink.

dsc05087.JPG

Darkened bottom of Salmon lily with a Blush Blossom marker.

dsc05088.JPG

Darkened bottom of reflection lily with a Going Gray and Blush Blossom marker.

dsc05089.JPG

Put Going Gray marker under Salmon Lily to create a shadow.

dsc05090.JPG

Put a fine line of Black marker under the Salmon lily to define shadow.

dsc05091.JPG

Colored over both the lily images with a Versamark marker and heat embossed using clear embossing powder and a heat gun.

dsc05092.JPG

dsc05093.JPG

Using a Mirror Image Stamp (see frequently asked questions in regards to Mirror image stamp) stamp a loose mirror image of the duck with basic black ink. 

Note:  to use mirror image stamp, stamp image on mirror image stamp and the stamp mirror image stamp on card stock.

dsc05094.JPG

Defined mirror image of duck a little with a going gray marker.

dsc05095.JPG

Stamp duck image above mirror image with Basic Black ink.

dsc05096.JPG

Went over both duck images with a Versamark marker and heat embossed using clear embossing powder and a heat gun.

dsc05097.JPG

dsc05098.JPG

Brayer Cloudy Blue ink over card stock, leaving it lighter at the top.

dsc05099.JPG

Brayered Not Quite Navy at the bottom and just a little at the top of the card stock.

dsc05100.JPG

Stamped lily pads with Lettuce ink.

dsc05101.JPG

Stamped more lily pads, but stamped off once on my scrap paper before stamping image (Second generation stamping).  This makes the images lighter in color.

dsc05102.JPG

Sponged on more Not Quite Navy ink at the bottom of the card stock.

dsc05103.JPG

Added gray marker at the bottoms of the lily pads and the bottom of the main image duck.

dsc05104.JPG

Stamped Reeds with Basic Black ink.

dsc05105.JPG

Put white highlights on top lily pad, duck, lily and reeds with a white gel pen.

dsc05108.JPG

Glued main imgage panel to a piece of Basic Grey “Archaic” design paper and swiped some Not Quite Navy ink across the design paper and onto the main image panel.

dsc05110.JPG

Stamped more reeds with Basic Black ink.

dsc05111.JPG

Drew in some of the bottoms of the reeds from the main image panel to the design paper panel with a black marker.  Used a White Gel pen to put highlights on the reeds on the designer paper.

dsc05112.JPG

Assembled card front and added Old Olive Photo Corner punches and copper brads.

dsc05113.JPG

Here is the card finished measuring 5.25″ x 5.25″.

dsc05118.JPG

Hope your day is filled with peace and tranquility.

Until my next post. . . . ..

Michelle


Pond Life MZ Style – Tutorial

dsc05084.JPG

I use stamps from all different companies these days.  My piece today uses Papertreyink.com stamps “Pond Life”.

I use to be stickily a Stampin’ Up girl, but too many fabulous companies have popped up that need my money, lol.  Really, I just can’t resist a great stamp set when I see it.  This is one set I just had to have.  So we are going on a little trip to the pond today with this tutorial.  Grab a cup of your favorite coffee, tea or soda and follow along.

Let’s get started.  🙂

Supplies:

Stamps: Paper Trey Ink “Pond Life” , Stampin’ Up Canvas BG
Paper: Stampin’ Up Whisper White, Blush Blossom and Cool Caribbean
Ink: Stampin’ Up More Mustard, Adirondack Terra Cotta, Peach Bellini, Salmon, Aqua, Lettuce, Ginger, Stream
Accessories: Stampin’ Up Markers Blush Blossom, Going Gray, Barely Banana, More Mustard, Faber Castell Black fine tip marker, White Gel pen, Sponges, Versamark pad and marker, Clear embossing powder, heat gun, Copper Brads

dsc05086.JPG

Stamped Water lily with Salmon ink on a 3.75″ x 3.75″ piece of Whisper White Card stock.

dsc05052.JPG

Add some Blush Blossom marker to the bottom of the images.

dsc05054.JPG

Added Barely Banana marker to the center tip of the images.

dsc05055.JPG

Colored over the images with a Versamark Marker.

dsc05056.JPG

Heat embossed the images with clear embossing powder and a heat gun.

dsc05057.JPG

This set has these great stems in them.  Since these stamps are unmounted you can take this stem and bend it when you stick it on the mount.  Nice to make different shaped stems and grasses.  It looks funny to have straight grasses. 🙂

Stamped stems by first loading stamp with Versamark and then More Mustard ink before stamping.

dsc05058.JPG

Heat embossed stems with clear embossing powder and a heat gun.

dsc05059.JPG

Stamped lily pads, by first loading the stamp with Versamark, then Lettuce ink and then added some More Mustard marker to the edges of the stamp before stamping.

dsc05060.JPG

Heat embossed with clear embossing powder and a heat gun.

dsc05061.JPG

Sponged on Peach Bellini ink.

dsc05062.JPG

Sponged on Aqua Ink.

dsc05063.JPG

Sponged on Terra Cotta ink.

dsc05064.JPG

Sponged on Stream ink.

dsc05065.JPG

Added some more lily pads with Lettuce ink, but stamped off once on my scrap paper before stamping on the card stock (also known as a second generation stamping).

dsc05066.JPG

Added some more stems with Lettuce ink.

dsc05067.JPG

Stamp the Cat tail head stamp with Ginger ink.

dsc05068.JPG

Added a shadow under some of the lily pads and lilies with a Going Grey marker.

dsc05069.JPG

Added a fine line of black marker under the lilies to really give them dimension.

dsc05070.JPG

Added Ginger ink to the bottom left corner of the card stock.

dsc05071.JPG

Stamp some more lily pads with Lettuce ink.

dsc05072.JPG

Added some hand drawn grasses with a black marker and put a fine line of black marker down the right side of the cattails.

dsc05073.JPG

Added White Gel pen highlights to a few of the grasses, tops of the lilies and tops of the cattails.

dsc05074.JPG

Stamped Canvas background stamp on a 5 1/8″ x 5 1/8″ piece of Cool Caribbean card stock with Aqua ink.

Stamped Canvas background stamp on a 4.75″ x 2″ piece of Blush Blossom card stock with Salmon ink.

dsc05075.JPG

Sponged Stream ink on the top right corner of the Cool Caribbean card stock panel.

dsc05076.JPG

Sponged Ginger ink on the bottom left corner of the Blush Blossom panel.

dsc05077.JPG

Assembled card and added Copper Brads.

Here it is finished measuring 5.25″ x 5.25″.

dsc05084.JPG

Hope your day if filled with the wonderful sounds of lapping water and frogs croaking.  🙂

Until my next post. . . . . . .

Michelle


Moo Cards and a Blog Candy Winner

 dsc04958.JPG

Moo Cards ROCK!

I had so much fun making my sample Moo Cards for Innovative Stamp Creations Moo Card Challenge (see challenge details below).  Moo Cards are all the rage right now.  Moo cards are like Artist trading cards but measure 1 1/8″ x 2 3/4″.    These little cards are addictive.  At first, I was fretting about the small area I had to work with on the cards.  I’m a big scene type stamper if you hadn’t noticed, lol.  But once I got started I didn’t want to quit.  I even altered a tin for my moo cards to reside in.   You can even make magnets out of these cards and give them as a special gift. 

All images for my samples are by Innovative Stamp Creations.  Here is a link to their on line store:  http://www.innovativestampcreations.com/ischomepage.html

I was first introduced to Moo Cards at an Art & Soul Retreat I attended back in May.  I was so amazed at all of the creative variations people could achieve on such a little area.   People were trading them like crazy and there I was not even knowing what a Moo card was.  I apparently live a sheltered life here in my little stamp room, lol.  Did you all know about these cards?  Have you made any?

Here are the details for the challenge:

Innovative Stamp Creations Challenge C7   (key word ISCC7)

Moo cards are like Artist trading cards but measure 1 1/8″ x 2 3/4″.  Play along and upload your Moo card creations to your blog and/or an on line gallery for a chance to  WIN a FREE Innovative Stamp Creations Stamp Sheet “Art4Frames II” and Tin!  Super easy to enter, use Innovative Stamp Creations stamps only on your design, then post your link in the comments section on Innovative Stamp Creation’s Blog found here:  http://www.innovativestampcreations.blogspot.com/

A random name will be chosen and announced on the Innovative Stamp Creation’s blog on July 20, 2008.  I can’t wait to see what you come up with, play along!

dsc05023.JPG

One more thing, the WINNER OF TUESDAYS BLOG CANDY IS. . . . . . .. . . . . . . . . .  .

Robyn A, Who wrote:

Beautiful card Michelle, who wouldn’t be thrilled to receive it? Thanks for the opportunity to win it, it would be great to see your work in real life.

Robyn, congratulations and please e-mail your address to mzindorf@aim.com so I can mail this card right out to you.

Thanks to all who commented.  Stampers are the nicest people! Until my next post. . . . . . . . .

Michelle


Toile Blossoms Scene – Tutorial

dsc05046.JPG

Today’s piece is dedicated to all the Stampin’ Up stamp hoarders.  Now you know who you are, a few of you have even asked me to use some of my old, but loved stamps in projects.  I was a hobby demo so I never felt the need to get rid of my old stamps when new ones came out.  So I have around 300 Stampin’ Up sets, that is what is left after weeding out sets that weren’t my style.  We won’t talk about my unmounted stamp collections in this same post. You all will think I’m a stamp junkie or something, lol. 

Let me hear about your stamp collections/addiction in the comments section of this post.  If you are getting this by e-mail update, click this link to leave me your comment:

http://zindorf.blogs.splitcoaststampers.com/2008/07/09/toil-blossoms-scene-tutorial/

I know I’m not the only one that will chose new stamps over new shoes, let me hear from you.  🙂

Anyway, I have used Stampin’ Up sets “Toile Blossoms” &  “Lovely as a Tree” in today’s piece. 

Let’s get started on the tutorial.  🙂

Supplies:

Stamps: Stampin’ UP Toile Blossoms & Lovely as a Tree
Paper: Stampin’ Up Whisper White, Not Quite Navy and Soft Sky
Ink: Stampin’ Up Soft Sky, More Mustard, Not Quite Navy, Basic Black & Old Olive, Palette Noir Black
Accessories: Piercing Tools, Prismacolor Markers, Going Gray marker, White Gel Pen, Black marker, Ticket Corner Punch, Sponges, Brayer, Clear Embossing Powder, Heat Gun, Versamark Marker, Gold Brads

dsc05051.JPG

Stamped Toile Blossom images on a piece of 5″ x 5″ Whisper White card stock with Palette Noir Black ink.

dsc05025.JPG

dsc05026.JPG

Colored the center of the flower petals with a Prismacolor Deco Pink marker.

dsc05027.JPG

Added just a little Prismacolor Magenta marker to the flower petal centers.

dsc05028.JPG

Colored the leaves with a Prismacolor Chartreuse marker.

dsc05029.JPG

Colored the shadow (dark side) of the leaves with a Prismacolor Light Olive Green marker.

dsc05030.JPG

Colored over the leaves and flowers with a Versamark marker.

Note:  Be careful to color the white parts first and then the colored parts so the color doesn’t smear onto the white part of your image.  You can clean the tip of your Versamark marker my coloring on scrap paper for a second.

dsc05031.JPG

Heat emboss the images using clear embossing powder and a heat gun.

dsc05032.JPG

Brayered Soft Sky ink at the top of the card stock.

dsc05033.JPG

Brayered Not Quite Navy ink at the very top of the card stock, not covering the Soft Sky ink entirely.

dsc05034.JPG

Stamped Tree image with Palette Noir Black ink.

dsc05035.JPG

Sponged More Mustard ink on the bottom of the card stock. 

Note:  The embossed images resist the ink.  Just wipe the ink off the images with a paper towel.

dsc05036.JPG

Sponged Old Olive ink at the bottom of the card stock using a swiping motion from the bottom let corner toward the top right.  This was done to simulate grasses.  Also, sponged Old Olive Green ink in the leaf area of the tree.

dsc05037.JPG

Added just a bit of Black ink to the very bottom of the card stock.

dsc05038.JPG

Colored the tree trunk with a Going Gray Marker and added some grasses at the base of the tree with a Prismacolor Light Olive Green marker.

dsc05039.JPG

Sponged a bit of Basic Black ink on the right side of the leaf area of the tree and just a faint hint of black under the tree for a shadow.

dsc05040.JPG

Added White highlights (specks) on the left side of the leaf area of the tree with a white gel pen.

dsc05041.JPG

Sponged heavily some Not Quite Navy ink at the top of the card stock to give the sky some interest.

dsc05042.JPG

Used a black fine line marker and traced along the bottom side of the flowers and leaves to create the look of a shadow.  Also colored along the right side of the tree trunk with the black marker.

Used the ticket corner punch on the main image panel and the Not Quite Navy panel.

dsc05043.JPG

Used my piercing tools and a fine tip black marker to do some faux stitching all the way around the card stock.

dsc05044.JPG

dsc05045.JPG

Added some gold brads and here is the completed card measuring 5.25″ x 5.25″.

dsc05046.JPG

Hope your day is filled with blooming flower gardens and shade trees.

Until my next post. . . . . . .

Michelle


ISC Flutterby – Tutorial & Blog Candy

dsc05023.JPG

I have a little butterfly action for you on today’s tutorial and also I’m giving this card away as blog candy.

All you need to do to enter for a chance to get this card is leave me a comment here on this post.  If you are getting this blog update by e-mail and you wish to comment, please click this link that will take you to my blog so you can comment for a chance to win this card:  http://zindorf.blogs.splitcoaststampers.com/2008/07/08/isc-flutterby-tutorial-blog-candy/

I’ll use a random number generator to pick a number on Thursday morning, July 10th.

The images used in today’s tutorial are by Innovative Stamp Creations from their “Flowers & Elements” & “About Me” Sheets.  Here is a link to their online store:

http://www.innovativestampcreations.com/ischomepage.html

Ready for some Emboss Resist, Resist?  Let’s get started on today’s Tutorial.  🙂

Supplies:

Stamps: Innovative Stamp Creations “About Me” & “Flowers & Elements”
Paper: Stampin’ Up Whisper White, Soft Sky & Basic Black
Ink: Stampin’ Up More Mustard, Barely Banana, Going Gray, Basic Black, Baroque Burgundy & Really Rust
Accessories: Prismacolor Marker Sky Blue Light, Ribbon, Brads, Photo Corner Punch, Aqua Painter, Versamark marker, Going Gray marker, Faber Castell Yellow & Black markers, Sponges

  dsc05024.JPG

Stamped Butterfly with Palette Noir Black ink on a 3.75″ x 5.25″ of Whisper White card stock.

dsc04995.JPG

Colored in the image with a Prismacolor Sky Blue Light marker.

dsc04996.JPG

Darkened the middle of the image with a Faber Castell Black marker.

dsc04997.JPG

Colored over the entire image with a Versamark marker, by coloring the light parts first and then going to the dark parts.

dsc04998.JPG

Heat embossed the image using clear embossing powder and a heat gun.

dsc04999.JPG

Over Stamped butterfly image with the Flower image using Craft Going Gray ink.

Note:  if you don’t have craft ink you can load your stamp first with Versamark then your Classic ink before stamping.  The Versamark will let your embossing powder stick to your image.

dsc05000.JPG

Heat embossed the image with clear embossing powder and a heat gun.

dsc05001.JPG

Colored in the flower using an Aqua Painter and Barely Banana ink. 

Note:  While your ink pad is closed you can squeeze the lid down on the pad to create a little pool of ink on the lid in which to water color with.

dsc05002.JPG

Added some Going Gray ink to the top half of the flower.

dsc05003.JPG

Colored the entire flower with Versamark marker.

dsc05004.JPG

Heat embossed it with clear embossing powder and a heat gun.

dsc05005.JPG

Used the Barely Banana ink pad directly on the card stock, covering all of the it.

dsc05006.JPG

Sponged More Mustard ink on ramdomly, but leaving the lower left corner light.

dsc05007.JPG

Sponged on Really Rust ink.

dsc05008.JPG

Sponged on some Baroque Burgundy ink.

dsc05009.JPG

Sponged a little black ink to get really dark under the butterfly and at the top of the card stock.

dsc05010.JPG

Added a Going Gray marker shadow at the bottom of the flower.

dsc05012.JPG

Traced fine line around the bottom of the flower and butterfly to create some depth. 

dsc05013.JPG

Added some Faber Castell Yellow marker on top of the embossed flower to punch up the color a bit. 

dsc05016.JPG

Heated the embossing powder on the flower to melt the marker in a bit.

dsc05017.JPG

Assembled card and added ribbon, brads and punched photo corners.

dsc05018.JPG

Here the card is finished measuring 5″ x 6.5″.

dsc05023.JPG

Thanks for checking out the tutorial today.  Why don’t you give emboss resist, resist a try?

May your day be filled with dreamy sweet smelling flowers and butterflies.

Until my next post. . . . . . .

Michelle


Rustic Gourd Birdhouse

dsc04988.JPG

Quick post this morning.  I purchased this large dried gourd at a flea market for 75 cents, about 2 years ago.  Yep that’s right, it’s been hanging around in my stamp room for 2 years, lol.  My husband put a not so perfect hole in the front of it and drilled some small holes in the bottom for drainage and small holes in the top of the neck so I can run some twine through to hang it. 

This gourd is very blemished, even after sanding it with Sandpaper, so I decided to make it very rustic looking.   

No tutorial today since this was pretty much straight stamping.  I used Black Stazon ink to stamp the images. 

The images are by Innovative Stamp Creations :

http://www.innovativestampcreations.com/ischomepage.html

Since I was using unmounted stamps, I could using them without any mount and wrap the rubber around the gourd to stamp it.  I held the stamp in my hand, inked it and then pressed it to the gourd.   Where the images didn’t stamp as dark as I would like I colored them using a Black Faber-Castell marker.  The flower was colored in with a Brown Faber-Castell marker.  These markers are nice.  They are Indian ink and very fade resistant.

After stamping and coloring I finished it by spraying Clear High Gloss Polyurethane on it for protection.  My husband woke up this morning, saying what is that smell, lol.  Don’t worry folks I took it out side to spray it, but brought it in the house to dry.

It’s not the fanciest birdhouse ever created, but I like it’s rustic charm.  🙂  Hopefully some bird family will enjoy it too.

Hope your day is filled with peace and sunshine.

Until my next post. . . . . . . . .

Michelle


Moody Palms – Tutorial

dsc04985.JPG

A few things this morning before I get on with the tutorial.

During this 4th of July weekend, please give a shout out to Chad who is on his FIFTH deployment  to the Middle East and to his Unit.  Here is a link to his mothers blog that the unit is reading, please leave a comment for them:  http://flatfishpaperarts.blogspot.com/2008/07/happy-4th-of-july-chad_04.html

Secondly, we have a Blog Candy winner!   Drum roll please. . . . . . . . . . .

It’s lucky number 80, Grace O’Neal who wrote the following comment:

I just started getting your newsletters this week and love your creations! Absolutely beautiful. I plan on trying a few for myself in the next few weeks – can’t wait! Very inspiring. … Thanks and have a great 4th!

Grace, please e-mail your address to mzindorf@aim.com and I will get those stamps mailed out to you.  Congratulations!

Everyone else who left a comment, thank you so very much!

Regarding the terrific stamp images used for the piece, they came from http://www.mypapermoon.com

OK, let’s get started on the tutorial! 🙂

Supplies:

Stamps: Images by MyPaperMoon.com
Paper: Stampin’ Up Whisper White, Not Quite Navy and Soft Sky
Ink: Stampin’ Up Basic Black, Not Quite Navy, Bordering Blue & Soft Sky
Accessories: Sponge, Markers, Aqua Painter, White Gel Pen, Stamp-A-Ma-Jig, Soft Sky Reinker, Brads

dsc04986.JPG

Using a Stamp-a-ma-jig for placement, stamped 4 palm trees on a piece of 4.5″ x 4.5″ Whisper White card stock.  First one with Soft Sky ink, second with Bordering Blue ink, third one with Not Quite Navy ink and Fourth one with Basic Black ink.

dsc04959.JPG

dsc04961.JPG

dsc04962.JPG

dsc04964.JPG

dsc04965.JPG

dsc04967.JPG

dsc04970.JPG

Colored the trucks in with matching colored markers.

I don’t have a Soft Sky Marker so I used my Aqua brush and reinker to color the Soft Sky tree trunk in.

dsc04973.JPG

dsc04974.JPG

Using a circular motion, sponged Soft Sky ink at the top of the card stock and under the Soft Sky Tree.

dsc04975.JPG

Sponged Bordering Blue ink under the Bordering Blue Tree.

dsc04976.JPG

Sponged Not Quite Navy at the bottom of the card stock, up to the Not Quite Navy Tree.

dsc04977.JPG

Sponged Basic Black ink at the bottom of the card stock and lightly sponged in some in the blue area behind the trees.

dsc04978.JPG

Made Dash markers with a White Gel pen in the water area and along the left side of the tree trunks.   Also, added a bit in the leaves of the darker trees.

dsc04980.JPG

Traced the right side of the tree trunks with a black marker.

dsc04981.JPG

Stamped the bird with Basic Black ink.

dsc04983.JPG

Assembled the card and here it is finished measuring 5.25″ x 5.25″.

dsc04985.JPG

Hope your day is filled with Soft Balmy Breezes.

Until my next post. . . . . . . . .

Michelle


Party Dresses – Tutorial

dsc04943.JPG

Happy Fourth of July Everyone!

This morning I decided to make my Granddaughter’s Birthday card.  She is a girlie, girl for sure.  Loves, loves, loves pink!   So what do you put on a Girlie Girl’s card, pink dresses, of course. 

These images are from Rupa Shevde’s set “Retro Boutique” that can be purchased from Gina K. Design’s online store found here:  http://www.ginakdesigns.com/

Let’s get started on the tutorial.  🙂

Supplies:

Stamps: Rupa Shevde’s “Retro Boutique” from Gina K. Designs
Paper: Stampin’ Up Whisper White, Basic Black, Old Olive Cameo Coral
Ink: Stampin’ Up Basic Black, Old Olive & Always Artichoke, Palette Noir Black, Adirondack Lettuce
Accessories: Prismacolor Markers, White Gel Pen, Versamark marker, clear embossing powder, heat gun, Going Grey marker, Black marker, Sponge, Adhesive Rhinestones

dsc04951.JPG

Stamped the dresses on a 6″x 6″ piece of Whisper White Card stock with Palette Noir Black ink.

dsc04923.JPG

Stamped the four purses using Palette Noir Black ink.

dsc04924.JPG

Used my Curvy Cutter and cut it out into a 5″ circle.

dsc04925.JPG

dsc04926.JPG

Colored the dresses on at a time using these 3 colors of Prismacolor Markers in this order, Light Peach, Deco Peach, Blush Pink.  With solvent based markers, you want to work fast to try to avoid hard lines.  If you do get a hard line, try going over the hard line with the lightest color to blend it some.

dsc04927.JPG

I blended my hard lines between the Blush Pink & Deco Peach by going over it with Deco Peach again.

dsc04928.JPG

Colored the purses with Light Peach.

dsc04929.JPG

Added Blush pink to the purse flowers.

dsc04930.JPG

Colored the leaves on the purse with Light Olive Green.

dsc04931.JPG

Colored all the images with Versamark marker and heat embossed the using clear embossing powder and a heat gun.  I found it is easiest to work one image at a time, coloring with Versamark and then heat embossing before going to the next image.

dsc04933.JPG

dsc04934.JPG

Now that your images are heat embossed they will resist ink.

Sponged in a circular motion, Lettuce ink in the center of the card stock.

dsc04935.JPG

Sponged in a circular motion, Old Olive ink, not covering the Lettuce ink entirely. 

dsc04936.JPG

Sponged in a circular motion, Always Artichoke ink at the edge of the card stock.

dsc04937.JPG

Wanted the edge to be very dark, so I sponged Black ink at the edge.  Be careful when you are using black ink over embossed images, it will turn your light colors gray, yuck!  If you do get it on the light colors, wipe it off immediately.

dsc04938.JPG

Now my image looks flat and I want to give it some life.  Using the brush point of a Stampin’ Up Going Grey marker, I traced a thick line at both sides of the dresses and under the purses creating a shadow.

dsc04939.JPG

To bring the images forward more, I traced a line down the sides of the dresses and under the purses.  Now that added some more life.

dsc04940.JPG

Can’t forget the bling, assembled the card and added some Brenda Walton Adhesive olive colored Rhinestones that I got from GinaKDesigns.com.

dsc04941.JPG

Put dotes in the corners of the card with a white gel pen.

dsc04942.JPG

Here is the card all finished measuring 5.25″ x 5.25″

dsc04943.JPG

Hope you will try this emboss resist tutorial.

May your day be filled with fireworks and party dresses.

Until my next post. . . . . .

Michelle


Chickadee in the Woods – Tutorial

dsc04915.JPG

Here it is Thursday already!  Wow, the older I get the faster time flies.  Am I the only one that feels this way?

Anyway, today I got back to nature with the Stampin’ Up’s Set “Touch of Nature”.  I love this little Chickadee.  Isn’t he the cutest little bird?  I have Chickadees all over my yard.  They are such happy little souls.  I can’t help but smile when I see and hear them.

Also, today I’m giving BLOG CANDY!  Anyone miss out on the Studio G Series 8 stamps?  I have 12 packs here just waiting for some lucky stamper.

Well here is your chance to get them.  All you need to do to enter is leave me a comment here on this post.  If you are getting this blog update by e-mail and you wish to comment, please click this link that will take you to my blog so you can comment for a chance to win these stamps:  http://zindorf.blogs.splitcoaststampers.com/2008/07/03/chickadee-in-the-woods-tutorial/

I’ll use a random number generator to pick a number on Saturday morning, July 5th.

dsc04921.JPG

Ready for the tutorial?  Let’s get started 🙂

Supplies:

Stamps: Stampin’ Up Touch of Nature
Paper: Stampin’ Up Whisper White, Basic Black, Old Olive & Bordering Blue
Ink: Stampin’ Up Bordering Blue, Old Olive & Blue Bayou, Palette Noir Black
Accessories: Prismacolor Markers, White Gel Pen, Versamark Marker, Clear embossing Powder, Sponge, heat tool, Black maker

dsc04920.JPG

Stamped the bird with Palette Noir Black ink on a piece of 3.5″ x 5″ Whisper White card stock.  I’m using the Palette ink because it doesn’t smear with the Solvent based Prismacolor markers.

dsc04895.JPG

Colored the bottom of the birds belly with a Buff marker.

dsc04896.JPG

Extended the limb to the edge of the card stock with a Fabe Castell black marker.

dsc04897.JPG

Colored the birds head, very bottom of the belly and back with a Cool Grey 30% marker.

dsc04898.JPG

Colored the dark parts of the leaves with a Light Olive Green marker.

dsc04899.JPG

Colored the Branch with a Buff colored marker.

dsc04900.JPG

Added some Cool Grey 80% colored marker to the dark parts of the birds head and back.

dsc04901.JPG

Added a bit more Buff marker to the birds belly.

dsc04902.JPG

Colored over the bird with a Versamark marker, being very careful to stay within the lines.

dsc04903.JPG

Heat embossed using clear embossing powder and a heat gun.

dsc04904.JPG

Sponged Bordering Blue ink in a pouncing motion all over the card stock.  I want it to look splotchy.

dsc04905.JPG

Stamped leaves by first loading my stamp with Old Olive ink and then misting the stamp a tiny bit so it would look a bit out of focus when I stamp it.  Note:  I tried this out on scrap paper first to see how much misting to do for the effect I wanted.

dsc04906.JPG

dsc04907.JPG

Stamped some Bordering Blue Leaves, some I misted, some I didn’t.

dsc04908.JPG

Sponged Bordering Blue ink at the right side of the card stock using a circular motion for good coverage.

dsc04909.JPG

Stamped a few leaves using Blue Bayou ink at the right side of the card stock.

dsc04910.JPG

Sponged Blue Bayou ink at the right side of the card stock, not covering all of the Bordering Blue ink. 

dsc04911.JPG

Traced the underside of the Bird and the branch with a Black marker.

dsc04912.JPG

Added White Gel pen highlights to the leaves on the branch and a dot on the birds eye.

dsc04913.JPG

Assembled card and here it is finished measuring 5″ x 6.5″.

dsc04915.JPG

Don’t forget to comment to enter to win the blog candy for today.  🙂

Hope your day is filled with the sights and sounds of birds singing their happy little tunes.

Until my next post. . . . . . .

Michelle