Wanted pony – Tutorial

dsc04889.JPG

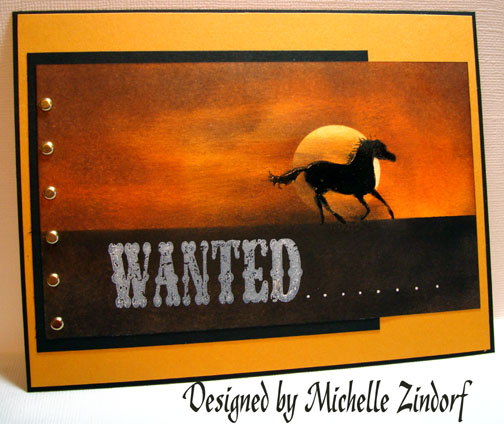
I love the western style stamp sets from Stampin’ Up and I have them all, but I don’t use them nearly enough.  Drug this one out today, dusted it off and got down to business.  Fussed around with this card to long to post it this morning before work, hence the late post.  🙂

Ready for the tutorial?  Let’s get started.  🙂
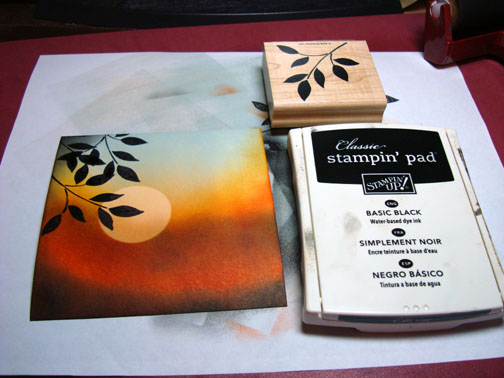
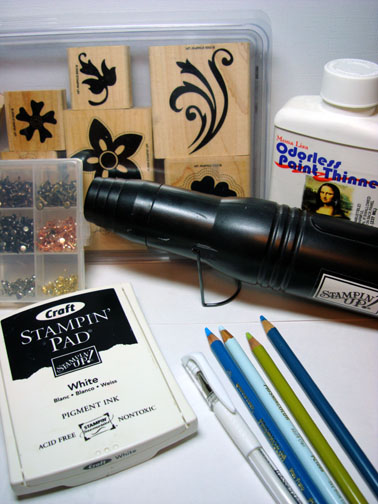
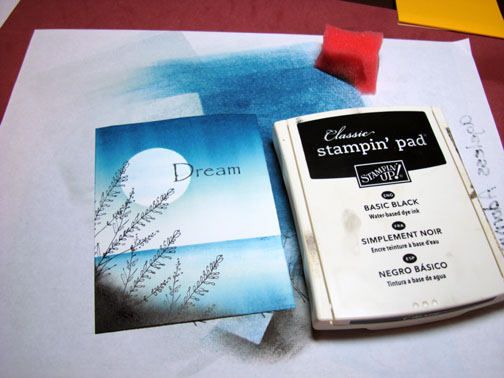
Supplies:

Stamps:  Stampin’ Up “Wanted”

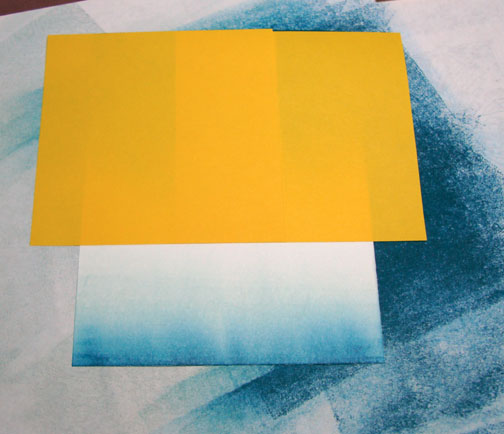
Paper:  Stampin’ Up Whisper White, Basic Black & More Mustard

Ink:  Stampin’ Up More Mustard, Craft White, Basic Black, Chocolate Chip, Really Rust, Apricot Appeal

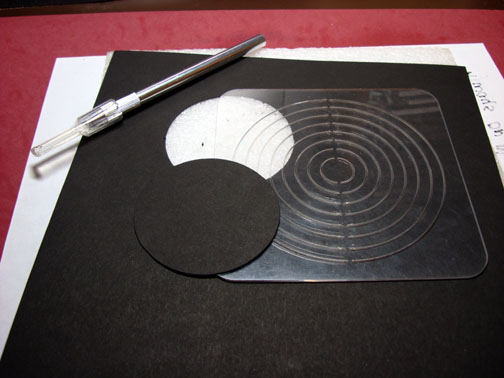
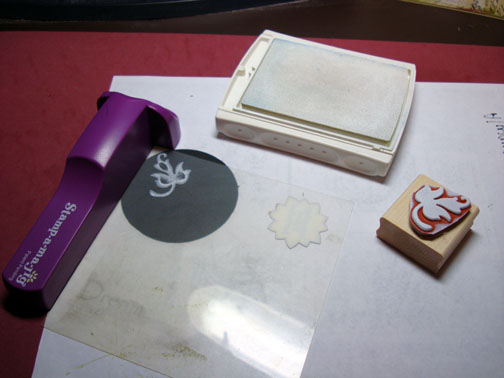
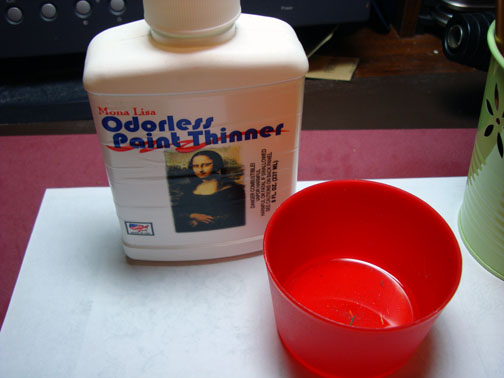
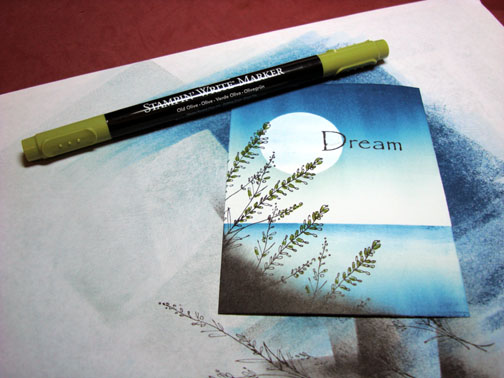
Accessories:  Brads, Stamp-a-ma-jig, Black marker, Versamark marker, White Gel pen, Piercing Tools, 1 1/4 circle punch, post it note, Brayer, clear embossing powder & heat gun, sponges

dsc04893.JPG

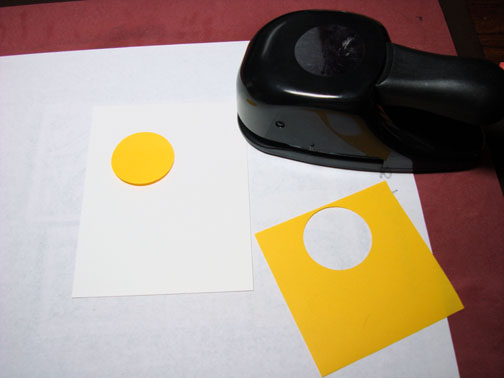
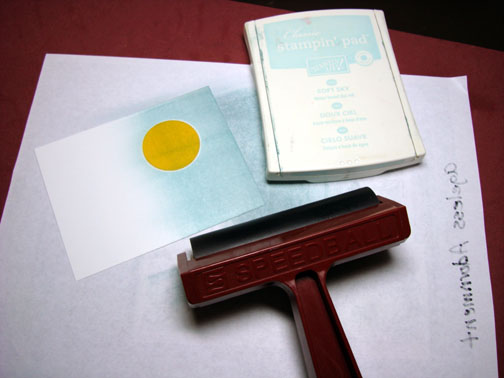
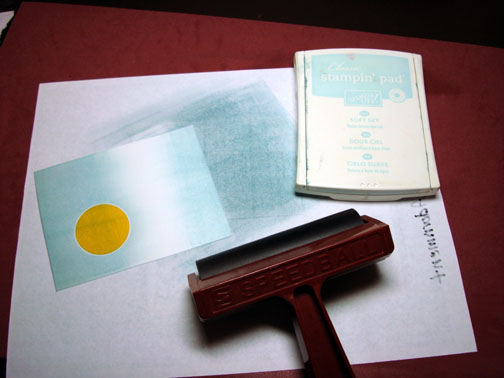
Punched a circle from the sticky part of a post it note and put in on a piece of Whisper White Card stock as a mask for the sun.

dsc04866.JPG

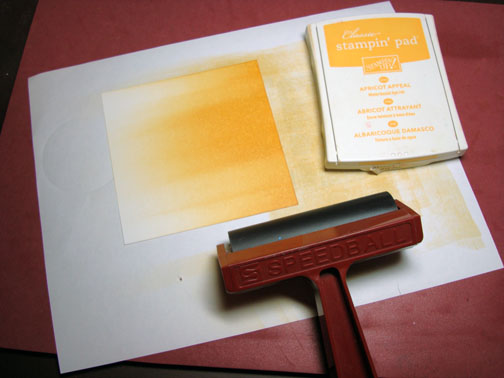
Brayered Apricot Appeal ink over the entire card stock.

dsc04867.JPG

Removed sun mask.   Using my Stamp-a-ma-jig for placement, stamped the horse using Basic Black ink.

dsc04868.JPG

Colored the horse in with a black Faber Castell marker.

dsc04870.JPG

Be sure that your background ink is very dry before moving on to this step. 🙂  Otherwise the embossing powder will stick to the entire card stock.

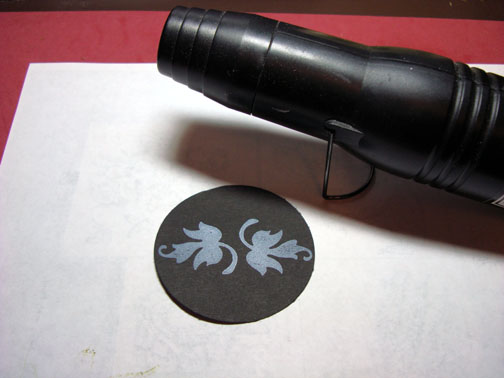
Colored over the horse with a Versamark maker and heat embossed it with clear embossing powder and a heat gun.

dsc04871.JPG

dsc04872.JPG

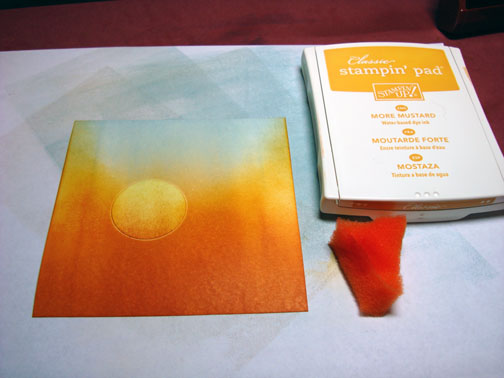
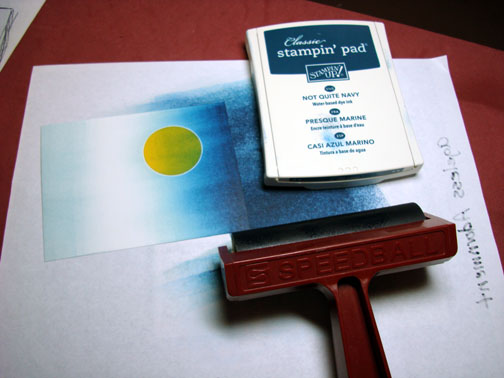
Sponged More Mustard on ink, using a left to right motion, streaking the ink across the card stock.

dsc04875.JPG

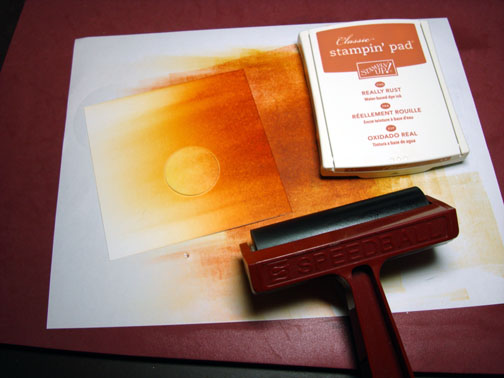
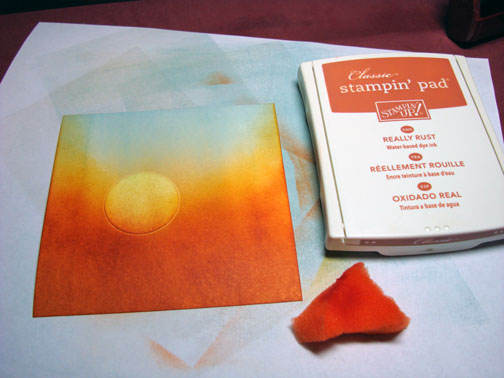
Put a fresh post it note sun mask on.

dsc04876.JPG

Sponged on Really Rust ink using a streaking motion across the card stock.

dsc04877.JPG

Added some Chocolate Chip ink by sponging it on using the same streaking motion.

dsc04878.JPG

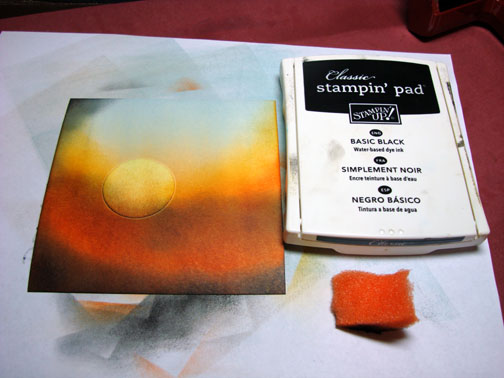
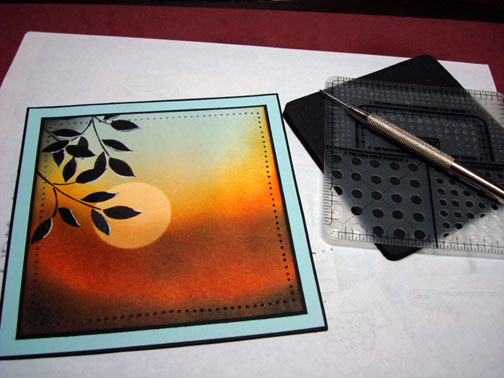
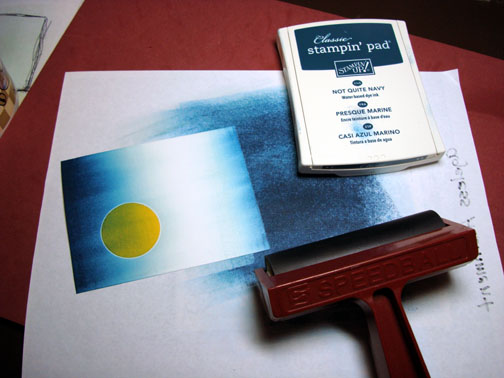
Covered the sky area with post it note masks.

dsc04879.JPG

Sponged Basic Black ink all over the un-masked area of the card stock.

dsc04880.JPG

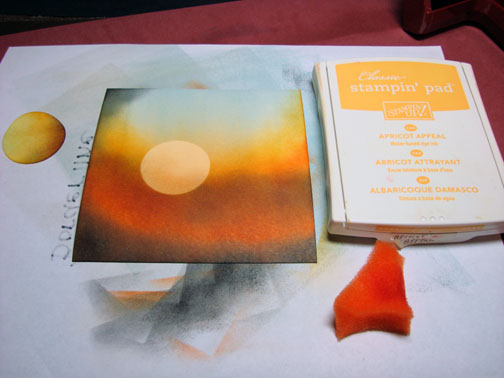
Removed the masks and added some More Mustard streaks acoss the sun with a sponge.

dsc04881.JPG

Added some Really Rust ink streaks across the sun.

dsc04882.JPG

Sponged on just a little black ink around the horses legs in a pouncing motion to simulate dust being kicked up.

dsc04884.JPG

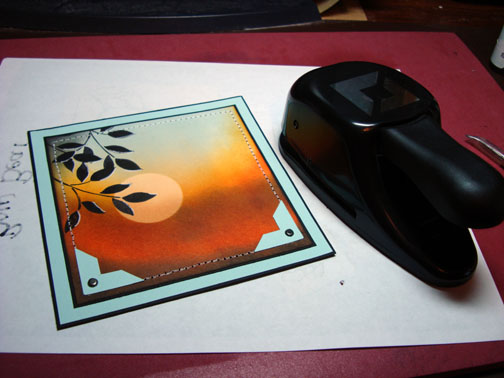
Assembled the card front and used my piercing tools to make holes for my brads so they would be in a straight line and well spaced.

dsc04885.JPG

Using a stamp-a-ma-jig for placement, stamped the “wanted” stamp with White Craft ink.

dsc04886.JPG

Added White dots behind the stamped “wanted” with a white gel pen.

dsc04887.JPG

Here you have it the completed card measuring 5″ x 6.5″.

dsc04889.JPG

Hope you enjoyed this tutorial.  Take a few moments and create a dramatic sky with some warm colors of ink.

May your day end with a fabulous sunset!

Until my next post. . . . . . . . . . .

Michelle


Artsy Victorian Tile – Tutorial

dsc04862.JPG

I love to color.  It is so relaxing to me.  Last night I sat down to color and came up with this creation.  This is a variation on Karen Barber’s Black and White Magic technique that I did a post on last week.  The technique of coloring with Prismacolor Pencils and then outlining the image with a White gel pen apparently can be done on any color of card stock other than white with wonderful results.  It even showed up very well on SU River Rock card stock. 

I love making cards that look like tiles, they are so versatile you can use them for so many different occasions.

The images used in todays tutorial are from Innovative Stamp Creations “Artsy Victorian Sheet”.  Here is a link to their online store:  http://www.innovativestampcreations.com/ischomepage.html

Let’s get started on the tutorial.  🙂

Supplies:

Stamps: Innovative Stamp Creations “Artsy Victorian”
Paper: Stampin’ Up Basic Black & River Rock
Ink: Stampin’ UP Craft White and Basic Black
Accessories: Prismacolor Pencils, Odorless Paint Thinner, Flower Punches, White Gel Pen, Stamp-A-Ma-Jig, Piercing Tools, Copper Brad

dsc04865.JPG

Stamped image on Basic Black card stock with White Craft ink.

dsc04842.JPG

Dried the ink with a heat gun.  You can also just wait for it to dry, but I’m not that patient.

dsc04843.JPG

When I color with Prismacolor Pencils, I dip my pencil point in Odorless Paint Thinner and then color.  The pencil melts like butter on the card stock and blends very nicely.

dsc04845.JPG

Started coloring with a Yellow Ochre pencil.

dsc04846.JPG

Then added Pumpkin Orange Pencil.

dsc04847.JPG

Colored part of the center of the image with a Warm Grey 30% pencil.

dsc04848.JPG

Then colored the rest of the center image with a True Blue pencil.

dsc04849.JPG

Colored around the center image with a Poppy Red pencil.

dsc04850.JPG

Used the True Blue pencil again on the outer frame of the design.

dsc04851.JPG

Here is where the magic happens.  Outlined the image with a white gel pen.  Wow!  That makes it come to life.

dsc04852.JPG

Trimmed the image down, leaving a bit of black card stock showing all the way around.

dsc04853.JPG

Stamped with Black ink part of the flourish image at each corner of a 4.5″ x 4.5″ piece of River Rock card stock using a Stamp-a-ma-jig for placement.

dsc04854.JPG

dsc04855.JPG

Colored the flourish with the Yellow Ochre and the True Blue pencils.

dsc04856.JPG

Outlined the images with the White Gel Pen.

dsc04857.JPG

Assembled card front and then felt the corners needed a bit more pop, so I added some of the Pumpkin Orange pencil to the center of the flowers.

dsc04858.JPG

Add some punched flowers to the center.

dsc04859.JPG

Added a copper colored brad to the center and used my piercing tools to add piercings in between the corner images.

dsc04860.JPG

And here you have it, the finished card measuring 5.25″ x 5.25″.

dsc04862.JPG

Hope your day if filled with warm rich colors!

Until my next post. . . . . . . . . . . . .

Michelle


End of June Zindorf Garden Tour

dsc04797.JPG

We have had so very much rain all this month, not even once have I had to water the gardens.  This is my third year at this house and so it is the third year for this garden.  My Sister the Master Gardener told me, when I started putting in my perennial gardens, the first year your plants will sleep, second year they creep and the third year they leap.  Well they are all leaping this year for sure!

It was such a beautiful morning, not to hot or cold.  So I took a walk with my camera to take some photos to share with everyone.   Please don’t look at the dead-heading of plants that hasn’t been done or the weeds that haven’t been pulled.  I’ve been making card tutorials and have been a bit neglectful of late.  🙂  The plants still seem to be so very happy this year.  They all seem to be two feet taller than they were last year this time.

Sweet Peas

dsc04796.JPG

Now here is my pal, Lucas behind the Day-lilies.  Note:  Lucas is over 100 lbs and he can almost hide behind them they have gotten so very huge.

dsc04793.JPG

There is definitely no rhyme or reason to the planting of my gardens.  Whatever I like gets shoved in somewhere.    I’m in the country for Pete’s sakes, so I have a country style garden.

dsc04839.JPG

dsc04802.JPG

dsc04804.JPG

I love Cone Flowers and so do the butterflies and Yellow Finches.  I’m sure to take some photos in the near future of all the butterflies, it’s to early in the morning for them just yet.

dsc04807.JPG

dsc04829.JPG

dsc04830.JPG

I still haven’t started digging my gardens that will go in front of this fence.  It’s an over whelming project that I just keep putting off. 🙂

dsc04815.JPG

Strawberry jar, yummmmm.

dsc04810.JPG

Come sit a while at one of our swings.. . . . . . .dsc04812.JPG

A view from the swing this morning.  The corn fields are growing like made too.  Told you I was in the country.  There is no place like it.

dsc04823.JPG

I feed all the birds.  We have droves of Hummingbirds.

dsc04832.JPG

I have Lavender planted through out the gardens.  I love the smell as you walk by.

dsc04818.JPG

I’ll  leave you with the thoughts of the sweet, calming smell of Lavender, birds singing, corn stalks rustling in the breeze, morning sun on your face and the views from my swing. 

Have an absolutely lovely day!

Until my next post. . . . . . . . .

Michelle


Beginning of the Day – Tutorial

dsc04786.JPG

I’m wrapping up leaf week here on my blog.  I hope you have been inspired this week to get out those leaf stamps and use them for projects other than Fall themed ones.  Now you know I had to wrap the week up with a brayered sky scene!

Let’s get started on the tutorial.  🙂

Supplies:

Stamps: Stampin’ Up Best Blossoms
Paper: Stampin’ Up Whisper White, Basic Black & Soft Sky
Ink: Stampin’ Up Apricot Appeal, Basic Black, Really Rust, More Mustard & Soft Sky
Accessories: Photo Corner Punch, 1 3/8″ Circle Punch, Brayer, Sponges, Piercing Tools & White Gel pen,

dsc04791.JPG

Brayered Apricot Appeal on the bottom 2/3rds of a piece of Whisper White Card stock that measures 4.5″ x 4.5″.

dsc04773.JPG

Punched a 1 3/8″ circle from the sticky part of a post it note and used it as a mask for the sun.

dsc04774.JPG

Brayered More Mustard over the bottom 2/3rds of the card stock.

dsc04775.JPG

Brayered Really Rust ink at the bottom 1/2 of the card stock.

dsc04776.JPG

Brayered Soft Sky ink at the top of the card stock.

dsc04777.JPG

Decided I wanted some more interest to the sky so I sponged More Mustard ink in a “U” shape around the sun.

dsc04778.JPG

Sponged Really Rust ink just under the More Mustard sponging.

dsc04779.JPG

To add more interest, sponged black at the bottom, left top corner and then lightly through the center of the card stock.

dsc04780.JPG

Removed post it note mask and sponged Apricot Appeal ink at the bottom of the sun so it isn’t so stark looking.

dsc04781.JPG

Stamped leaves with Basic Black ink.

dsc04782.JPG

Highlighted the leaves by outlining just the side of the leaf that is facing the sun.

dsc04783.JPG

Assembled my card front and used my piercing tools and a White Gel pen to put in some faux stitching around the main panel edge.

dsc04784.JPG

Added some Soft Sky card stock photo corner punches and a brad to the bottom two corners.

dsc04785.JPG

Here is the finished card, measuring 5.25″ x 5.25″.

dsc04786.JPG

I hope your day today started with a fantastic sunrise and ends with a fantastic sunset!

Until my next post. .. . . . . . . . . . .

Michelle


Black & White Magic Leaves – Tutorial

dsc04769.JPG

My Dear and Talented Friend, Karen Barber taught me how to do this “Black & White Magic” technique a while back, but I hadn’t had a chance to use the technique for a project of my own until today.  So I am going to share her technique with you.  To see more “Black & White Magic” cards check out Karen Barber’s SCS Gallery, here is the link:  http://www.splitcoaststampers.com/gallery/showgallery.php?cat=500&ppuser=138472

Ready?  Let’s get started.  🙂

Supplies:

Stamps: Stampin’ Up Stitched Exoctics
Paper: SU Basic Black, Bashful Blue, Old Olive
Ink: White Craft ink
Accessories: Prismacolor Pencils, Orderless Paint Thinner, Coluzzle, White Gel Pen, Heat Gun, Brads, Stamp-a-ma-jig, Photo Corner Punch

dsc04772.JPG

With a Coluzzle circle template, cut a 2.5″ circle from Black card stock.

Also, cut a 3 1/8 circle from Bashful Blue card stock.

dsc04747.JPG

Using a Stamp-a-ma-jig for placement, stamped two leaves on the black circle with White Craft ink.

dsc04748.JPG

dsc04749.JPG

Heat set the white ink with a heat gun.

dsc04750.JPG

Now it is time for some color.  Colored the leaves with Prismacolor pencils.  When coloring I first dip the end of my pencil in a little container that has Orderless paint thinner in it.  This makes the pencil melt like butter onto your card stock when coloring.

dsc04751.JPG

dsc04752.JPG

First colored with Sky Blue Light.

dsc04753.JPG

Next colored with True Blue.

dsc04754.JPG

Next colored with Peacock Blue.

dsc04755.JPG

Finished coloring with Lime peel.

 dsc04756.JPG

Next, outlined the images with a White Gel pen.  Wow!  That makes them pop!

dsc04757.JPG

Cut a Piece of Black card stock 3 1/8″ x 5 1/8″.  Used my Circle Coluzzle template to round one end of the card stock.

dsc04758.JPG

Stamped the Flourish with White Craft ink on to the end of the card stock.

dsc04760.JPG

Heat set the White ink with a heat gun and then colored the flourishes the same way I colored the leaves.

dsc04761.JPG

dsc04762.JPG

dsc04763.JPG

dsc04764.JPG

Finished by outlining the flourishes with a white gel pen, assembled card and added Photo Corners.

dsc04766.JPG

Added Brads to the photo corners and here is the completed card measuring 5.25 x 5.25.

dsc04769.JPG

Ok, it’s time to announce the winner of the Leaf in Pond card,  drum roll, please. . . . . . . . . . . .

The random number generator picked a low number today, #12 and the winner is: 

Alison Snow, who left this comment:

Michelle, you have such a way of thinking outside the box with your creations…truly a talent and a gift.  Thanks for sharing and I would be so happy to be the recipient of this beautiful work of art!

Alison, congrats!  Please e-mail me your complete address and I will get that card in the mail to you.

Everyone else, thank you so much for playing along!

May your day be filled with cheerful colors and cheerful thoughts.

Until my next post. . . . . . .

Michelle


Distressed Leaf Notecard – Tutorial

dsc04745.JPG

I’m continuing on with “Leaf Week” in which I’m trying to use leaf images in ways other than fall themed.

Now this card is visually interesting, don’t you think?  Get a load of that shadow on the left and bottom side of the main image panel.  That panel is not raised, it is glued directly onto the panel under it, but putting in the shadow with markers really makes it look dimensional.  Follow along with todays tutorial to see just how to get that effect and maybe save some dough on postage by cutting down on card stock layers.  🙂

Supplies:

Stamps:  Stampin’ Up With Gratitude, French Script, Stitched Exotics

Paper:  Stampin’ Up River Rock & Very Vanilla

Ink:  Stampin’ Up River Rock, Distress Ink Peeled Paint, Aged Mahogany & Black Soot, Palette Noir Black

Accessories:  Prismacolor Marker Chartreuse, Faber Castell Black Marker, Going Gray marker, Aqua Brush, Small post it note 

dsc04746.JPG

Masked the center of a 3.75″ x 3.75″piece of River Rock card stock with a small post it note.  You could cut a shape out of the sticky part of a large post it note to and use it if you don’t have small post it notes.  (Nope I don’t have stock in the Post it Note company.  I should since I use them almost every day, lol)

dsc04723.JPG

Now beware, Distress inks go on very dark and then dry much lighter.  You’ll see 🙂

Dragged the Peeled Paint Distress ink pad directly over the card stock and mask.  Dragging it from left to right and then top to bottom.

dsc04724.JPG

Stamped a large leaf twice on the card stock using Peeled Paint distress ink.

dsc04725.JPG

Stamped stitched designs with Aged Mahogany Distress ink.   This looks sooooo very dark now, but it will dry much lighter, trust me.

dsc04726.JPG

Removed post it note mask and stamped a smaller leaf in the center of the card stock with Palette Noir Black ink.  Note:  I used the Palette ink because I am going to color the leaf in with a Solvent based Prismacolor marker and the Palette ink won’t smear with them.

dsc04728.JPG

Colored the leaf in with a Chartreuse Prismacolor Marker.

dsc04729.JPG

I used a piece of coarse sand paper to distress the card stock edges and center a bit.  Sand paper is a great distressing tool and very economical too, as far as tools go.   Also, see how much lighter the ink is getting as it dries.

dsc04731.JPG

Stamped a small leaf image randomly on a 5 1/8″ x 5 1/8″ piece of Very Vanilla card stock with River Rock ink.

dsc04732.JPG

Dragged the River Rock ink pad directly across the card stock from left to right on the top of the card stock and then top to bottom on the right hand side of the card stock.

dsc04733.JPG

Used an Aqua Painter and River Rock ink and watercolored the small leafs loosely.

dsc04734.JPG

Glued the Main image panel to the center of the background panel.

I inked only part of the French Script back ground stamp before stamping it in two different directions using Black Soot Ink.

By inking only part of the background stamp it gives this worn away look.   Note:  Yep, I know I stamp it up side down.  🙂

dsc04736.JPG

Dragged the Peeled Paint ink pad randomly over the edges of the background panel.

dsc04737.JPG

Dragged the Aged Mahogany ink pad randomly over the edge of the background panel.  The splashes of Red really add something.  🙂

dsc04738.JPG

Now to create the shadow for the main image panel.   Using a SU Going Gray marker, made a thick line under the main image panel and to the left side of it.

dsc04739.JPG

Using a fine point black marker, drew a line right against the left and bottom sides of the main image panel.  Like magic, instant dimension.  🙂

I also darkened the outside of the main image leaf with the black marker to make it pop a bit more.

Note:  I messed up and got black marker on the main image panel bottom left corner.  Solution, sanded it off with the sand paper.

Additional Note:  Faber Castell markers are wonderful!  They are Indian Ink markers and very dark.  You can get them at about any art supply store or online at DickBlick.com.

dsc04740.JPG

Here it is the finished card measuring 5.25″ x 5.25″.

dsc04745.JPG

Hope your day is spectacular in every way!

Until my next post. . . .. . . .

Michelle


ISC Leaf in Pond – Tutorial and Blog Candy

dsc04690.JPG

Ok, after an over whelming response I recreated this card so you can see how it was done.  🙂  But, this also leaves me with two of the same card, so I’ll give one away here as blog candy.  If you would like a chance at getting it, please leave a comment on this post.  If you are getting this blog update by e-mail and you wish to comment, please click this link that will take you to my blog so you can comment for a chance to win this card http://zindorf.blogs.splitcoaststampers.com/2008/06/25/isc-leaf-in-pond-tutorial/

I’ll use a random number generator to pick a number on Friday morning.

The images used on this card are by Innovative Stamp Creations, Stamp Sheets “Summer Flair” and “Fall Leaves”.  Here is a link to their online store:

http://www.innovativestampcreations.com/ischomepage.html

Let’s get started on the tutorial.   🙂

Supplies:

Stamps: Innovative Stamp Creations “Flair of Summer” & “Fall Leaves”
Paper:SU Whisper White, Old Olive & Taken with Teal
Ink: Adirondack Lettuce, Stream & Pool
Accessories:Prismacolor Markers, Versamark Marker and pad, Clear embossing powder, heat gun, Coluzzle Circle Template, Sponges, brayer

dsc04718.JPG

Stamped Leaf image on Whisper White card stock by first loading the stamp with Versamark and then Lettuce ink before stamping.

dsc04692.JPG

Heat embossed image using clear embossing powder and a heat gun.

dsc04693.JPG

Colored in the open area of the leaf with a Prismacolor Chartreuse marker.

dsc04694.JPG

Colored the leaf with a Prismacolor Light Olive Green marker leaving some of the leaf points light green.

dsc04695.JPG

Colored over the entire image with a Versamark Marker and heat embossed using clear embossing powder and a heat gun.

dsc04696.JPG

dsc04697.JPG

Stamped half of the grasses image by loading only part of the stamp with Versamark and then lettuce ink before stamping.

dsc04698.JPG

Heat embossed grasses using clear embossing powder and a heat gun.

dsc04699.JPG

Brayered over the card stock with Pool ink.

dsc04700.JPG

Cut various sizes of circle with a Coluzzle out of card stock to use as mask.

dsc04701.JPG

Using the largest circle (3 5/8″) I held it in place as I sponged Stream ink around it.  I tried to have the darkest ink area right at the mask edge.

dsc04702.JPG

dsc04703.JPG

dsc04704.JPG

Using a smaller circle (2.5″), I put it in the middle and sponged Stream ink around the outside edge of it.

dsc04705.JPG

dsc04706.JPG

dsc04707.JPG

Using the smallest circle (2″), I put it in the middle and sponged Stream ink around the outside edge of it.

dsc04708.JPG

dsc04709.JPG

dsc04710.JPG

I created a larger circle on the outside of the others by sponging Stream ink in the corners of the card stock.  You could use a larger circle mask for this step.

dsc04711.JPG

Stamped the black grasses in the upper left corner by loading Basic Black ink on half of the stamp.

dsc04712.JPG

To give the illusion of part of the leaf being under water I made a line between the dark green and the light green areas on the image with a White Gel pen.

dsc04713.JPG

There you have it!  The finished cards all assembled, measuring 5.25″ x 5.25″.

dsc04716.JPG

Hope your day is filled with peace and cool pond breezes.  🙂

Until my next post . . . . . . . . .

Michelle


ISC Wood and Leaf – Tutorial

dsc04685.JPG

I’m continuing on with the ways to use a leaf image week here on my blog.  Why Leaf week, because I can, lol.  No, really I love leaf/nature images.  There is something comforting and peaceful about an image of a leaf.  At least that is how I view them.  🙂  They shouldn’t just be used for fall cards, as I have been so very guilty of in the past.  This creation ended up looking masculine to me, which is a plus in my world, since I’m surround by men.

The images used today are from Innovative Stamp Creations.  Here is a link to their online store:  http://www.innovativestampcreations.com/ischomepage.html

I also made this card, but I don’t have a tutorial for it.  My camera battery died after the first shot when I was making it.  I would probably be willing to recreate it, but only if there is enough interest in the tutorial.  So if you are interested in the tutorial, please leave a comment on this post or if you are getting this by e-mail click on this link to leave a comment.  http://zindorf.blogs.splitcoaststampers.com/2008/06/23/isc-wood-and-leaf-tutorial/

dsc04690.JPG

Let’s get started on the tutorial.  🙂

Supplies:

Stamps:  Innovative Stamp Creations “Wood Grain” & Fall Leaves

Paper:  SU Whisper White, Basic Black, Blush Blossom & Really Rust

Ink:  Palette Noir Black, SU Basic Black & Handsome Hunter, Adirondack Peach Bellini & Ginger

Assessories:  Prismacolor Markers Forest Green & Spearmint, Brayer, Versamark Marker, Clear embossing Powder, heat gun, Sponges, Brads, ticket corner punch, Piercing tools, White Gel pen, Grunge board hinges.

dsc04687.JPG

Stamped leaf on Whisper White card stock with Palette Noir Black ink. 

Note:  I used this ink because I am going to color the image with solvent based markers and the Palette ink will not smear with this medium.

dsc04664.JPG

Colored the leaf image in with a Prismacolor Spearmint marker.

dsc04665.JPG

Colored part of the leaf with a Prismacolor Forest Green marker.

dsc04666.JPG

Colored over the entire image again with the Spearmint marker to soften and blend the colors together.

dsc04667.JPG

Added a bit more Forest green at the bottom of the leaf.    I love these solvent based Prismacolor markers because, just like I’ve shown here with just two markers, you can layer the colors to get a whole lot of variation in shading.  Fun huh?

dsc04668.JPG

Colored over the entire image with a Versamark marker and heat embossed using clear embossing powder and a heat gun.

dsc04669.JPG

dsc04670.JPG

Brayered over the entire card stock with Peach Bellini ink.

dsc04671.JPG

Brayered Ginger ink on the right side of the card stock.

dsc04672.JPG

Using a large unmounted stamp, such as this Wood Grain stamp, is so very easy.  I just put them on my work surface face side up.  Ink them by swiping my ink pad across the top.  Put my card stock face down on the rubber stamp.  Put a scrap piece of paper over it and rub it with my hand to transfer the image onto the card stock.

Note:  After inking the wood grain stamp, I used a sponge and swiped from top to bottom on the rubber stamp to get more of a stripe in the wood image.

dsc04674.JPG

Sponged Basic Black ink heavily at the Right side of the card stock.

dsc04675.JPG

Sponged a little Handsome Hunter ink at the left side of the black ink to soften the black edge.

dsc04676.JPG

Sponged Ginger ink at the bottom of the leaf image to create a shadow.

dsc04677.JPG

Outlined the top of the leaf image with a white gel pen to add some highlight.

dsc04678.JPG

I got this Grunge board by Tim Holtz from Innovative Stamp Creations and decided to give it a try today.  First of all, this is not like chip board it is so flexible.  I was amazed at how it took ink too.  I inked my hinge pieces with basic black ink.

dsc04680.JPG

dsc04681.JPG

Used a ticket corner punch on the corners of my main image panel.

dsc04682.JPG

Assembled the card and pierced along the top, bottom and left side of the Really Rust Panel with my piercing tools.

dsc04683.JPG

Here is my finished card measuring 5″ x 6.5″.

dsc04685.JPG

Thanks for hanging out with me today while I continue on with my Leaf excursion.  Hopefully, you will start to see leaves in a whole new light too.

May your day be filled with the tinkling sound of  Aspen leaves.

Until my next post. . . . . . .

Michelle


Botanical Dreams II – Tutorial

dsc04659.JPG

I was thinking today (watch out!) about all the different ways that a leaf can be used.  I use to only think about using leaf images during the fall and always colored them in fall colors.    Well this week I am going to try to think out of that fall box and use leaf images in other ways.  The leaf image itself is very powerful and can often be used alone.  This image is by Asela Hopkins from her new “Botanical Dreams” set is stunning.  This set can be found at Gina K. Designs, http://www.ginakdesigns.com/.

Ready to start this tutorial?  Let’s go.  🙂

Supplies:

Stamps: Asela Hopkins “Botanical Dreams”
Paper: SU Whisper White, Old Olive, Soft Sky & Old Olive
Ink: SU Soft Sky, Not Quite Navy, Blue Bayou, Night of Navy, Black
Accessories: SU Markers Old Olive, Always Artichoke, Gable Green, Swirl Cuttlebug folder, Versamark pad and marker, clear embossing powder, heat gun, photo corner punch, brad, sponges

dsc04663.JPG

Stamp leaf image with black ink on Whisper White Card stock.

dsc04636.JPG

Color image with a Gable Green Marker.

dsc04637.JPG

Color Inside of the leaves with an Old Olive marker.

dsc04638.JPG

Colored inside the Old Olive with a Always Artichoke marker.

dsc04639.JPG

Colored over entire leaf image with the Gable Green marker to blend and soften edges.

dsc04640.JPG

Colored over leaf image with a Versamark marker and heat embossed using clear embossing powder and a heat gun.

dsc04641.JPG

dsc04642.JPG

You can’t see it in the photos, but I dotted the card stock all over with the Versamark marker and then heat embossed the dots with clear embossing powder and a heat gun.  You will be able to see it in later steps.

dsc04643.JPG

dsc04645.JPG

Sponged on Soft Sky ink in a circular motion all over the card stock.

dsc04646.JPG

After the Soft Sky ink dried entirely, I sponged a bit of Versamark on the card stock to create a speckled background.  I covered the sponged versamark with clear embossing powder, but it seemed to be to thick so I took a sponged and sponged some of the embossing powder off before heating it with a heat gun.  Note:  this you will also see better in later steps.

dsc04647.JPG

dsc04648.JPG

dsc04649.JPG

Sponged on Blue Bayou ink.

dsc04650.JPG

Use the swirl Cuttle bug folder to emboss the card stock.

dsc04651.JPG

dsc04652.JPG

Sponged on some more Blue Bayou ink on the swirls around the leaf image to define them.

dsc04653.JPG

Sponged on Not Quite Navy ink leaving some light spots on the card stock showing.

dsc04654.JPG

Getting darker yet, sponged on Night of Navy ink.

dsc04655.JPG

Even getting darker on the left side and on the top right corner, sponged Black ink.

dsc04656.JPG

Assembled card and added Photo corner punches.

dsc04657.JPG

Added a brad to the photo corner punches and here the card is finished, measuring 5″ x 6.5″.

dsc04659.JPG

Well I had a wonderful day yesterday stamping with Mary Brown, Connie Babbert and Karen Barber.  Here is a picture of us together at a teahouse  we went to for lunch.

dsc04631-c.jpg

From left to right, Me, Karen Barber, Mary Brown and Connie Babbert.

We had the most fantastic time stamping together.  Here is a glimps of the projects we made, less mine, you seen mine on my post yesterday.  They are so very talent! 

dsc04633.jpg

They wip out 3D projects like they are nothing.  I struggle with 3D, that’s for sure!!!  Anyway, if you ever get the opportunity to stamp with any of these ladies, do it!  You won’t regret it.

Well that’s it for today!  Hope your Sunday is sensational!

Until my next post. . . . . . .

Michelle


Botanical Dreams MZ Style – Tutorial

dsc04629.JPG

This was created with a brand new set by Asela Hopkins “Botanical Dreams” that can be purchased from Gina K. Designs.  Here is the link to Gina’s online store:  http://www.ginakdesigns.com/

I’m going on a little drive to Columbus, OH today with my friend Karen Barber to meet two new stamping friends, Connie & Mary.  We are all bringing a shoe box swap to share with each other.  A shoe box swap is when you bring all the makings for a project for everyone to make one and kind of teach the stamp project to the people you are stamping with.  It is loads of fun and I can’t wait to see what they have in store for me.    I love stamping with friends old and new!  Anyway, if you are Karen, Connie or Mary stop reading this post! LOL.  This is my shoe box swap for today.  Wish you all could come and stamp with us, but since you can’t, are you ready for the tutorial?

Let’s get started.  🙂

Supplies:

Paper:  SU Whisper White, Not Quite Navy& Soft Sky

Ink:  SU Soft Sky, Basic Black & Not Quite Navy

Accessories:  1 3/8″ Circle punch, post it notes, Brads, Brayer, Sponges, Stamp-a-ma-jig, Old Olive Marker

Punched 1 3/8″ circle from the sticky part of a post it note to use as a mask for the moon.

dsc04614.JPG

Brayer on Soft Sky ink at the top half of the card stock.

dsc04615.JPG

Brayered on Soft Sky ink at the bottom 1/4 of the card stock.

dsc04616.JPG

Brayered Not Quite Navy ink at the top of the card stock not covering the Soft Sky ink completely.

dsc04617.JPG

Brayered Not Quite Navy ink at the very bottom of the card stock.

dsc04618.JPG

Covered the sky area of the card stock with post it notes.  The sticky part of the post it note is put were I want my horizon line to be.

dsc04619.JPG

Sponge on Not Quite Navy using a right to left swiping motion, right at the edge of the post it note onto the card stock.   This really defines the horizon line and gives a water look.

dsc04620.JPG

Removed post it note mask.

dsc04621.JPG

With an almost dry sponge, sponged with a swiping motion across the moon, leaving faint streaks of Not Quite Navy.

dsc04622.JPG

Stamp the plant image 4 times with Basic Black ink at the lower left corner of the card stock.

dsc04623.JPG

Using a Stamp-a-ma-jig for placement, stamp the sentiment with Basic Black ink.  What would I do without my Stamp-a-ma-jig.  I guess I would just send out cards with crooked stuff stamp on them (like in the old days).  LOL

dsc04624.JPG

dsc04625.JPG

Sponged Basic Black ink on the lower left corner using an up ward swiping motion to create a grassy effect.

dsc04626.JPG

Colored the plant leaves with an Old Olive marker.

dsc04627.JPG

Assembled the card and here it is finished measuring 5.25″ x 5.25″.

dsc04629.JPG

One more thing, I want to tell you about the Spellbinders Nestabilities sale going on at Innovative Stamp Creations.  Here are the details.  🙂

 Innovative Stamp Creations 
15-16% OFF Spellbinders Nestabilities diecuts!
Discount has been applied on the shopping cart!
OFFER ends Sunday 6/22/08
Some nesties are in stock others will arrive next week! 
Have fun shopping!

Hey, when you make a purchase, tell them I sent you in the comments section when checking out.  🙂   Enjoy!

May all your dreams come true today!

Until my next post, because I’m out of here to go stamp and make new friends .. . . . . . . . .

Michelle