Before I get into today’s tutorial it is my pleasure to announce the winner of the Stampin’ Up Yummy Stamp set. The winner was selected using a Random number generator and the winner is. . . . . . . . . . ..

Barbara Taylor, who wrote “Would love to win this. Grandchildren are great. I have 13 and 9 great grandchildren.”
Congrats Barbara, please e-mail your address to mzindorf@aim.com and I will pop these in the mail to you.
A big thanks to everyone for playing along!
Now on with the tutorial 🙂
Supplies:
| Stamps: Stampin’ Up Blooming With Love |
| Paper: Stampin’ Up Whisper White, More Mustard, Baja Breeze & Not Quite Navy |
| Ink: Stampin’ Up More Mustard, Close to Cocoa, Creamy Caramel, Not Quite Navy, Baja Breeze & Basic Black |
| Accessories: Stampin’ Up Markers, Versamark Marker, Clear embossing powder, heat gun, sponges, brayer, white ribbon and silver brads, Tombo Mono Multi Glue, White Gel Pen |
Please don’t forget you can order your Stampin’ Up products from me 24-7 from this link: http://michellezindorf.stampinup.net or e-mail me at mzindorf@aim.com if you are within the United States. Also, please consider being part of my Stampin’ Up Team. We have valuable monthly meetings in Miamisburg, Ohio.

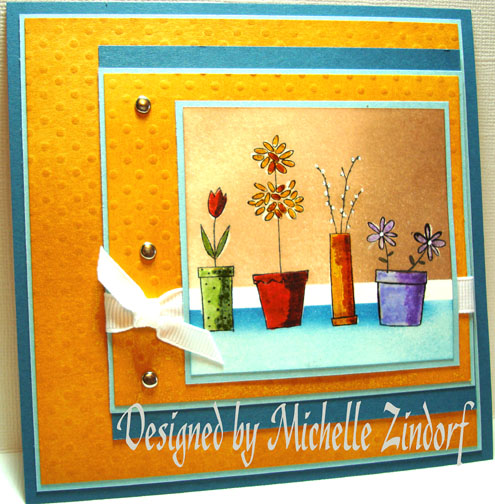
On a 2.75″ x 3″ piece of Whisper White card stock stamped the flower post with Basic Black ink.

Colored the end pot with a Lavender Lace Marker. Colored the flowers in the pot and the shadow down the right side of the post with an Almost Amethyst marker.

Colored the next post and flowers with with an More Mustard marker. Added Pumpkin Pie marker to the middle petals of the flowers and to create the shadow on the pot.

Colored the next pot and the tulip with a Ruby Red marker. Added Bravo Burgundy marker to both the tulip and the pot to create a shadow on the right side of them.

Colored the leaves of the flowers with an Old Olive marker. Colored the last pot with a Certainly Celery marker and then added Old Olive for the shadow on the pot’s right side.

Decided I wanted a darker shadow on the More Mustard pot so I added Really Rust marker to the right side of it.

Colored over all of the pots and flowers with a Versamark marker and heat embossed the images using clear embossing powder and a heat gun.


Masked the top of the card stock with a post it note and sponged Baja Breeze ink on the unmasked card stock.

Sponged Not Quite Navy ink right at the post it note edge to create a shadow for the pots.

Took the post it note mask off and put a new one on to mask the bottom of the card stock. I masked a bit of the white above the Not Quite Navy to create a white border behind the pots. Sponged Creamy Carmel ink on the unmasked area of the card stock.

Sponged Close to Cocoa ink at the right side of the card stock.

Removed the mask and added White gel pen to the buds on the 3rd pot and the center of the flowers on the fourth pot.

Used my Big Shot die cut machine and the Dot texture plate emboss two More Mustard panels.

Brayered More Mustard over both panels to make the embossing pop more.

Assembled my card and added ribbon and silver brads. Here you have the finished card that measures 5.25″ square.
May your day be filled with blooms!
Until my next post. . . . . . . . . . . . .
Hugs,
Michelle
Get ready for Brayer Workshops! I am coming to:

Fort Smith, Arkansas
Dayton, Ohio
Savannah, Georgia
Covington, Indiana
Buffalo, Minnesota
Webster, New York
New Johnsonville, Tennessee
Stoughton, Wisconsin
Castro Valley, California
Yardley, Pennsylvania (near Philadelphia)
Knox, Maine
Broomfield, Colorado
Lynchburg, Virginia
Columbia, Missouri
Portland, Michigan
Here is a link to my workshop calendar where you can see all of my travel schedule and to get info on beginner and advanced Brayer workshops: http://zindorf.blogs.splitcoaststampers.com/workshop-calendar
Link to my Stampin’ Up website were you can order all of your must have Stampin’ Up products from me 24-7: http://michellezindorf.stampinup.net
Here is a link to all of my tutorials: http://zindorf.blogs.splitcoaststampers.com/tutorials-ive-written/
Frequently asked questions answers: http://zindorf.blogs.splitcoaststampers.com/frequently-asked-questions/

Pingback: All About Gardening